Add a Plant-On
Adding a plant-on is as easy as clicking your mouse on the check box in front of the label "plant-on".
When this box is checked, Cabinet Solutions will put a plant-on on the end specified. However, there
are many different styles of plant-ons and many different ways to attach them to the cabinet. To set
all this up, Cabinet Solutions has several more dialog boxes that you can access by clicking on the
button labeled "Plant-On Properties".
Notice that you can access the properties for both the left and right side of this cabinet. The
properties of the left and right side work independently of each other so whatever changes you make
to one side be sure to do to the other if you want both sides the same.
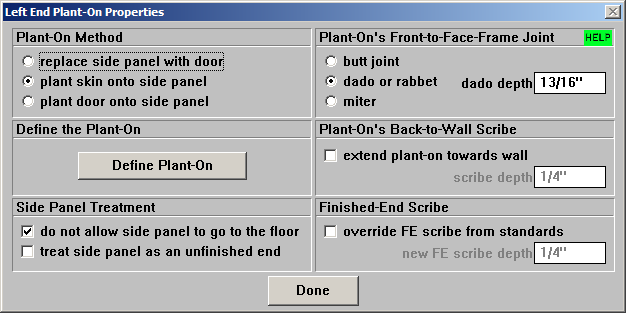
Plant-On Method:
There are 3 ways in which you can add a plant-on in Cabinet Solutions
- Replace Side Panel with Door: Click on this radio button if you want to replace the existing end panel with a door panel of some kind. You can then click on the "Define Plant-On" button below to specify what kind of door you want.
- Plant Skin onto Side Panel: Click on this radio button if you want to place some type of skin (1/4 plywood or laminate) over the existing end panel. You can then click on the "Define Plant-On" button below to specify what type of material you want.
- Plant Door onto Side Panel: Click on this radio button if you want to cover the existing end panel with a door panel of some kind. You can then click on the "Define Plant-On" button below to specify what kind of door you want.
Defining the Plant-On:
By clicking on the "Define Plant-On" button you can open up other dialog boxes that further allow you to
define your plant-on. If the plant-on is going to be a door of some kind, you will find the same dialog
boxes that are used in the standards for doors. (See Doors and Drawer Fronts
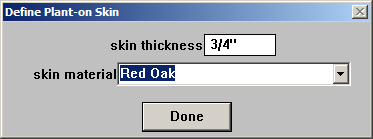
for a detailed description of these standards). If you select the option to "Plant Skin onto Side Panel"
a dialog box will open for you to select a material and enter in the material thickness.
Side Panel Treatment:
These two check boxes will affect the cabinet's original side panel that is sitting underneath the skin
or the door that is being applied to this end.
- Do not allow side panel to go to the floor: If you are sending your stile and/or the end panel of this cabinet to the floor the door or the skin that you are applying will go to the floor too. If you do not want the original side panel to go to the floor as well, check this box.
- Treat side panel as an unfinished end: Most plant-ons are applied to finished ends and in Cabinet Solutions, finished ends extend down to the bottom of the end stile. If your plant-on is a thin skin or laminate the side panel that sits underneath probably needs to continue to extend to the bottom of the stile for support. However, if you are applying a thicker skin or applying a solid door panel to the end, you may want the side panel that sits below to only extend down as far as an unfinished end panel. If so, check this box.
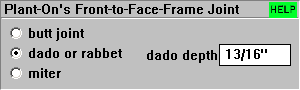
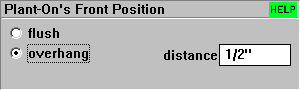
Plant-On's Front-to-Face-Frame Joint or Front Position:
This part of the dialog box allows you to set up how the plant-on will connect to the face-frame or (in
Euro) where the front of the plant-on will be positioned in relation to the front of the cabinet.
- Butt Joint: The front of the plant-on will sit adjacent to the back side of the frame.
- Dado or Rabbet: The front of the plant-on will sit adjacent to the back side of the frame.
- Miter: The front of the plant-on will be mitered to the frame.
- Flush: The front of the plant-on will align with the front of the rest of the cabinet box.
- Overhang: The front of the plant-on will stick out beyond the front of the rest of the cabinet box. Enter the dimension you want the plant-on to overhang.
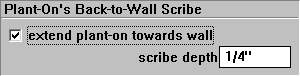
Plant-On's Back-to-Wall Scribe:
This part of the dialog box allows you to add an extra dimension to your plant-on for the purposes of
cutting off or scribing to the wall. This scribe depth is added to the plant-on overall size or in the
case that the plant-on is a door, this dimension is added to the back stile.
If you check the check box, an additional scribe amount will be added to the plant-on. Enter the
additional amount in the edit field labeled scribe depth.
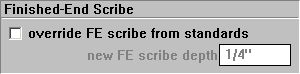
Finished-End Scribe:
This part of the dialog box allows you to override the standards for finished end scribe you set-up in
Job Standards. Remember, end scribe is the amount that the face frame overhangs the end of the cabinet.
This information appears in the assembly sheets so that the face-frame can be place on the cabinet box
correctly.
Check the box if you want to override the scribe set in the Job Standards. Enter the new scribe size
in the edit field provided.
- Click on the Done button when you've finished with the "Plant-On Properties" dialog box.
- Click on Accept or Cancel to leave the "Modify Ends of Cabinets" dialog box.
Adding a Preselected Cabinet Part
General instructions to add a preselected cabinet part:
- Follow the instruction to select a cabinet.
- In the section entitled "Add Boards", select the cabinet part that you want to add by clicking on the button in front of that cabinet part.
- When adding most parts, a dialog box appears. In this dialog box there is a silhouette of the cabinet showing the cabinet's different numbered openings. (There are Special Instructions for adding mullions, mullion stiles and center stiles which include 2 additional steps.) Click on the opening to add the cabinet part. You can add as many of these parts to this cabinet as you want at this time. Each mouse click will add a part to the opening that you click inside of.
- To move on to add another part or do another "Edit" function, click on the Done button in the Edit Cabinet dialog box.
Note: Once a part is added, it is quite common then to adjust it's placement. To learn more about this, check out the Edit Openings section.
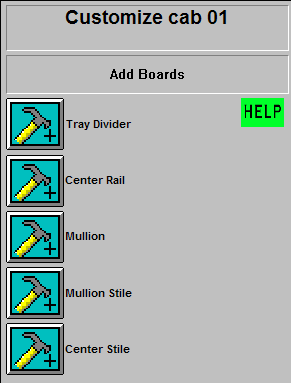
Definitions of the cabinet parts that can be added:
In Face Frame:
- Tray Dividers: Tray dividers are defined as any internal partition that does not sit behind a face frame piece. Therefore they divide the internal space of the cabinet without affecting the cabinet door layout.
- Center Rail: Enter the width of the rail that horizontally divides the standard base cabinet. Cabinet Solutions automatically places a shelf behind the center rail if it is needed.
- Mullion: Mullions are vertical face frame pieces that attach between two rails. Each time you place a mullion, you can choose whether to place a partition behind each mullion or not. You can also set the width of the mullion.
- Center Stile: Center stiles are vertical face frame pieces that when placed split both the top and bottom rail of the cabinet they are placed in. Each time you place a center stile, you can choose whether to place a partition behind each center stile or not. You can also set the width of the center stile.
- Mullion Stile: Mullion stiles work like mullions where they join into the top rail (that is they won't split the top rail), and work like center stiles where they join into the bottom rail (that is they will split the bottom rail). Each time you place a mullion stile, you can choose whether to place a partition behind each mullion stile or not. You can also set the width of the mullion stile.
- Partitions: Partitions are vertical cabinet parts that sit behind mullions, center stiles, and mullion stiles. They not only divide the internal part of the cabinet but they can also be used to split other cabinet parts when making large custom cabinets.
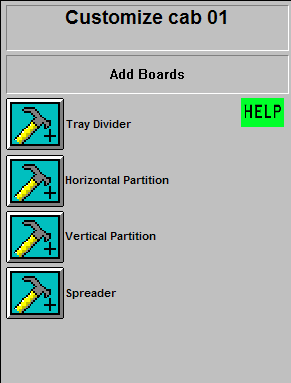
In Euro:
- Tray Dividers: Tray Dividers are internal cabinet dividers that don.t affect the cabinets door openings.
- Horizontal Partition: Horizontal Partitions are parts that sit horizontally within a cabinet, dividing the cabinet and dividing the cabinet opening so that where there was once one door there will now be two, one on top of the other.
- Vertical Partition: Vertical Partitions are parts that sit vertically within a cabinet, dividing the cabinet and dividing the cabinet opening so that where there was once one door there will now be two sitting side by side.
- Spreader: Spreaders are parts that sit horizontally within a cabinet, dividing the cabinet opening so that where there was once one door there will now be two, one on top of the other.
Special instructions when adding Mullions, Mullion Stiles, and Center Stiles »
Properties for Partitions »
Adjust Shelves
To adjust the shelves in an opening:
- Follow the instructions to edit the number of shelves in an opening.
- In the dialog box that appears, click on the Adjust Shelves button.
- A dialog box will appear like the one below:
The Adjust Shelves Window:
- Height: Enter the actual height of the shelf opening.
- Width: Enter the actual width of the shelf opening.
- Top & Bottom: These refer to the top and bottom of the shelf opening. The shelves are in order from bottom upwards to the top.
- Move Shelf Up/Down: By clicking the button Up, you can move a shelf's location one shelf up. The shelf will now be closer to the top of the shelf opening. By clicking the button Down, you can move a shelf's location one shelf down. The shelf will now be closer to the bottom of the shelf opening.
To Adjust A Shelf:
- Select the shelf you wish to modify from the list box on the left.
- Click the Adjust This Shelf button. The items that are available for the shelf you selected will become enabled.
- Enter the desired information for this shelf.
- To apply the changes you made, click the button at the bottom right Apply Changes To This Shelf. To cancel the changes you made, click the button at the bottom left Cancel Changes To This Shelf.
- Click Done to close the Adjust Shelves window.
Note: The shelf dado location will be displayed in the top right of the window, for example: "This shelf is 7 23/32" from the bottom of this opening to the bottom of this shelf." This will help you position your dadoes and location which shelf goes where. This information will also be displayed in the Assembly Sheet.
- Autosize All Shelves: Click this button to reset all shelves in this opening to their default sizes and locations.
- Dado Depth: For fixed shelves, enter the dado depth this shelf will be using.
- Width-Opening Less: For adjustable shelves, subtract the width of the shelf from the width of the shelf opening.
- Depth-Opening Less (From Front): Enter the distance from the front of the shelf opening to the front of the shelf.
- Depth-Opening Less (From Back): Enter the distance from the back of the shelf opening to the back of the shelf.
- Glass Shelf: To make this shelf glass instead of wood, click this check box.
- Move Shelf Up/Down: Enter the dado location (or the distance from the bottom of the shelf to the bottom of the shelf opening). You can also use the up and down arrows located to the left of the entry field. Note: Cabinet Solutions will not allow you to enter a value greater than or less than the available opening size for the shelf you are adjusting. If you exceed the size, Cabinet Solutions will automatically enter the maximum or minimum size for you. This will protect against overlapping or intersecting shelves.
- Appliance Opening: For adjustable shelves, you can place an appliance on top of the shelf. (See Appliance Opening.)
- Autosize This Shelf: Click this button to reset this shelf to its default size and location.
Appliance Opening
To select an Appliance Opening:
- Click on the check box to the left of the words Appliance-Opening to place a check in the check box. This will enable the list box below and the button Adjust Appliance-Opening. (See picture below)
- Click the arrow to the right of the list box and select the type of appliance you want in the shelf opening. (The appliance will be placed on top of the shelf.)
- Click the button Adjust Appliance-Opening.
- A dialog box will appear.
- Follow the directions for Adjusting an Appliance-Opening.
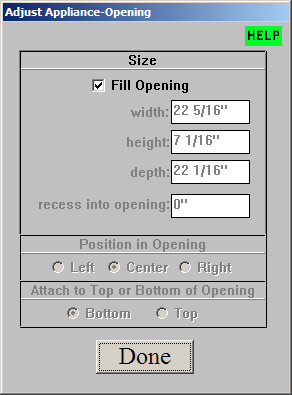
Adjusting an Appliance Opening
Size
By default, the Fill Opening check box will be checked.
- Fill Opening: The width, height, and depth will be the maximum the shelf opening will allow. You will not be able to modify any of the dimensions or options when this is checked.
- Width: Enter the width of the appliance.
- Height: Enter the height of the appliance.
- Depth: Enter the depth of the appliance.
- Recess Into Opening: Enter the distance the appliance should be pushed into the opening.
Position In Opening
By default, the Center radio button will be selected.
- Left: This will align the appliance with the left of the opening.
- Center: This will align the appliance with the center of the opening.
- Right: This will align the appliance with the right of the opening.
Attach to Top or Bottom of Opening
By default, the Bottom radio button will be selected.
- Bottom: This will place the appliance on top of the shelf, or at the bottom of the shelf opening.
- Top: This will place the appliance at the top of the opening.
Cabinet Parts
The cabinet parts column contains standards for stiles, rails, drawers, roll-outs, nailers & stretchers, backs, toes, shelves, and vertical partitions + tray dividers.
Connect Toe Kicks
By default, base cabinets are built with a back toe kick. If you have not disabled this feature in
Initial Values under Toe Kicks, then a back toe board will be included in base cabinets. The "Connect
Toe Kicks" button is a tool that allows you to pick one or more cabinets in a room so you can "connect"
the front and back toe boards together. Doing this makes a long run of toe kicks often called a "Ladder
Kick".
Note: Some cabinets will not be allowed to have their toe boards connected.
To Connect Toe Kicks from one or more cabinets within the current room:
- In the Place Cabinets Screen, click on the Connect Toe Kicks button in the Tool Box to the right of the screen. You will notice a new Tool Box appear. You are now set to select the cabinets whose toe boards you want to connect.
- To select a cabinet, simply move your mouse cursor to where it is touching the cabinet you want to connect, then click the left mouse button. The outline of the cabinet you've selected will change colors to a bright BLUE. This indicates which cabinets have been selected.
- Continue clicking on cabinets until you've highlighted all the cabinets that you want to connect. You can click on the "Select All Cabinets" button if you want to connect all the cabinets in the current room.
Note: By clicking on a cabinet a second time causes the cabinet to become "unselected" and that cabinet then won't be marked to have its toe boards connected.
- Once you've selected all the cabinets in the group of cabinets you want to connect, click on the "Connect Toe Kicks" button. This will mark the selected cabinets to have their toe boards connected. The selected cabinets will now turn RED letting you know which cabinets are going to have their toe kicks connected.
- If at any time you want to check which cabinets are selected to have their toe boards connected, come back to this screen and see if any cabinets are RED.
- If you would like to un-mark certain cabinets from having their toe boards connected, follow steps 2 through 4, except now click on the "Disconnect Toe Kicks" button. This will un-mark the selected cabinets from having their toe boards connected. The toe boards will now be independent.
If you move your mouse cursor around, as it touches each cabinet, information about that cabinet appears in the top of the Tool Box. Included in that information is whether a cabinet is selected and whether its toe boards will be connected.
Editing Cabinets
Adding parts to your cabinet is fast and easy with Cabinet Solutions. You can quickly add a Tray Divider,
Center Rail, Mullion, Mullion Stile, or Center Stile. (In Euro these will be labeled: Tray Divider,
Horizontal Partition, Vertical Partition, and Spreader.)
Deleting Cabinet Parts and Boards
You can delete any board or any part in a cabinet. Most can be deleted with this simple View/Delete Boards feature. If for some reason Cabinet Solutions will not allow the deletion using this feature, a note will appear instructing you to delete the part through Cabinet Standards, which will be discussed later in this chapter.
To delete cabinet parts and boards:
- In the "Edit Elevations Screen", move the mouse until the cabinet you want to edit is highlighted. (Pause to allow the highlight to settle on the cabinet you have chosen.)
- Click the left mouse button to select the highlighted cabinet for editing. The cabinet will become larger on the screen.
- Under the "View / Delete Boards" section in the tool box that appears, click on the "View / Delete Boards" button.
- Then in the 3-D wire view of the cabinet that appears, move the mouse until the cabinet part or board that you want to delete is highlighted.
Note: This is called "View / Delete Boards" because it is a fast way to find out the size of cabinet parts without looking through the whole cabinet cut list. Just touch the board you want to see the size of. The name and size of each board you highlight will appear in the top of the Tool Box.
- Click on the board you want to delete. A box will appear asking you if you want to delete the cabinet board you selected. Click on the Yes button if you want to delete that board from the cabinet. Click on the No button if you do not.
- Cabinet Solutions will stay in this Delete Board mode until you cancel out of it by clicking on the "Done" button in the bottom of the tool box.
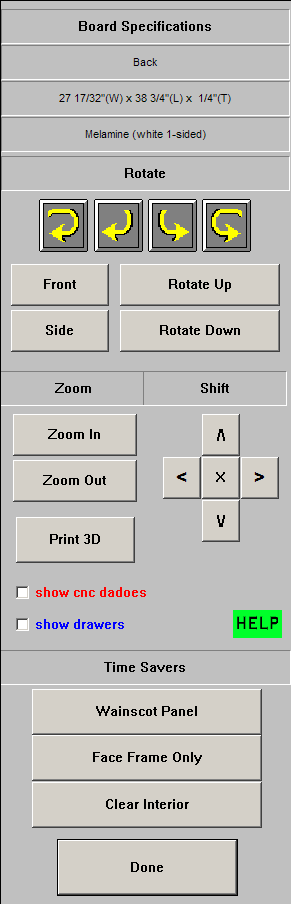
View / Delete Boards Tool Box
Rotate
Click the yellow arrow to rotate the cabinet in the direction of the arrows. The two arrows on the ends will rotate the cabinet faster than the two in the center.
- Front: Click this button to rotate the cabinet so you are looking at its front.
- Side: Click this button to rotate the cabinet so you are looking at its side.
- Rotate Up: Click this button to rotate the cabinet upwards.
- Rotate Down: Click this button to rotate the cabinet downwards.
Zoom
- Zoom In: Click this button to zoom in on the cabinet, making the cabinet larger.
- Zoom Out: Click this button to zoom out from the cabinet, making the cabinet smaller.
Shift
Click the Up, Left, Right, Down, and X arrow buttons to shift the cabinet picture in the direction of the arrow. Clicking the X will shift the cabinet to the center of the window.
Print 3D
Click the Print 3D button to print the wireframe view of this screen.
Show CNC Dadoes
Click this check box to show dadoes that are used in most CNC operations. This also helps you get a quick view at where your dadoes are in the cabinet. The dadoes appear in RED.
Show Drawers
Click this check box to show any drawers and rollouts that are in the cabinet. This helps you get a quick view at where your drawers and rollouts are in the cabinet. The drawers and rollouts appear in BLUE.
Time Savers
These buttons will help you save time by doing all the work for you.
- Wainscot Panel: Clicking this button will delete all the boards in the cabinet except for the doors. This will prepare the doors to be used with Wainscot panels. (See Doors & Drawer Fronts for help with using Wainscot.)
- Face Frame Only: Clicking this button will delete all the boards in the cabinet except for the face frame. This feature only works in Face Frame mode.
- Clear Interior: Clicking this button will delete all the interior boards in the cabinet leaving the exterior box. Boards that may be deleted are shelves, mullions, partitions, rails, etc. Everything that is inside the top, sides and bottom of the cabinet will be deleted. This is helpful for "starting over" after placing many mullions and center rails.
Openings are the spaces in the front of the cabinet that allow access of some sort into the cabinet. In Cabinet Solutions, you can quickly and easily change the size of the opening, the type of opening or what's in an opening or covering that opening.
Edit Shelves
The number of shelves in a particular cabinet can and should be set at the time a cabinet is placed. However, once you start dividing a cabinet up into different sections, the number of shelves per section may vary. Cabinet Solutions is designed to allow you to easily set the number of shelves for each section in a particular cabinet.
To edit the number of shelves in an opening:
- Follow the instructions to select a cabinet.
- In the dialog box that appears, click on the Shelves button.
- In the new dialog box that appears, click on the opening that you want to change the number of shelves in.
- A new dialog box will appear. Type in the number of fixed and /or adjustable shelves you want in the opening.
- Click Accept to keep these changes or Cancel to keep things as they were.
- Repeat this for every opening you need to change.

You can adjust the shelves within this opening by clicking the Adjust Shelves button. (See Adjust Shelves)
To Adjust Shelves:
Modifying End Types
Every time you place a cabinet, Cabinet Solutions checks to see what that cabinet is being placed next to and it automatically sets the end type for you. There may be times when you want a particular end to differ from what Cabinet Solutions has set it to. You need to modify the end type using this feature. This feature will also allow you to add a door panel to an end. In Cabinet Solutions we call this end a "Plant-On End".
To modify the end type:
- Follow the instruction to select a cabinet.
- In the Customize tool box, find and click on the Ends button.
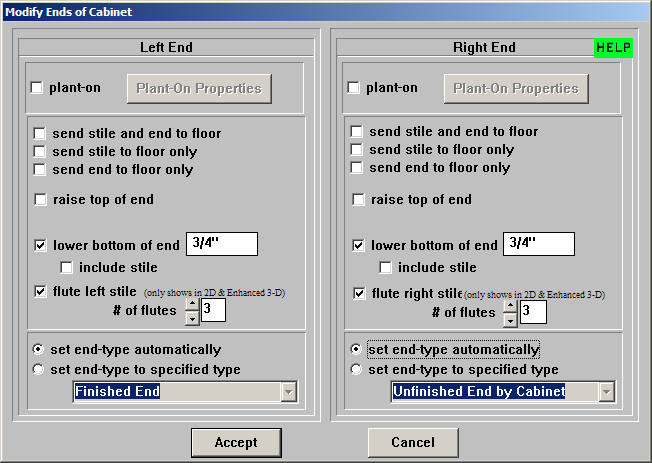
The Modify Ends of Cabinet Dialog Box
- Plant-On: You can Add a Plant-On and define what that plant-on will be.
- The following options allow you to build custom cabinets like refrigerator cabinets that are essentially refer uppers with both ends extended to the floor.
- Send Stile and End to Floor (Send End to Floor in Euro): You can send the stile with the end panel to the floor. In Euro, you can only send the end panel to the floor.
- Send Stile to Floor Only (Face Frame only): You can send the stile and not the end panel to the floor.
- Send End to Floor Only (Face Frame only): You can send the end panel and not the stile to the floor.
- The following options allow you to build custom cabinets that have valances under or above the cabinet and the end panels will cover the valance.
- Raise Top of End: You can raise the top of the end panel upwards by entering a positive (+) number. You can also lower the top of the end panel by entering a negative (-) number. Raising the top of the end panel will not move the entire end panel, rather it will stretch or make it longer.
- Include Stile (Face Frame only): You can include the stile when raising the top of the end panel. The stile will be flush with the top of the end panel.
- Lower Bottom of End: You can lower the bottom of the end panel downwards by entering a positive (+) number. You can also raise the bottom of the end panel by entering a negative (-) number. Lowering the bottom of the end panel will not move the entire end panel, rather it will stretch or make it longer.
- Include Stile (Face Frame Only): You can include the stile when lowering the bottom of the end panel. The stile will be flush with the bottom of the end panel.
- Flute Left/Right Stile: You can show fluting on the left and/or right stile by clicking the check box Flute Left (or Right) Stile. The fluting will only show up in the 2-D Elevation view and the Enhanced 3-D. It currently will not show up in the Basic 3-D. If you have the Display Doors option checked in the Elevations Screen, the fluting will show as vertical lines depending on the number of fluting you specified (see below). If you have the Display Doors option un-checked, the fluted stile(s) will be indicated by "(F)".
- # of Flutes: You can either use the up and down arrows or type in the desired amount of flutes you want to use on this particular stile. You can have a different number of flutes for each stile. The program will not allow you to put in more flutes than possible.
- Set End-Type Automatically: Cabinet Solutions will automatically set the end-type of the cabinet based on your configuration settings and how the cabinet is placed in the room.
- Set End-Type to Specific Type: You can choose to manually change the end-type. Setting the end-type to a specific type allows you to have the end-type act the way you want it to. If the end-type was automatically set as a Finished End, but you wanted it to be an Unfinished End because you didn't want the side panels to drop below the bottom, then you will want to manually set the end-type to Unfinished End. Depending on which end-type you select, the standards for that end-type you have set up will be applied. This allows you to have full custom control over the ends of your cabinets.
Viewing a Cut List
At times, you may want to view your cut list before you print it. This is always recommended when you have been making changes to your Job Standards that are out of your ordinary routine.
To view a cut list:
- Follow the instruction to select a cabinet.
- In the Edit Cabinet dialog box, click on the View Assembly Sheet button.
- In the window that appears, the assembly sheet for this particular cabinet will appear.
Note: No changes can be made to the parts already listed in this cut list without returning to the previous window where you can of course, add parts, delete parts, or change them through editing the cabinet standards. However, in this screen you can add, or delete specialty parts that Cabinet Solutions does not allow you to put in anywhere else.
- To add a part, click on the Add Custom Part button at the top of the tool box.
- In the window that appears, fill in all the boxes for information given. Including part name, size, material type, and quantity.
- Next click on the Add Part button. It will now appear at the bottom of your printed assembly sheet as well as in a special section of your general cut list.
- If you want to delete any of these parts that you've added, move your mouse into the cut list screen and point it at the board you wish to remove.
- When the part you want to get rid of is highlighted, click your mouse.
- A notice will appear asking you if you are sure that you want to delete the specified part.
Adjusting Cabinet Standards
There may be times when you have gone through all the steps to this point and still want to make further changes. To do this, you may need to adjust the standards for this particular cabinet. The cabinet will be changed to correspond to the changes that you make in the Cabinet Standards. For example, let's say you have placed a sink base with the correct exterior dimensions. You have added a mullion to divide the lower opening but you also want to eliminate the back in this sink cabinet because there is a lot of plumbing and electrical hookup to do. This is the time you want to edit this cabinet by changing its particular standards.
To adjust cabinet standards:
- Follow the instructions to select a cabinet.
- In the Edit Cabinet dialog box, click on the Cabinet Standards button.
- Follow the instructions for changing the Standards.
IMPORTANT NOTE: Once you change a cabinet.s specific standards in the Edit Cabinet window, these new standards are isolated so they will not be affected by the Job Standards any longer. Therefore, if you change a Job Standard at a later time, it will have NO AFFECT on this cabinet.
Saving a Custom Cabinet
Cabinet Solutions allows you to save a cabinet you have edited. This is a very useful feature because once you save a cabinet it appears in the list of custom cabinets that you can place in the Place Cabinets Screen. You simply click on the Custom icon in the Place Cabinets Screen and select the custom cabinet you want to place.
To save as a custom cabinet:
- Follow the instructions to select a cabinet.
- In the Edit Cabinet dialog box, edit the cabinet to your specifications.
- When you are finished editing, click on the Save to Library button.
- Type in the name of the custom cabinet in the dialog box that appears.
- Click on the Save button.
- Click on the Done button in the Edit Cabinets dialog box.
- This cabinet is now saved in your custom cabinet file and can be recalled and placed from the custom icon in the Place Cabinet screen Tool Box.
Openings / Rollouts
Making changes to an openings or adding a rollout to an opening:
- Follow the instruction to select a cabinet.
- In the tool box that appears, click on the Openings / Rollouts button.
- In the new dialog box that appears, click on the opening that you want to edit.
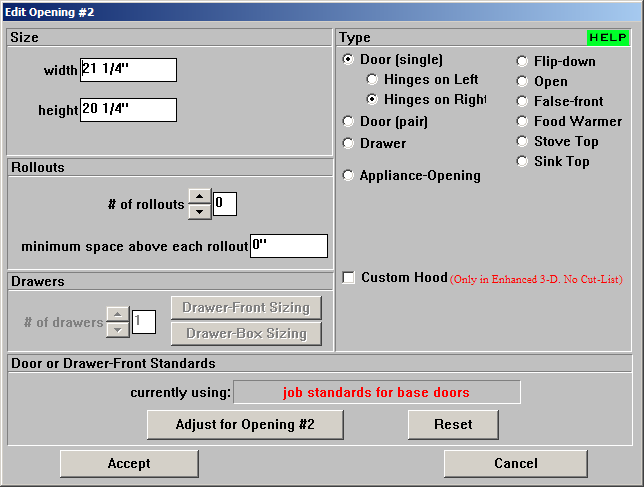
As you can see, there are many options when it comes to editing an opening. Which options are functional when you go into this new dialog box depends on what kind of opening you are working with. If the opening has doors covering it, you will be able to add rollout shelves behind the doors. If the opening is going to have an appliance inside it, the only option that will be working is the sizing edit fields.
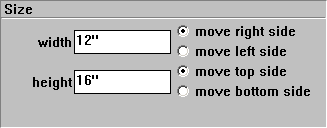
- To change the size of the opening (i.e. its height or its width), find the Height or Width entry field and type in the size you want the opening to be. This can only be done if you are moving parts that can be moved without affecting the overall cabinet size. For example, you can move a center rail that sits between the top drawer in a cabinet and the door below it, but you can't move the top rail above the top drawer in that cabinet since to move that top rail actually makes the cabinet taller. To move that top rail, you have to resize the entire cabinet.
Note: The program needs to know which side of the opening to move: Left or Right, Top or Bottom. Click on the radio button indicating which side of the opening you want moved.
- To change the opening Type, simply click on the appropriate radio button.
- To change the type of appliance in the opening, select the Appliance-Opening radio button. A drop down list will appear. Click the arrow to the right of the drop down list and select the type of appliance you want in the opening. If you want to change the dimensions and placement of the appliance in the opening, follow the directions for Modifying an Appliance Opening.
- Custom Hood: Click the Custom Hood check box if you would like to display a range hood in the Enhanced 3-D. Checking Custom Hood will set the opening to a false-front, remove interior parts such as shelves, and remove knobs/pulls. There will be no job costing nor parts cut-list and it will only show up in the Enhanced 3-D. However, you can view the overall door size under the Master Cut-List.
If the opening is a Door (single) or Door (pair) or Open (meaning nothing is covering the opening like in a bookcase), you can then add rollout shelves to the opening. To do this, enter the number of rollout shelves you want in the "# of rollouts" entry field.
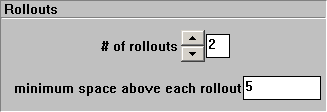
You can also use the Arrow buttons to increase or decrease the number of rollouts in the opening. You can also set the "minimum space above each rollout". This number insures that your rollouts stay a certain distance apart.
- If the opening is set to Drawer, the "Drawers" section of this dialog box will be enabled. This box allows you to add more than one drawer to a single opening. This is often the case when you are building frameless cabinets.
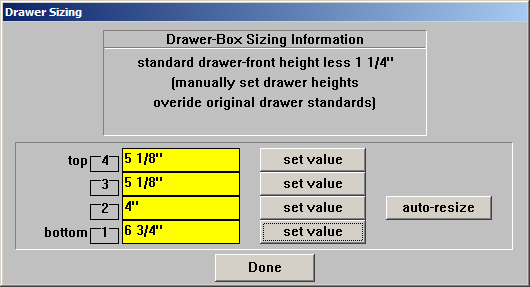
- If you have at least one drawer in a single opening, you can set the sizes for the drawer boxes. Click the button labeled "Drawer-Box Sizing".
- In the new dialog box that opens, click the "set value" button of the bottom drawer (notice that the corresponding edit field changes from yellow to white and the button you just clicked is now labeled "done". In the white edit field, type in the new size you want the drawer-box to be, then click the button whose label just changed to "done".
- Notice that the sizes to the other drawer-boxes do not automatically resize. The minimum and maximum drawer-box size is determined by the drawer-front size for that drawer. Drawer-front sizing is explained in the next section below. Continue up the drawer-box size list giving each drawer-box the size you want it to have. If you make a mistake, just click the auto-resize button and Cabinet Solutions will resize the drawer-box.
- Click "Done" to return to the "Edit Opening" dialog box.
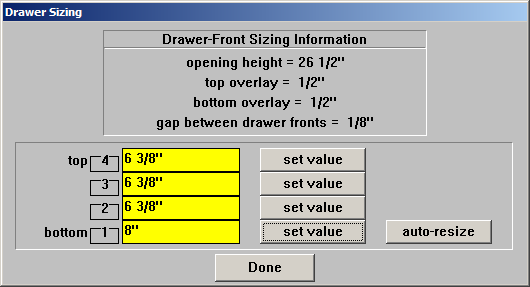
- If you add more than one drawer in a single opening, you can set the sizes for the drawer-fronts. Click the button labeled "Drawer-Front Sizing".
- In the new dialog box that opens, click the "set value" button of the bottom drawer (notice that the corresponding edit field changes from yellow to white and the button you just clicked is now labeled "done". In the white edit field, type in the new size you want the drawer-front to be, then click the button whose label just changed to "done".
- Notice that the sizes to the other drawer-fronts automatically resized. This sizing is done using your Job Standards for "overlays" and "gap between door pair". Continue up the drawer-front size list giving each drawer-front the size you want it to have. If you make a mistake, just click the auto-resize button and Cabinet Solutions will resize the drawer-front.
- Click "Done" to return to the "Edit Opening" dialog box.
- Whenever you select to cover an opening with a door, a pair of doors or a drawer-front, you can adjust the standards used on that door or drawer-front. This feature gives you the ability to change the door style on one opening in a cabinet to be different than the door style on a different opening in a cabinet. Just as an example, you may be building an entertainment center with solid raise panel doors on it. There maybe one section though, that needs glass doors on it. Use this feature to make that adjustment. Click on the "Adjust for Opening #__" button. If you decide you want the opening to revert back to the door style set in your Job Standards, click the button labeled "reset".
- Click on the Accept button to apply the changes you've made in the "Edit Opening" dialog box or click Cancel and none of the changes you made will apply.
- You can now select a new opening to edit or click the Done button in the Edit Opening dialog box to return to the Customize Cabinet dialog box.
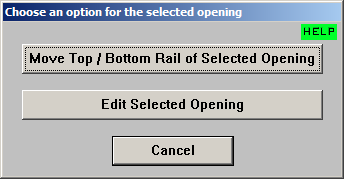
- Special Step: If you build custom face frame cabinets and you build multiple sections into a single cabinet (such as a range hood cabinet placed between 2 standard upper cabinets, all as one piece) and you've already placed mullion stiles or center stiles in the cabinet, a different dialog box will appear.
- This dialog box gives you 2 options. The bottom button, "Edit Selected Opening", will take you to the "Edit Opening" dialog box just described. The top button, "Move Top / Bottom Rail of Selected Opening", opens a dialog box in which you can move the bottom rail or the top rail of a section. Simply enter the distance from the top or the distance from the bottom that you want to move the rail.
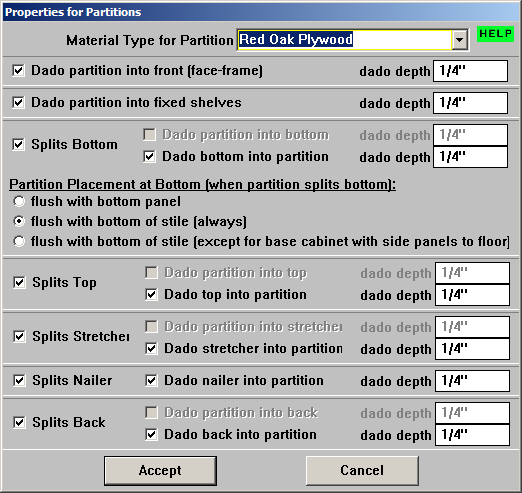
Properties for Partitions
Some of you may never need the features contained in this particular dialog box, like those of you that build modularly. But for those who build multiple sections into one large cabinet or for those of you building furniture type pieces like desks, this dialog box is an important one to understand. First of all, with this tool you can choose whether the partition is made of a finished material or an unfinished material. That way, if you are building a desk, you can place a mullion stile or center stile into the cabinet with a partition behind it. Make that partition a finished material.
Later when we discuss editing the openings, you will learn how to move up the bottom rail in the knee space section. When you do this, the partition that is then exposed will be a finished material. Also, for those of you who build a cabinet over 8' in length but only purchase 8' material, you can split your bottoms, tops, and backs so that you can build the whole thing without buying 10' material.
The "properties" for the partitions behind mullions can be changed for every mullion that you place or set them once and they will stay set that way for every mullion you place as long as you don't go in and make changes to this dialog box. If you never split other cabinet parts with your partitions, remove all the checks from the check boxes, select the material you want your partitions to be made of and you can skip this dialog from now on.
- Material Type for Partition: Use the drop down menu to select the material you want the current partition to be made of. After you place the partition, if you need to change the material, click on View/Delete Boards in the Edit Elevations Screen and click on the partition you want to modify. A dialog box will ask you if you want to change the material. Click Yes.
- Dado partition into front (face-frame): Check this box if you want the partition dadoed into the mullion in front of it. Enter the dado depth in the provided entry field.
- Dado partition into fixed shelves: Check this box if you want the partition that connects to a fixed shelf to be dadoed into that fixed shelf. Enter the dado depth in the provided entry field.
- Split Bottom: Check this box if you want your bottom panel split into sections. You must split the bottom if you want to move up either adjoining section.
- If you do not check this box you can then chose to: Dado the partition into the bottom. Enter the dado depth in the provided entry field.
- If you check the "Split Bottom" check box you can then chose to: Dado the bottoms into this Partition. Enter the dado depth in the provided entry field.
- Partition Placement at Bottom (when partition splits bottom):
- flush with bottom panel: Click this if your partition splits the bottom and then sits flush with the bottom of the bottom panel.
- flush with bottom of stile (always): Click this if your partition splits the bottom and then always sits flush with the bottom of mullion.
- flush with bottom of stile (except for base cabinet with side panels to floor): Click this if your partition splits the bottom and then sits flush with the bottom of the mullion in all the cases except when your side panels go to the floor. In that case, the partition will split the bottom and go to the floor too.
- Split Top:
- Check this box if you want your top panel split into sections. You must split the top if you want to move down either adjoining section. If you are not using tops in your cabinets this check box will have no affect.
- If you do not check this box you can then chose to: Dado the partition into the top. Enter the dado depth in the provided entry field.
- If you check the "Split Top" check box you can then chose to: Dado the tops into this Partition. Enter the dado depth in the provided entry field.
- Split Stretcher:
- Check this box if you want your stretchers split into sections. You must split the stretchers if you want to move down either adjoining section. If you are not using stretchers in your cabinets this check box will have no affect.
- If you do not check this box you can then chose to: Dado the partition into the stretchers. Enter the dado depth in the provided entry field.
- If you check the "Split Stretchers" check box you can then chose to: Dado the stretchers into this Partition. Enter the dado depth in the provided entry field.
- Split Nailer:
- Check this box if you want your nailers split into sections.
- If you do not check this box you can then chose to: Dado the nailer into the partition. Enter the dado depth in the provided entry field.
- Split Backs:
- Check this box if you want your backs split into sections.
- If you do not check this box you can then chose to: Dado the partition into the backs. Enter the dado depth in the provided entry field.
- If you check the "Split Backs " check box you can then chose to: Dado the backs into this Partition. Enter the dado depth in the provided entry field.
Special instructions when adding Mullions, Mullion Stiles, and Center Stiles
- Follow the instruction to select a cabinet.
- In the section entitled "Add Boards", select mullion, mullion stile, or center stile (for the rest of these instructions we will refer to these three items as "mullions"). All three are provided because different shops build in different ways. A new dialog will appear.
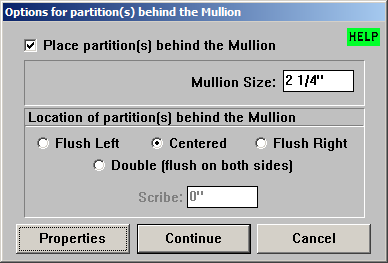
- This dialog box gives you the choice each time you place a mullion to also place a partition behind the mullion. Place a check in the check box-- "Place a partition behind" if you want a panel behind the face frame piece.
- Use the radio buttons provided to position the partition behind the face frame piece. There is also a radio button that places 2 partitions behind a single mullion. Both partitions are flush with the left and right side of the mullion.
- If the partition is Flush Left or Flush Right, you can set the scribe for the partition behind the mullion. If the partition is Flush Left, the partition will be moved to the right the distance of the scribe indicated. If the partition is Flush Right, the partition will be moved to the left the distance of the scribe indicated.
- Next to the words "Mullion Size:" or the name of the board you are placing, you can enter the width of the board in the entry field to the right. This makes it easy to place custom boards on the fly.
- Before proceeding on, click on the Properties button in the lower right hand part of the dialog box. Another dialog box will appear that will let you select the material type you want each partition to be and to choose if that partition will split any of the other parts within that cabinet.
- When you have finished setting the "Properties for the Partition", click the "Accept" button.
- In the "Options for partition(s) behind the mullion" dialog box, click on the "Continue" button to go on and place the mullion(s).
- In the dialog box that appears, a silhouette of the cabinet is presented with the openings numbered. Click on the opening to add the cabinet part. You can add as many of these parts to this cabinet as you want at this time. Each mouse click will add a part to the opening that you click inside of.
- To move on to add another part, or do another "Edit" function, click on the Done button in the Edit Cabinet dialog box.