File (Managing Your Jobs)
The menu bar item associated with managing jobs is File. Click on the word File in the menu bar and a vertical list will appear. The
functions in this list include: New Job, Open Job, Save Job, Save Job As, Delete Job, Delete CCB, Backup Files, Restore From Backup, Export Cut List
and Exit.
Starting a New Job
Starting a New Job is very easy in Cabinet Solutions. Just click your mouse on the buttons and follow the directions that come up on the screen.
(The Start New Job button in the Start Up Screen also performs this function.)
To start a new job:
- Move the mouse until the pointer on the screen points to Start New Job button. Click the mouse button.
- A dialog box will appear warning you that if you have not saved your current job it will be deleted. Click on OK if you want to continue. Click on Cancel if you want to save your current job.
- If you clicked on OK a dialog box will appear asking you if you want to enter new standards for the new job. If you do not want to enter new standards click on the No button in the dialog box and you can start the new job.
- If you want to enter new standards click on the Yes button in the dialog box. Enter the new standards for your job and then you can start the new job.
Opening a Job
You can open a job you have previously saved. (The Open Existing Job button in the Start Up Screen also performs this function.)
To open a job:
- Click on the word File in the menu bar at the top of the screen.
- Click on the word Open Job in the vertical list that appears.
- A dialog box will appear that will warn you that if you have not saved the job you were just working on, you will lose any changes that you've made to the job since the last time you saved it. If you still need to save the job you were just working on, click Cancel. The save dialog box will appear allowing you to save the your work.
- If you clicked OK, a dialog box will appear with a list of the jobs that are currently in existence. Click on the name of the job you want to open or type in the name of the job. The name of the job will appear at the top of the list.
- Click on the Open button in the dialog box. (Click on the Cancel button to cancel and return to the job you were doing.)
- If you clicked on the Open button, the job you selected will appear on the screen.
Saving a Job
This section will teach you how to save your Cabinet Solutions job file. Once you have created a new file, we highly recommend that you save frequently,
especially to guarantee that your important changes are made. We also recommend doing a file backup frequently. See Backing up Cabinet Solutions Files
To save the job you are working on:
- Click on the word File in the menu bar at the top of the screen.
- Click on the words Save Job As... in the vertical list that appears.
- A dialog box will appear. Make sure the job you want to save is displayed at the top of the list.
- To select the job you want to save, click on the name of the job in the list or type in the name of the job. The job will appear at the top of the list in the dialog box.
- Click on the Save button in the dialog box. (Click on the Cancel button if you do not want to save the job.)
- If you clicked on the Save button, you will return to the screen you were working in and you will be working on the job that you just saved.
Note: In the File menu, clicking on Save As... will act as Save Job As... when you have not already saved the job. However, if you have already saved the job, a message box will appear asking you if you want to overwrite the existing job with the same name. Clicking Yes will save the current job over the existing one. This feature speeds up the saving process.
Note: We recommend doing a file backup frequently as well. See Backing up Cabinet Solutions Files.
Deleting a Job
You can delete a job you have previously saved.
To delete a job:
- Click on the word File in the menu bar at the top of the screen.
- Click on the word Delete Job in the vertical list that appears.
- A dialog box will appear with a list of the jobs that are currently in existence. Click on the name of the job you want to delete or type in the name of the job. The name of the job will appear at the top of the list.
- Click on the Delete button in the dialog box. (Click on the Cancel button to cancel and return to the job you were doing.)
- A message will come up on screen asking you if you are sure you want to delete that job. Answer yes to delete. Answer no if you have picked a job by mistake.
Warning: If you answer yes, this job will be deleted and no longer retrievable.
Deleting a CCB File
You can delete a ccb file you have previously saved.
To delete a ccb file:
- Click on the word File in the menu bar at the top of the screen.
- Click on the word Delete CCB in the vertical list that appears.
- A dialog box will appear with a list of the ccb's (custom cabinet's) that are currently in existence. Click on the name of the ccb you want to delete or type in the name of the ccb. The name of the ccb will appear at the top of the list.
- Click on the Delete button in the dialog box. (Click on the Cancel button to cancel and return to the job you were doing.)
- A message will come up on screen asking you if you are sure you want to delete that ccb. Answer yes to delete. Answer no if you have picked a ccb by mistake.
Warning: If you answer yes, this ccb will be deleted and no longer retrievable.
Backup Files
You can back up Cabinet Solutions files to a 3 1/2" drive or any compatible drive. You cannot burn to a CD through Cabinet Solutions. You must use the CD Burner software that came with your computer.
To back up Cabinet Solutions files:
- Left click on the "File" menu at the top of any of the Cabinet Solutions main screens.
- Left click on "Backup Files...". The backup file screen will appear.
- Select the drive you wish to backup to.
Note: A or B drives are usually your 3 1/2" floppy drives. You cannot backup to a CD unless you use your CD burner software that came with your computer.
- Next, select the individual files you wish to backup. You can left click the "Select All" button either next to the file list to select all of the files in that particular list, or the "BACKUP ALL FILES" button at the bottom of the screen. If you forget to select a drive, a note will to remind you to choose the drive where your Cabinet Solutions information will be backed up will appear.
- Left Click "OK" to begin the backup procedure. A message will appear reminding you to make sure you have a disk in the drive you selected. (See Fig #1.)

Fig #1
Note: If you forget to install a 3 1/2" floppy disk in your A or B drive (or the drive you selected), the program will crash and you will have to click on "ABORT" until a dialog box appears. (See Fig #2.)
- Once you have pressed the "BACKUP ALL FILES" or "COPY SELECTED FILES" button, the files will begin to backup on to the drive you have chosen. If the drive fills up before all the files have been backed up, the program will display an error message asking you to insert an additional disk. (See Fig #2.)
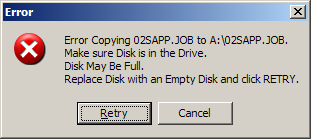
Fig #2
- If this should appear, put a new disk in the drive and press the "RETRY" button to proceed with the backup.
Note: Pressing "Cancel" will move the backup procedure to the next file to see if it will fit on the disk and will then move from file to file looking for something that will fit on the unused portion of the disk. It is not advised that you press the "Cancel" button as all your files will not backup once "Cancel" has been pressed.
Restore From Backup
You can restore Cabinet Solutions files from a previous backup.
To restore Cabinet Solutions files:
- Restoring a previous backup of Cabinet Solutions files from a 3 1/2" drive or any drive:
- Left click on the "File" menu at the top of any of the Cabinet Solutions main screens. Left click on "Restore From Backup...". The restore backup file screen will appear. Select the drive you wish to restore from.
- Next, click the "Read Drive" button. This will list all the files on that drive. A message will appear reminding you to make sure you have a disk in the drive you selected. (See Fig #1.) Next, select on the individual files you wish to restore. You can left click the "Select All" button either next to the file list to select all of the files in that particular list, or the "RESTORE ALL FILES" button at the bottom of the screen.
Fig #1
Note: If you forget to install a 3 1/2" floppy disk in your A or B drive (or the drive you selected), the program will crash and you will have to click on "CANCEL" until a dialog box appears. (See Fig #2.)
- Once you have pressed the "RESTORE ALL FILES" or "COPY SELECTED FILES" button, the files will begin to restore on to your computer. If the drive fills up before all the files have been restored, the program will display an error message asking you to insert an additional disk. (See Fig #2.)
Fig #2
- If this should appear, keep left-clicking "Cancel" until the restore process stops. You want to do this because this means that your computer is out of space. This almost would never happen, but if it does, clear some hard drive space from your computer and try the restore process again.
Note: Pressing "Cancel" will move the restore procedure to the next file to see if it will fit on the disk and will then move from file to file looking for something that will fit on the unused portion of the disk.
CCB Manger
You can organize your custom cabinet files by filing away custom cabinets that you do not use on a regular basis. This clears up the custom cabinet library making it easier to find the most commonly used custom cabinets. You can create folders based on categories such as "Bases" and "Uppers", etc. You can even delete custom cabinets that are no longer needed. This is a great tool for keeping your custom cabinets organized.
Job Manager
You can organize your job files by filing away jobs that you do not use on a regular basis. This clears up the job library making it easier to find the most commonly used jobs. You can create folders based on customers' names or businesses, etc. You can even delete jobs that are no longer needed. This is a great tool for keeping your jobs organized.
Export Cut List
You can export the Cut List to a TEXT file to be imported into a database program.
To export the Cut List »
Exit
Click on Exit to close Cabinet Solutions.
View
In this menu you can activate your Zoom feature in any screen to get a closer look at your work.
This is very handy when doing rooms with large wall lengths or if you have a small monitor because it
lets you easily enlarge any section of the screen you need to see enlarged.
Zoom Selection Mode
- Click on the word View in the menu bar at the top of the screen.
- Click on the word Zoom Selection Mode in the vertical list that appears.
- Your mouse cursor will now appear as a magnifying glass
 when moved into the drawing screen.
- Using the left button on your mouse, Click and drag the magnifying glass diagonally across the area of the screen you want enlarged. Hint: Make the area you want to view a square box rather than a rectangle since Cabinet Solutions will have to size it into a square to fit the drawing screen.
- You may do this as many times as you need to enlarge the image you want to see.
Note: A short cut to get into this "Zoom" mode is a quick double click of the right button on your mouse. Double click the button while your cursor is in the drawing screen and your cursor should appear as a magnifying glass.
Previous View
- Click on the word View in the menu bar at the top of the screen.
- Click on the word Previous View in the vertical list that appears.
- Your drawing screen will reset back to the view it was in before your last zoom selection. Remember that you can zoom in as many times as you like. This feature is like taking one step backwards.
Initial View (The view your room started in)
- Click on the word View in the menu bar at the top of the screen.
- Click on the word Initial View in the vertical list that appears.
- Your drawing screen will reset back to it's original view. Remember that you can zoom in as many times as you like. This feature takes you all the way back to the beginning.
Display
As explained in the Overview, Cabinet Solutions
consists of a series of screens in which you do your work. The Display selection in the menu bar
provides a simple and easy way to access the screen you desire. You can access the following screens by
selecting Display from the menu bar:
Changing to Another Screen
- Click on the word Display in the menu bar at the top of the screen.
- In the vertical list that appears, click on the name of the screen that you want to appear.
Standards
The Standards Option provides a drop down list which includes the following functions: Adjust Job Standards,
and Set-Up Options.
To perform the Standards Options:
- Click on Standards in the menu bar.
- In the drop down list, click on the name of the standards you want to view or change.
- When you are finished with those standards, click "Done".
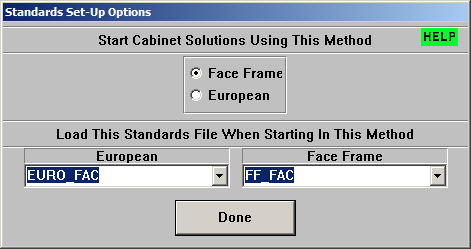
Explanation of Standards Menu Items
To set which style of constructions Cabinet Solutions will use when first started up:
- Select Standards in the menu bar.
- Select setup options from the drop down list.
- Click on the radio button for face frame or Euro construction, depending on which style of construction you most often use in your shop.
- In the bottom half of the same window, you can choose from the two lists which set of standards you want to automatically load when you first select the "Face Frame" or "European" radio buttons in the Job Standards window. Just click on the arrow next to the list and then click on the set of standards you want to select.
Options Menu
The Options selection in the menu bar provides you with many commands and features. These include Units, Advanced Program Settings, and Licensing.
The following provides explanations of all these functions.
Units
The Units Option provides you with selections regarding the way you want measurements calculated and displayed. You can choose inches with fractions,
inches with decimals, feet and inches, metric (in millimeters), or metric (in tenths of millimeters). You can also select how you want your squared
measurement displayed; either in Square Feet or Square Meters. You can have Square Feet displayed for squared totals even when you have Metric selected
for your part and lineal measurements.
Cabinet Solutions accepts input of measurements in many forms and will automatically convert to the units that have been selected.
To choose how measurements are displayed:
- Click on Options in the menu bar.
- Click on Units in the drop down list.
- Click on the name that describes the way you want the measurements displayed.
- Click on Square Feet or Meters.
- Click on the name that describes the way you want your squared measurements displayed.
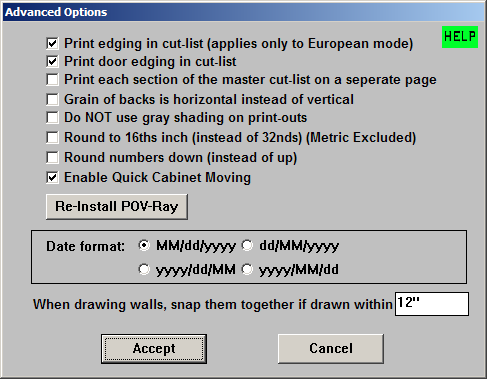
Advanced Program Settings
To open the Advanced Program Settings dialog window:
- Click on Options in the menu bar.
- Click on Advanced Program Settings in the drop down list.
The Advanced Program Settings option provides several different ways in which you can control certain features in Cabinet Solutions. In this section,
you will find an explanation for each option as well as instructions as to how to change the setting.
This menu accesses some additional tools that come with your Cabinet Solutions software. These include:
To access the tools:
- Click on Tools in the menu bar.
- Click on the name of the tool you want to use.
Print
Printing from the menu bar can be done from any screen at any time. Cabinet Solutions allows you to print your information in several different ways. You can print
out an entire cut list, or you can select any number of sections to print out individually. You can print all the assembly sheets for the entire job, or you can
select any number of them one-by-one. The same is true for your elevations, you can choose to print as many as you need at a given time.
To print using the menu bar:
- Click on Print in the menu bar.
- In the drop down list, click on the items that you want to print.
- For most items, Cabinet Solutions will now print your selection. However, some items will have a new window appear.
- In this window, by pointing your mouse cursor at each item and clicking, you can select one item, or several, to go to print.
- Click accept to send the selected items to the printer; or click cancel to quit.
If you selected Master Cut List, there are three check boxes:
- Batch By Size Only: checking this will group together similar sized items onto one line.
- Increase Font For Fax: checking this will increase the printed font size to be better read after a fax transfer.
- Totals Only: checking this will only print the totals for each section.
Help
The Help title in the menu bar allows you to easily open the Cabinet Solutions Help files. You.ll find the manual within this Help so that while you are
working on the software, you can call up any chapter or section of a chapter to your screen for easy reference.
To access Help:
- Click on the word Help in the menu bar at the top of the screen. A drop down menu will appear.
You can also click on any Green Help buttons you see throughout the program.
- Click on the name of the Help item that you want to access.