Editing Walls
To select a wall to be edited:
- Click on the "Edit Wall" radio button.
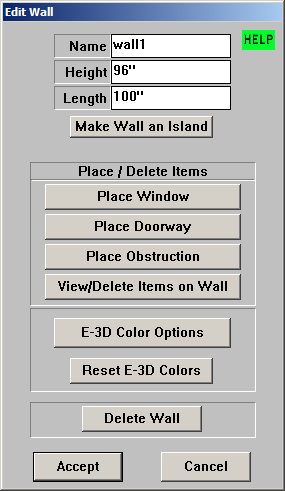
- Now move your mouse cursor into the drawing screen. As you move your mouse around you will notice that the wall that the mouse is closest to will change colors or "highlight". Click the mouse when the wall that you wish to edit is highlighted. An edit window will appear with the following wall edit options available.
Wall Name
You can change the name of a wall at any time.
- Follow the steps to select the wall.
- In the entry field after Wall Name, type in the new name of the wall.
- Click on the Accept button when the correct wall name is displayed.
Wall Height
You can change the height of a wall at any time.
To change the height of a wall:
- Follow the step to select the wall.
- In the entry field after Wall Height, type in the new wall height.
- Click on the Accept button when correct wall height is displayed. <>br />
NOTE: Several of the standards use the height of the wall as part of the calculations for cabinet heights. Make sure to verify that when you change the ceiling height, you adjust your cabinets accordingly.
Wall Length
You can change the length of a wall at any time.
To change the length of a wall:
- Follow the steps to select the wall.
- A dialog box will appear. Click on the Resize Wall button to change the length of the wall.
- In the dialog box, click on the Change Wall at the Square button or on the Change Wall at the Star button. (The wall that you have selected will have a square at one end and a star at the other. The button you select determines which side of the wall is shortened or lengthened.)
- Another dialog box will appear. Type in the new length of the wall or change the displayed length by using the arrows next to ft (feet), in (inches), or 32nds (of an inch).
- Click on the Accept button when the correct wall size is displayed.
NOTE: The affects of this change can be quite significant. When you change the size of a wall, one of the wall ends has to change it.s position. If you have already drawn a wall connected
to the wall end you are moving, that connection will be broken and the cabinets placed in the corner will no longer work as if they are in a corner. To reestablish a corner, the connecting wall will need to be
redrawn. Also, if you.ve already placed cabinets on the wall whose size you are changing, those cabinets will not know how to adjust to the new size. You will have to make adjustments to those cabinets in the
Place Cabinets screen after your done editing the wall. We highly recommend using measurements you have acquired from the actual job site for your wall lengths when drawing them, to avoid having to make these
changes which may make you redo some of your work.
Deleting a Wall
You can delete a wall at any time.
To delete a wall:
- Follow the steps to select the wall.
- A dialog box will appear. Click on the Delete Wall button to delete the wall.
NOTE: Be careful when you delete a wall. If you have already placed cabinets, appliances, windows, doors, or obstructions on a wall, those items will be deleted if you delete the wall.
Placing Windows, Doors, and Obstructions
You may place windows, doors, and obstructions at any time. An obstruction may be anything you want to be reminded of, like plumbing around a sink, or outlets that will require the cutting of a back, etc.
To place a window, door, or obstruction:
- Follow the steps to select the wall.
- A dialog box will appear. In the lower half of the dialog box will be the following buttons: Place Window, Place Door, and Place Obstruction. Click on the button representing the item you want to place.
- A new dialog box will appear.
- If you center align your windows, doors, or obstructions, check the Center Align button to align the object by its center. The value you put in Distance from Square will be used to center align the object. The Center Line value will be shown on the Elevations for the respected wall.
- Enter the height of the item you are placing.
- Enter the width.
- Either enter the distance from the square or press the Tab key and enter the distance from the star. Cabinet Solutions will automatically calculate the other distance.
- Enter the height from the floor.
- If you are placing an obstruction type in the name of the obstruction.
- Click on the Accept button to place the item, or click on the Cancel button to cancel.
Deleting Windows, Doors and Obstructions
You can delete all of the windows, doors and obstructions that you place. You can delete them individually, or all at once.
To delete windows, doors, and obstructions:
- Follow the steps to select the wall.
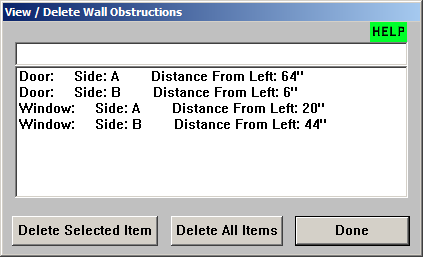
- A dialog box will appear. Click on the View/Delete Items on Wall button located near the bottom of the dialog box.
- In the dialog box that appears, there is a list of all the items on that wall.
NOTE: There are two sides to every item. Side A and side B. Items such as windows and doors can be seen on both sides. Items such as obstructions (light switches, electrical outlets, etc.) might only be seen on one side, so here you can delete the side you don.t want. The "Distance From Left:" will help you determine which side to delete. This assumes you are looking at the wall head on.
- To delete an item, position the mouse over the item you wish to delete, click the left mouse button to select it. Then click the button Delete Selected Item.
- To delete all the items on the wall, click the Delete All Items button.
NOTE: The Delete All Items button only deletes windows, doors, and obstructions. This button does not delete cabinets or appliances that you have placed. However, it will delete all the windows, doors, and obstructions that have been placed on the wall.
Deleting a Wall
You can delete a wall at any time.
To delete a wall:
- Follow the steps to select the wall.
- A dialog box will appear. Click on the Delete Wall button to delete the wall.
NOTE: Be careful when you delete a wall. If you have already placed cabinets, appliances, windows, doors, or obstructions on a wall, those items will be deleted if you delete the wall.
Placing Windows, Doors, and Obstructions
You may place windows, doors, and obstructions at any time. An obstruction may be anything you want to be reminded of, like plumbing around a sink, or outlets that will require the cutting of a back, etc.
To place a window, door, or obstruction:
- Follow the steps to select the wall.
- A dialog box will appear. In the lower half of the dialog box will be the following buttons: Place Window, Place Door, and Place Obstruction. Click on the button representing the item you want to place.
- A new dialog box will appear.
- If you center align your windows, doors, or obstructions, check the Center Align button to align the object by its center. The value you put in Distance from Square will be used to center align the object. The Center Line value will be shown on the Elevations for the respected wall.
- Enter the height of the item you are placing.
- Enter the width.
- Either enter the distance from the square or press the Tab key and enter the distance from the star. Cabinet Solutions will automatically calculate the other distance.
- Enter the height from the floor.
- If you are placing an obstruction type in the name of the obstruction.
- Click on the Accept button to place the item, or click on the Cancel button to cancel.
Deleting Windows, Doors and Obstructions
You can delete all of the windows, doors and obstructions that you place. You can delete them individually, or all at once.
To delete windows, doors, and obstructions:
- Follow the steps to select the wall.
- A dialog box will appear. Click on the View/Delete Items on Wall button located near the bottom of the dialog box.
- In the dialog box that appears, there is a list of all the items on that wall.
Note: There are two sides to every item. Side A and side B. Items such as windows and doors can be seen on both sides. Items such as obstructions (light switches, electrical outlets, etc.) might only be seen on one side, so here you can delete the side you don't want. The "Distance From Left:" will help you determine which side to delete. This assumes you are looking at the wall head on.
- To delete an item, position the mouse over the item you wish to delete, click the left mouse button to select it. Then click the button Delete Selected Item.
- To delete all the items on the wall, click the Delete All Items button.
NOTE: The Delete All Items button only deletes windows, doors, and obstructions. This button does not delete cabinets or appliances that you have placed. However, it will delete all the windows, doors, and obstructions that have been placed on the wall.
Enhanced 3-D Color Options
You can change the Enhanced 3-D colors for this wall.
To change the Enhanced 3-D colors for this wall:
- Follow the steps to select the wall.
- A dialog box will appear. Click on the E-3D Color Options button located near the bottom of the dialog box.
- Follow the steps for changing the Enhanced 3-D Color Options.
Resetting the Enhanced 3-D Colors
You can reset the Enhanced 3-D colors for this wall to the default colors for the room.
To reset the Enhanced 3-D colors for this wall:
- Follow the steps to select the wall.
- A dialog box will appear. Click on the Reset 3-D Colors button located near the bottom of the dialog box.
- A message box will ask you if you want to reset the colors.
Placement of Cabinets
Changing a Cabinet's Dimensions
This section provides instructions for changing a cabinet.s dimensions when you are in the "Place Cabinets Screen". In fact, it is only in the Place Cabinets Screen that a cabinet's overall dimensions can be changed.
To change a cabinet that you have already placed:
- In the Place Cabinets Screen, use the mouse to highlight the cabinet you want to change. (Pause to allow the highlight to settle on the cabinet you have chosen.) Notice that as you highlight the cabinet, its size will appear in the top of the tool box.
- Click on the left mouse button to select the highlighted cabinet for editing.
- A dialog box will appear. Click on the "Edit Cabinet" button.
- In this second dialog box that appears, change the dimensions of the cabinet by entering the new dimensions in the edit fields.
- When the cabinet dimensions are correct, replace the cabinet by clicking on the Move Cabinet button in the lower part of the dialog box.
- After you click on the Move Cabinet button, the cabinet will appear on the drawing screen. Move the mouse to replace the cabinet on the wall. Click the mouse when you have moved the cabinet to the appropriate place on the wall.
Moving a Cabinet
You can only move a cabinet.s position relative to the wall when you are in the Place Cabinets Screen.
To move a cabinet:
- In the Place Cabinets Screen, use the mouse to highlight the cabinet you want to move. (Pause to allow the highlight to settle on the cabinet you have chosen.)
- Left Click on the mouse button to move the highlighted cabinet.
- A dialog box will appear. Click on the "Edit Cabinet" button.
- In this second dialog box that appears, click on the Move Cabinet button.
- After you click on the Move Cabinet button, the cabinet will appear on the drawing screen. Move the mouse to place the cabinet in the appropriate place on the wall.
- Click the left mouse button when you have positioned the cabinet in the appropriate place on the wall.
To move a cabinet using the Quick Cabinet Moving feature:
- In the Place Cabinets Screen, use the mouse to highlight the cabinet you want to move. (Pause to allow the highlight to settle on the cabinet you have chosen.)
- Right Click on the mouse button to engage the Quick Cabinet Moving feature. The mouse cursor will change into up/down and left/right arrows
 indicating you will be moving the cabinet.
- Left Click on the mouse button to begin moving the cabinet. Move the mouse to place the cabinet in the appropriate place on the wall.
- Click the left mouse button when you have positioned the cabinet in the appropriate place on the wall.
Deleting a Cabinet
You can delete a cabinet when you are in the Place Cabinets Screen or by using the Delete Cabinets
tool from the Tools menu.
To delete a cabinet:
- In the Drawing Screen, use the mouse to highlight the cabinet you want to delete. (Pause to allow the highlight to settle on the cabinet you have chosen.)
- Click the left mouse button to select the highlighted cabinet to be deleted.
- A dialog box will appear. Click on the "Edit Cabinet" button.
- To delete the cabinet, click on the Delete Cabinet button in the lower part of the dialog box.
To Delete Multiple Cabinets:
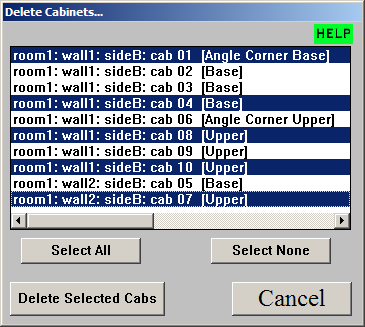
- In the Place Cabinets Screen, click the Tools menu at the top of the screen. Select the words Delete Cabinets. A dialog box will appear looking like the one below.
- Click on each of the cabinets you want to delete. You can click on the Select All or Select None buttons to select all the cabinets to be deleted or to select none of the cabinets to be deleted respectively.
- Click the Delete Selected Cabs button to delete the selected cabinets.
- A message box will appear asking if you really want to permanently delete all of the selected cabinets. If you are absolutely sure, click Yes.
- All the selected cabinets will now have been deleted.
Note: If at any time you accidentally click on a cabinet in the "Place Cabinet Screen", simply click on the cancel button in the first window that appears.
The Edit Cabinet Window
- In the Place Cabinets Screen, use the mouse to highlight the cabinet you want to change. (Pause to allow the highlight to settle on the cabinet you have chosen). Notice that as you highlight the cabinet its size will appear in the top of the tool box.
- Click on the mouse button to select the highlighted cabinet for editing.
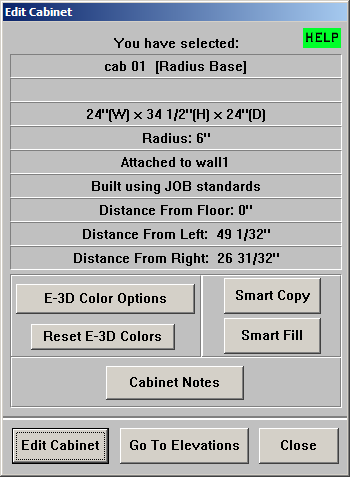
- A dialog box will appear like the one below.
Enhanced 3-D Color Options
You can change the Enhanced 3-D colors for this cabinet.
To change the Enhanced 3-D colors for this cabinet:
- Follow the steps to select the cabinet.
- A dialog box will appear. Click on the E-3D Color Options button located near the bottom of the dialog box.
- Follow the steps for changing the Enhanced 3-D Color Options.
Note: To change the colors for countertops, see editing walls.
Resetting the Enhanced 3-D Colors
You can reset the Enhanced 3-D colors for this cabinet to the default colors for the room.
To reset the Enhanced 3-D colors for this cabinet:
- Follow the steps to select the cabinet.
- A dialog box will appear. Click on the Reset 3-D Colors button located near the bottom of the dialog box.
- A message box will ask you if you want to reset the colors.
Using Smart Copy
- Smart Copy: Click this button to make an exact copy of the cabinet you have selected. The Cabinet Specifications window for the new cabinet will appear. Follow the directions for Placing a Cabinet.
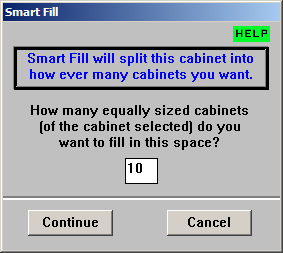
Using Smart Fill
Smart Fill allows you to fill a space with any given number of the same cabinet you want. The way Smart Fill works is it will take any cabinet and "split" it up into any given number of the same cabinet, equally sized. For example: If you took a 100" wide base cabinet and used Smart Fill giving it a number of 10 (cabinets), then it would take that 100" wide base cabinet and split it into 10 exact copies of itself, each new base cabinet being 10" in width, all fitting within the original 100" space.
- Smart Fill: Click this button to open a window like the one below.
- Enter the number of cabinets (you want to fill the space with) in the entry field provided.
- Click the Continue button to apply Smart Fill on the selected cabinet.
- Click the Cancel button to return to the Edit Cabinet window.
Cabinet Notes
Cabinet Notes allow you to save notes for each cabinet in your job.
To save notes for this cabinet:
- Follow the steps to select the cabinet.
- A dialog box will appear. Click on the Cabinet Notes button located near the bottom of the dialog box.
- A dialog window will appear with the following:
- Last Modified: This is the date the notes were last modified or had changes made to them and were saved.
- Current Date: This is the current date that will be stored with the notes.
- Enter the notes in the lines provided. As you type, if you reach the end of the line, it will automatically continue down to the next line. Do not hit the Enter key on your keyboard to do this.
- Clear All Notes: Click this button to clear (delete) all the notes for this cabinet and to close the dialog window.
- Print Notes: Click this button to print the notes for this cabinet. You can also print the notes for each cabinet when you print the assembly sheets.
- Save Notes: Click this button to save the notes you have entered for this cabinet. If you delete the cabinet, the notes will be deleted as well.
Go To Elevations
You can jump directly to the elevations view of the cabinet you have selected with one click.
To go to the elevations view for this cabinet:
- Follow the steps to select the cabinet.
- A dialog box will appear. Click on the Go To Elevations button located near the bottom of the dialog box.
- The screen will switch to the Edit Elevations Screen and automatically select the correct wall the cabinet is on.
Place a cabinet without the Smart Placer:
There are two positioning boxes that appear in your tool box when you go to place a cabinet. Using your
mouse, position the cabinet on the wall near the spot where it will actually be placed, then release your
mouse. Do not touch your mouse again until the cabinet is placed. Next, determine the distance from
either end of the wall to the cabinet you are placing. If it is the distance to the right wall, press
the F2 key on your keyboard. Next, enter the distance from the right wall to the cabinet using the numbers
on the keyboard. Then press Enter. You can do the same thing from the left side using F3. By
following this procedure, you will be able to place the cabinet in exactly the desired distance.
Another way of placing the cabinets with or without Smart Placer is to set the Cabinet on the wall
it is to be placed on. Using the directional arrow keys on your keyboard move the cabinet into place. The
cabinets will move in the same direction as the key you press. The keys move the cabinets in increments
of 1/32 of an inch. However, the increments can be increased by using the following combinations.
- Arrow Key + Ctrl = 1/4" movement
- Arrow Key + Shift = 1" movement
- Arrow Key + Ctrl + Shift = 8" movement
When you have positioned the cabinet exactly where you want it, press the enter key on your keyboard to
place the cabinet.
Smart Placer
The different functions of Smart Placer include:
- Avoiding Overlapping: The Smart Placer prevents the cabinets from occupying the same physical space. The Smart Placer snaps a cabinet to the nearest open space. If the space is too small for the cabinet, the cabinet will shrink to fit in the open space. This allows you to fill a space simply by over-sizing the cabinet and placing it in the space.
- Snapping the Sides of Cabinets Together: If you choose NOT to use the Smart Placer, you would have to line up the cabinets and fit them next to each other with painstaking manual precision. But using the Smart Placer makes positioning easier. Simply overlap the sides of the cabinets and they will automatically snap together. For example, if you are placing a dishwasher next to a sink cabinet, simply place the dishwasher so that it slightly overlaps the sink on the side that you want the dishwasher to be placed.
- Aligning Uppers Over Bases: It can be difficult to manually align uppers over bases. Smart Placer automatically aligns an upper over a base. Whenever the center and one edge of an upper is over a base, the edge of the upper is aligned with the edge of the base. Smart Placer will also align the brick chimney over the brick fireplace and the brick fireplace over the brick hearth to make it easier for you to align the brick fireplace pieces.
- Clearances from Cabinets to Doors and Windows: In the standards you specify the clearance from doors and windows. The Smart Placer prevents you from placing a cabinet too close to a door, window, or obstruction. When you try to place it too close, the cabinet is automatically snapped to the minimum clearance distance you have specified in the standards.
- Snap Cabinets in Corners: The Smart Placer makes it easy to place a cabinet in a corner. When the cabinet overlaps the adjacent wall in the corner, the cabinet automatically snaps snugly into the corner.
NOTE: When the Smart Placer is turned off, the cabinet is placed exactly where you position it regardless of whether that position is physically possible or practical.
Windows + Doors (Initial Values)
These dimensions were put into Cabinet Solutions to help prevent a cabinet maker from making a mistake.
These values will keep cabinets away from doors and windows so that the door or window trim won't run
into your cabinets. If you account for the door and window trim in another manner, set these standards
to 0" and they won't affect your design. If you want to use this safeguard, Cabinet Solutions will never
place a cabinet closer than the size you put in these entry fields. Because this is an initial value,
Cabinet Solutions only uses this information when a cabinet is placed. Therefore, you can change the
sizes in this window for every cabinet placed next to a door or window and the cabinets will all be
different distances away from the door or window.
- Clearance from Window: Enter the minimum distance that must be between a cabinet and a window. (Remember to consider window casing, curtains, window valances, etc.) This standard exists to safeguard against wall cabinets overlapping window casings, etc. If this is not desired, you can set your job with a clearance of 0. In specific instances, you may want to turn off the Smart Placer feature.
- Clearance from Door or End of Wall: Enter the minimum distance that must be between a cabinet and a door or the end of a wall. (Remember to consider the door casing, light switches next to full height cabinet, etc.) This standard exists to safeguard against wall cabinets overlapping door casings, etc. If this is not desired, you can set your job with a clearance of 0. In specific instances, you may want to turn off the Smart Placer feature.
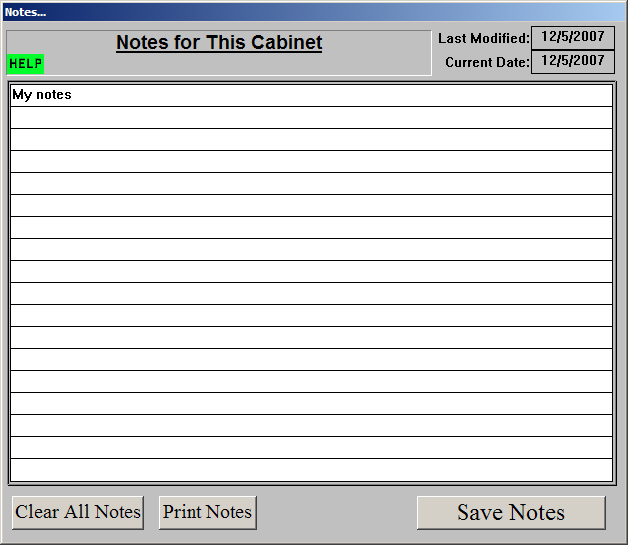
Notes
Notes allow you to save notes for items in your job. You will know which items you are saving by the title at the top of the window. It may say something like, "Notes for This Cabinet".
To save notes:
- Wherever you see a Notes button, click on the button to open the Notes dialog window.
- In the Notes dialog window, the following will appear:
- Last Modified: This is the date the notes were last modified or had changes made to them and were saved.
- Current Date: This is the current date that will be stored with the notes.
- Enter the notes in the lines provided. As you type, if you reach the end of the line, it will automatically continue down to the next line. Do not hit the Enter key on your keyboard to do this.
- Clear All Notes: Click this button to clear (delete) all the notes displayed and to close the dialog window.
- Print Notes: Click this button to print the notes currently displayed.
- Save Notes: Click this button to save the notes you have entered.