Construction Methods
Construction Methods
The first thing we want to establish is how you will be assembling your cabinets. If you use dado construction, there are places to put the depth of each dado. If you dowel or butt joint and screw your box parts simply turn off the dado box.
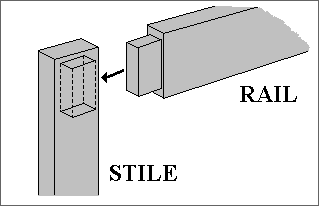
Face Frame Construction
- Butt Joint: If you join your face frame using the Castle Pocket method, or if you butt joint your frames using dowels or some other fastener, click on this radio button.
- Tenon & Mortise: If you tenon and mortise your frames together, click on this radio button and enter the depth of your tenon.
- Dado Cabinet to Face Frames: If you dado your box parts into your face frame, place a check in the check box in front of this option, and enter the depth you dado into the frame. This will add the needed depth to your box parts.
- Only Dado the Cabinet sides to the Face Frame: If you dado your boxes to your face frames, but only dado the sides in, check this box along with the box for Dado Cabinet to the Face Frame, and enter the size of the dado in the given box.
Cabinet Box Construction
- Dado Top into Side (Bases): If you dado the top of your base cabinet into the sides of the cabinet, place a check in the check box. Next, enter the depth of the dado.
Note: If you don't put a top in your base cabinets, this standard won't apply. You will find an option to add or remove the tops from your base cabinets in Construction Methods II section of standards.
- Dado Bottom into Side (Bases): If you dado the bottom of your base cabinet into the sides of the cabinet, place a check in the check box. Next, enter the depth of the dado.
- Dado Top into Side (Uppers): If you dado the top of your upper cabinet into the sides of the cabinet, place a check in the check box. Next, enter the depth of the dado.
- Dado Bottom into Side (Uppers): If you dado the bottom of your upper cabinet into the sides of the cabinet, place a check in the check box. Next, enter the depth of the dado.
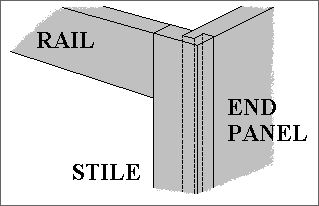
Cabinet End Construction
Note: These values only apply when the end panels are Same Size as Partitions or Side Panels Sit on Bottom. (See Construction Methods II)
- Dado Sides into Top (Bases): If you dado the sides of your base cabinet into the top of the cabinet, place a check in the check box. Next, enter the depth of the dado.
Note: If you don't put a top in your base cabinets, this standard won't apply. You will find an option to add or remove the tops from your base cabinets in Construction Methods II section of standards.
- Dado Side into Bottom (Bases): If you dado the sides of your base cabinet into the bottom of the cabinet, place a check in the check box. Next, enter the depth of the dado.
- Dado Sides into Top (Uppers): If you dado the sides of your upper cabinet into the top of the cabinet, place a check in the check box. Next, enter the depth of the dado.
- Dado Sides into Bottom (Uppers): If you dado the sides of your upper cabinet into the bottom of the cabinet, place a check in the check box. Next, enter the depth of the dado.
Filler From Uppers to Ceiling
- Insert Fillers from Upper to Ceiling (Appears Only in Euro): If your upper cabinets are going to the ceiling, it is sometimes necessary to place a filler between the top of the cabinet and the ceiling. This is done to insure that your doors won't scrape on any variance in the ceiling when they open. Cabinet Solutions will automatically insert them when this box is checked.