Controlling Your Room View
Controlling Your Room View
|
|
|
|
|
This is the main Adjust View controls view. Depending on the view that is being displayed, the information below the arrows and zoom can change but the main controls do not. |
|
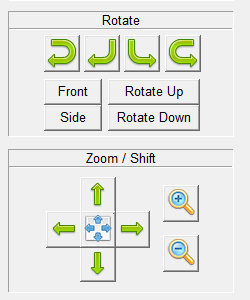
This Rotate control section is only visible in the View/Delete Boards section of the Designer. |
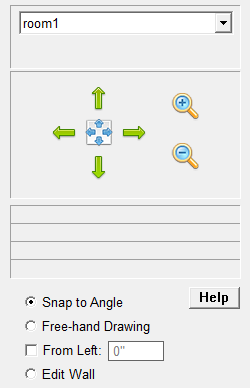
Shifting the View to the Right, Left, Up, or Down
To shift your view to the right, left, up or down:
- Locate the Arrow buttons in the Tool Box on the left.
- Click on one of the Arrows pointing right, left, up or down. Your view of the wall will be adjusted accordingly.
- Hold down the Right mouse button on the Drawing section of the window and moving your mouse in any direction will allow you to shift the view of the drawing around, the same as the arrows in the Tool Box but in a more rapid fashion.
- On the View/Delete Boards view, you can even hold down the Shift key on your keyboard and the Right Mouse button to move your cabinet around to better look at the information.
Centering the View
- Click on the button in the center of the Arrow buttons. The button has an X on it. The view will be centered.
Zooming In or Zooming Out
- Click on the Zoom In button for a closer view of the wall of cabinets. Click on the Zoom Out button to view the wall of cabinets from a greater distance.
- Zoom can also be done by the Center Mouse Button if your mouse has that feature. Rolling the Center Mouse button or scroll wheel Forward zooms in, and rolling it backwards zooms out.
Flipping the Wall Elevation
You can flip the wall to view the elevation of the cabinets you have placed on the other side of the wall.
To flip the wall:
- Click on the Flip button located in the middle of the tool box.
Rotating the Room Left, Right, Up, or Down
To rotate the 3-D view:
That information is described in the The Tour section of this help file.
Changing to a Different Room
To View a Different Room:
- In the Tool Box to the right, locate the display underneath the words Select Current Room. The name of the room currently being viewed will be displayed.
- Locate the small arrow at the end of the display. Click on the Arrow and a drop down menu will appear.
- Click on the name of the room you want to be displayed. The name of the room will appear in the display and you will now see the first wall of that room in the Drawing Screen.
- You can also change to a different wall by clicking on the name of the wall currently being displayed. The name of the wall will be highlighted in black. Type in the name of the wall you want to display. The new wall will appear in the Drawing Screen and the name of the wall will appear in the display.