Fillers (Euro Only)
Fillers (Euro Only)
This standard only appears when your standards are set to do Euro style construction as there are no end scribes in Euro because there is no face frame. However, it is still necessary to keep your cabinets and cabinet doors away from walls and ceilings. In Euro style, this is done with fillers.
In this section, you specify the size of fillers in the different situations you will find yourself in. These fillers will be automatically placed in for you when you place your cabinets. Note: If you set a filler size to 0", no filler will be placed in that situation.
Explanation of where filler will be automatically placed:
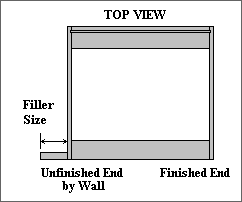
- Filler Width (base to wall): This filler is helpful in two ways; 1. It gives some space between your cabinet and the wall so that your doors can open further, 2. It gives you a piece that you can scribe to the wall if it is out of plum. Enter the size of the filler you want between your base cabinet and the wall.
- Note: This is the filler placed at the end of a run of base cabinets and the wall. A different standard will be used for blind corners.
- Filler Width (upper to wall): This filler is helpful in two ways; 1. It gives some space between your cabinet and the wall so that your doors can open further, 2. It gives you a piece that you can scribe to the wall if it is out of plum. Enter the size of the filler you want between your upper cabinet and the wall.
- Note: This is the filler placed at the end of a run of upper cabinets and the wall. A different standard will be used for blind corners.
- Filler Width (by appliance): There are situations in which you may want a filler between a cabinet and an appliance. For example, a particular appliance might come with a trim kit that you want to use. Adding a filler gives you something to connect that trim kit to. Enter the size of the filler you want between your cabinets and an appliance.
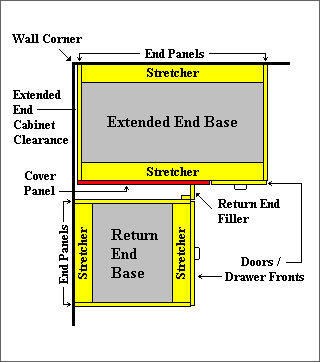
- Return End Filler (base): This filler allows you to create a corner space in a base blind corner situation. This is needed so that doors and drawer fronts aren't bumping and binding with each other in the corners. Enter the size of the filler you want between your return end base cabinet and the extended end base cabinet, (blind corner cabinet).
- Return End Filler (upper): This filler allows you to create a corner space in a upper blind corner situation. This is needed so that your doors aren't bumping and binding with each other in the corners. Enter the size of the filler you want between your return end upper cabinet and the extended end upper cabinet, (blind corner cabinet).
- Extended End Corner Space (base): his dimension is used for either the extension of the Cover Panel or the width of the Cover Panel Filler. Its purpose serves the same as a return end filler in that it is the second half of the space needed in a corner. This is needed so that your doors aren't bumping and binding with each other in the corners. Enter the dimension you want to add to your base extended end cover panel. To include a Cover Panel Filler, see Construction Methods II in Standards.
- Extended End Corner Space (upper): This dimension is used for either the extension of the Cover Panel or the width of the Cover Panel Filler. Its purpose serves the same as a return end filler in that it is the second half of the space needed in a corner. This is needed so that your doors aren't bumping and binding with each other in the corners. Enter the dimension you want to add to your upper extended end cover panel. To include a Cover Panel Filler, see Construction Methods II in Standards.
- Extended End Wall Clearance (Base): (Extended End may be a new term for some. Extended End Cabinets are the same thing as "Blind Corner Cabinets".) Enter the distance between the wall and the end panel of the base extended end. (In case the walls are out of square, one often leaves some distance here so that the line of cabinets is not affected.)
- Extended End Wall Clearance (Upper): (Extended End may be a new term for some. Extended End Cabinets are the same thing as "Blind Corner Cabinets".) Enter the distance between the wall and the end panel of the upper extended end. (In case the walls are out of square, one often leaves some distance here so that the line of cabinets is not affected.)
- Add filler when cabinets differ in depth by: There are times when two cabinets will be next to each other, but one cabinet, (like a full height pantry), may be so much deeper than the cabinet next to it, that it needs to be treated like a wall and have a filler placed between it and the cabinet next to it. This is the place where you can set the depth differences where you would like this to happen. If you never want it to happen, just put in a very large depth difference, like 50", and you should never have to worry about it.