Editing Walls
Editing Walls
To select a wall to be edited
- Click on the "Edit Wall" radio button.
- Now move your mouse cursor into the drawing screen. As you move your mouse around you will notice that the wall that the mouse is closest to will change colors or "highlight". Click the mouse when the wall that you wish to edit is highlighted. An edit window will appear with the following wall edit options available.
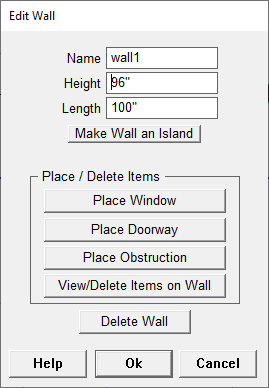
Wall Name
You can change the name of a wall at any time.
To change the name of a wall:
- Follow the steps to select the wall.
- In the entry field after Wall Name, type in the new name of the wall.
- Click on the Accept button when the correct wall name is displayed.
Wall Height
You can change the height of a wall at any time.
To change the height of a wall:
- Follow the step to select the wall.
- In the entry field after Wall Height, type in the new wall height.
- Click on the Accept button when correct wall height is displayed.
- NOTE: Several of the standards use the height of the wall as part of the calculations for cabinet heights. Make sure to verify that when you change the ceiling height, you adjust your cabinets accordingly.
Wall Length
You can change the length of a wall at any time.
To change the length of a wall:
- Follow the steps to select the wall.
- A dialog box will appear. Click on the Resize Wall button to change the length of the wall.
- In the dialog box, click on the Change Wall at the Square button or on the Change Wall at the Star button. (The wall that you have selected will have a square at one end and a star at the other. The button you select determines which side of the wall is shortened or lengthened.)
- Another dialog box will appear. Type in the new length of the wall or change the displayed length by using the arrows next to ft (feet), in (inches), or 32nds (of an inch).
- Click on the Accept button when the correct wall size is displayed.
- NOTE: The affects of this change can be quite significant. When you change the size of a wall, one of the wall ends has to change it's position. If you have already drawn a wall connected to the wall end you are moving, that connection will be broken and the cabinets placed in the corner will no longer work as if they are in a corner. To reestablish a corner, the connecting wall will need to be redrawn. Also, if you've already placed cabinets on the wall whose size you are changing, those cabinets will not know how to adjust to the new size. You will have to make adjustments to those cabinets in the Place Cabinets screen after your done editing the wall. We highly recommend using measurements you have acquired from the actual job site for your wall lengths when drawing them, to avoid having to make these changes which may make you redo some of your work.
Deleting a Wall
You can delete a wall at any time.
To delete a wall:
- Follow the steps to select the wall.
- A dialog box will appear. Click on the Delete Wall button to delete the wall.
- NOTE: Be careful when you delete a wall. If you have already placed cabinets, appliances, windows, doors, or obstructions on a wall, those items will be deleted if you delete the wall.
Placing Windows, Doors, and Obstructions
You may place windows, doors, and obstructions at any time. An obstruction may be anything you want to be reminded of, like plumbing around a sink, or outlets that will require the cutting of a back, etc.
To place a window, door, or obstruction:
- Follow the steps to select the wall.
- A dialog box will appear. In the lower half of the dialog box will be the following buttons: Place Window, Place Door, and Place Obstruction. Click on the button representing the item you want to place.
- A new dialog box will appear.
- If you center align your windows, doors, or obstructions, check the Center Align button to align the object by its center. The value you put in Distance from Square will be used to center align the object. The Center Line value will be shown on the Elevations for the respected wall.
- Enter the height of the item you are placing.
- Enter the width.
- Either enter the distance from the square or press the Tab key and enter the distance from the star. Cabinet Solutions will automatically calculate the other distance.
- Enter the height from the floor.
- If you are placing an obstruction type in the name of the obstruction.
- Click on the Accept button to place the item, or click on the Cancel button to cancel.
Deleting Windows, Doors and Obstructions
You can delete all of the windows, doors and obstructions that you place. You can delete them individually, or all at once.
To delete windows, doors, and obstructions:
- Follow the steps to select the wall.
- A dialog box will appear. Click on the View/Delete Items on Wall button located near the bottom of the dialog box.
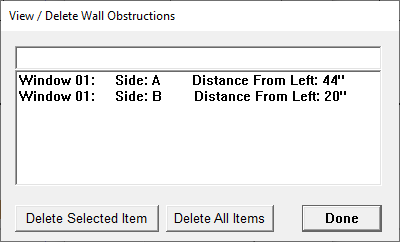
- In the dialog box that appears, there is a list of all the items on that wall.
- NOTE: There are two sides to every item. Side A and side B. Items such as windows and doors can be seen on both sides. Items such as obstructions (light switches, electrical outlets, etc.) might only be seen on one side, so here you can delete the side you don.t want. The "Distance From Left:" will help you determine which side to delete. This assumes you are looking at the wall head on.
- To delete an item, position the mouse over the item you wish to delete, click the left mouse button to select it. Then click the button Delete Selected Item.
- To delete all the items on the wall, click the Delete All Items button.
- NOTE: The Delete All Items button only deletes windows, doors, and obstructions. This button does not delete cabinets or appliances that you have placed. However, it will delete all the windows, doors, and obstructions that have been placed on the wall.
Deleting a Wall
You can delete a wall at any time.
To delete a wall:
- Follow the steps to select the wall.
- A dialog box will appear. Click on the Delete Wall button to delete the wall.
- NOTE: Be careful when you delete a wall. If you have already placed cabinets, appliances, windows, doors, or obstructions on a wall, those items will be deleted if you delete the wall.
Placing Windows, Doors, and Obstructions
You may place windows, doors, and obstructions at any time. An obstruction may be anything you want to be reminded of, like plumbing around a sink, or outlets that will require the cutting of a back, etc.
To place a window, door, or obstruction:
- Follow the steps to select the wall.
- A dialog box will appear. In the lower half of the dialog box will be the following buttons: Place Window, Place Door, and Place Obstruction. Click on the button representing the item you want to place.
- A new dialog box will appear.
- If you center align your windows, doors, or obstructions, check the Center Align button to align the object by its center. The value you put in Distance from Square will be used to center align the object. The Center Line value will be shown on the Elevations for the respected wall.
- Enter the height of the item you are placing.
- Enter the width.
- Either enter the distance from the square or press the Tab key and enter the distance from the star. Cabinet Solutions will automatically calculate the other distance.
- Enter the height from the floor.
- If you are placing an obstruction type in the name of the obstruction.
- Click on the Accept button to place the item, or click on the Cancel button to cancel.
Deleting Windows, Doors and Obstructions
You can delete all of the windows, doors and obstructions that you place. You can delete them individually, or all at once.
To delete windows, doors, and obstructions:
- Follow the steps to select the wall.
- A dialog box will appear. Click on the View/Delete Items on Wall button located near the bottom of the dialog box.
- In the dialog box that appears, there is a list of all the items on that wall.
- Note: There are two sides to every item. Side A and side B. Items such as windows and doors can be seen on both sides. Items such as obstructions (light switches, electrical outlets, etc.) might only be seen on one side, so here you can delete the side you don't want. The "Distance From Left:" will help you determine which side to delete. This assumes you are looking at the wall head on.
- To delete an item, position the mouse over the item you wish to delete, click the left mouse button to select it. Then click the button Delete Selected Item.
- To delete all the items on the wall, click the Delete All Items button.
- NOTE: The Delete All Items button only deletes windows, doors, and obstructions. This button does not delete cabinets or appliances that you have placed. However, it will delete all the windows, doors, and obstructions that have been placed on the wall.