To Place Cabinets
To Place Cabinets
- In the right middle of the screen, locate the icon (picture) of the type of cabinet you want to place. Click on the icon of the cabinet you want to place.
- A dialog box will appear with the title of "Cabinet Specifications".
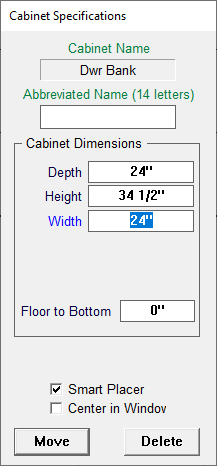
- The "Cabinet Specifications" box that appears is the first step in collecting information about this particular cabinet. It is here that you will set the basic overall size (height, width, depth) of the cabinet that you are placing. If the cabinet is an upper or will be above the floor, you will also set the height it sits off the floor. If the cabinet is to have shelves, this is where you enter general information on the number of shelves this cabinet will have per opening.
Later, you will be able to customize any cabinet to have multiple sections and set each section up with a different number of shelves if you so desire. The "entry fields" in this specifications window will already have values when you pick a cabinet to be placed. These "default" values come from your Job Standards. Many of the defaults, such as the cabinets depth may never need adjusting but others such as the cabinet widths will need to be set almost every time you place a new cabinet. Type in the new dimensions by first highlighting the old value using the mouse. You may also change the value by using the arrow buttons.
NOTE: Be sure to give the cabinet all the correct information at this point. As always, this can be changed at a later time but it is easiest if the correct dimensions have already been entered the first time around.
- You can turn the Smart Placer off by clicking on the box in front of Smart Placer so that it is no longer checked.
- If you are placing a sink cabinet, a special feature is available to you. It is a setting that causes the sink (or any cabinet) to automatically center on a window. A check in the box will cause your cabinet to be automatically centered on the window that the cabinet is placed nearest to.
- Under the words Abbreviated Name (14 letters):, you can type in an abbreviated "nick name" for the cabinet. This name will only show up in reports where the type of the cabinet would normally be displayed. Example: If the type of the cabinet was a Full Ht Pantry, many people would not want Full Ht Pantry to be displayed when the cabinet was to be an Entertainment Center. Therefore, if there is anything in the Abbreviated Name entry field, where it normally used to display Full Ht Pantry on reports, it will now display the Abbreviated Name, for example: Ent. Center.
- When you are done specifying the dimensions of a cabinet, click on the Place Cabinet button in the bottom of the dialog box. To cancel the cabinet, click on the Cancel Cabinet button.
- After you click on the Place Cabinet button, the cabinet will appear on the drawing screen. Move the mouse to position the cabinet. Pause to let the cabinet settle in that spot then click the mouse button to place the cabinet in the spot you have chosen. (Notice that in the lower right part of the screen the distances from the sides of the cabinet to the ends of the wall are displayed.)
For most people, placing a cabinet with precision using a mouse will be difficult --- thus, the invention of Smart Placer. With Smart Placer on, cabinets will not overlap other cabinets or walls. This allows you to begin laying out cabinets by picking a size then overlapping it with a wall or an adjoining cabinet. - Repeat the steps above until you have finished placing all the cabinets in the room.
Note: It is recommended that you begin laying out a room from the corner and work your way out, or to place the sink under a window and work off that fixed position. This always gives you an already placed cabinet to overlap.
Special Feature: You will notice as you place cabinets along the wall that the dimensions of each cabinet is displayed on the Floor Plan. Also, the space remaining on the wall will be displayed as well, helping you to determine what size cabinets to use in your design.
Special Instructions Regarding Corner Cabinets: Base and upper corner cabinets need to be placed in a special way. Although these cabinets will in reality be connected to both walls that make up the corner, Cabinet Solutions only sees it as being connected to the right wall that makes up the corner. Therefore, as you drag your corner cabinet into the corner, it is most effective to drag it along the right wall into the corner.