Doors
Doors & Drawer Fronts
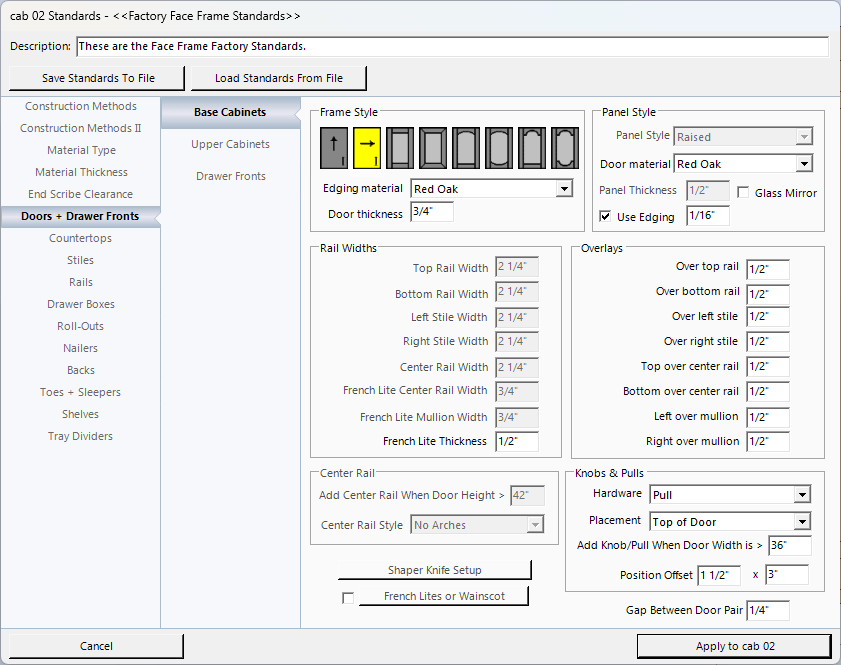
In this section you will choose the door style you want on your cabinets in this job. Cabinet Solutions allows you a lot of flexibility in placing doors. You can place a different door styles on upper cabinets than on base cabinets and different styles on drawers. Later in this manual you will learn how to change the door style of any cabinet within a room or even change the door style of one particular opening in a cabinet. The door standard section allows you to enter the standards that control the production of the cut list for the door parts. Even if you do not build your own doors, you may want to set the sizes to the approximate size that your door company uses so your pictures will most closely represent what the customer will actually be getting.
To select a door style:
- Click on the button in standards labeled Doors + Drawer Fronts.
- In the window that opens, choose between Upper Doors, Base Doors or Drawer Fronts.
- Click on the "Basic Door Style" you want for the cabinets. The styles are as follows:
- slab door with vertical grain
- slab door with horizontal grain
- square frame door
- square frame miter door
- square frame door with simple top arch
- square frame door with simple top & bottom arch
- square frame door with cathedral top arch
- square frame door with cathedral top & bottom arch
- Select the "Panel Style" if you are using any of the frame doors:
- glass (including mirrors)
- raised
- recessed
- frame only (no panels)
- one-piece recessed back (also called a back panel door)
Note: If you selected to use a "slab door" a check box and an entry field will appear that allow you to choose to use edging on the doors and to give that edging a thickness.
Center Rail
Earlier you set a standard to add a center rail when a door gets to a certain size. This section will control how that added center rail will be cut. You may be arching your top or bottom rail. Do you want an arch cut in the center rail? Do you want it arched for the bottom panel only or both the top and bottom panels?
- No Arches: This option will always put a straight center rail in your doors.
- Arch Top Edge Only: This option will cut an arch in the top side of the center rail.
- Arch Bottom Edge Only: This option will cut an arch in the bottom side of the center rail.
- Arch Top and Bottom Edges: This option will cut an arch in the top and bottom side of the center rail.
Overlays in Cabinet Solutions are designed to start from the size of the opening (door/drawer, door/door, and drawer/drawer depending on the style of cabinet that is being used) and expand outward in order to get the reveal that is needed. While that sounds simple, it can be confusing at first. Depending on if the job is built in Face Frame or Euro, the information to change is the same, but the names may be different. Below are the 2 different screens to show you the name differences:
|
|
|
|
|
Face Frame |
|
Euro |
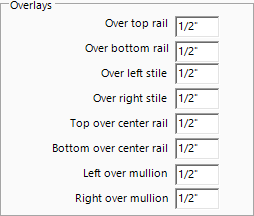
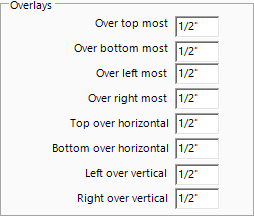
The top 4 items on the list: Over Top (Rail/Most), Over Bottom (Rail/Most), Over Left (Stile/Most) and Over Right (Stile/Most) are referring the outer edges of the cabinet face. The bottom 4 items on the list: Top Over (Center Rail/Horizontal), Bottom Over (Center Rail/Horizontal), Left over (Mullion/Vertical), and Right over (Mullion/Vertical) are referring to the inside of the cabinet face. Below is an image to help give a better idea:
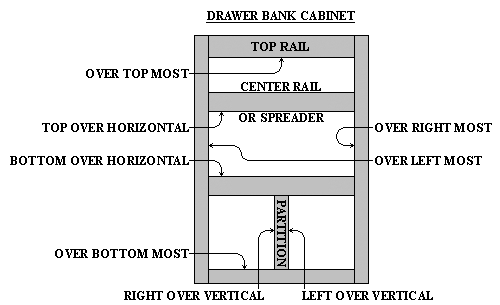
Euro Overlays
Face Frame overlays are fairly straight forward since there's a wider area between openings, either a rail or stile. Euro overlays are more difficult because they are generally over a horizontal partition (or spreader/stretcher) or vertical partition. Keep in mind that in a traditional European style cabinet, the horizontal partition (not spreader), and vertical partition does not exist.
Since Euro cabinets do not have a Face Frame, setting up the overlays involves a bit of math to get correct. The formula that we use for measuring out the reveal for inside parts is: Thickness of your divider, minus the desired gap, divided by 2, or (T-G)/2.
Example: My spreader is 3/4" thick and I want to have 1/8" gap between my drawer fronts. So my equation would look like this, 3/4 - 1/8, which is 5/8, and then I need to take that and divide it in half, which comes out to 5/16. So I would put in my Top and Bottom over Horizontal to be 5/16". If I wanted everything to be symmetrical, I would also set that to be my Left/Right over Vertical.
This works in most situations. You may notice that in a 3 Drawer bank, the bottom 2 drawer fronts may not be the same size. The reason for that is simple, the top of the bottom drawer front, and bottom of the drawer front above it are using the Top/Bottom over horizontal measurements but the bottom of the bottom drawer front is using the Over Bottom Most measurement. If that measurement isn't the same as bottom over horizontal, then that drawer front will be a different size. On a 4 drawer bank, the middle 2 drawer fronts will be the same size because they are using the same Top/Bottom over horizontal measurements.
Knobs / Pulls
You can customize the placement of knobs or pulls in Job Standards for your Upper Doors, Base Doors, and Drawer Fronts. You can even customize each individual opening's knob or pull placement through Openings / Rollouts.
Choose Hardware:
- None: Click this radio button if you will not be using any knobs or pulls for this door.
- Knobs: Click this radio button if you will be using knobs for this door.
- Pulls: Click this radio button if you will be using pulls for this door.
Choose Placement:
- Center of Door: Click this radio button if you would like the knob or pull to be centered on the door. This is useful for drawer-fronts, etc.
- Top of Stile: Click this radio button if you would like the knob or pull to be placed at the top of the stile. If you are doing European construction, the knob or pull will be placed at the top edge of the door.
- Middle of Stile: Click this radio button if you would like the knob or pull to be placed in the middle of the stile (vertically). If you are doing European construction, the knob or pull will be placed in the middle edge (vertically) of the door.
- Bottom of Stile: Click this radio button if you would like the knob or pull to be placed at the bottom of the stile. If you are doing European construction, the knob or pull will be placed at the bottom edge of the door.
- Add Knob/Pull When Door Width Is >: If you would like an extra knob or pull added when the door's width is greater than a certain amount, then enter that width here. The knobs or pulls will be positioned proportionally to the edge of the door. This is useful for drawer-fronts that need two knobs or pulls. (If you would not like an additional knob or pull added then make the amount very large so that the width would never exceed that amount.)
Position Offset: This section allows you to set the position of the door pull or knob on the door itself when Slab style doors are selected. Please note this doesn't get displayed if the Placement is set to center of door.
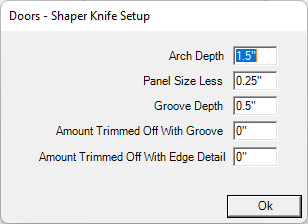
Note: Arch Depth is set in the Doors - Shaper Knife Setup window below. Wainscot Standards
Doors - Shaper Knife Setup Window:
|
|
|
|
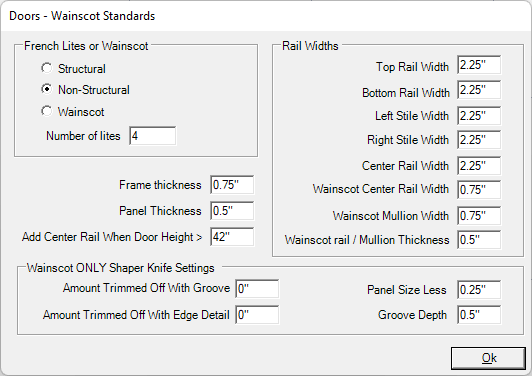
Doors - Wainscot Standards Window:
|
|
|
The following 4 standards for left & right stile and top & bottom rail widths should be given finished sizes. If you cut these pieces oversize and then trim small amounts off when the panel groove is cut and the edge detail is put on, there will be other standards to use to enter that information so your cut-list is correct.
Wainscot ONLY Shaper Knife Settings
|