Movement
Movement
Movement in the Tour can be done in 2 different ways. The first method uses keyboard and mouse controls to move around the job, and the second method uses the on screen buttons. Both methods have their pros and cons, but each accomplish the same thing, moving around the job.
First Method - Keyboard and Mouse:
Each key or key combination described below will continue to move the camera around the room until the key or keys are released. The highlighted keys on the image below are the ones that are used in our software. Below them are the descriptions of what they do:

|
W or Up Arrow |
|
Moves the camera Forward (Zoom In) |
|
S or Down Arrow |
|
Moves the camera Backward (Zoom Out) |
|
A or Left Arrow |
|
Rotates the camera Left (Pan Left) |
|
D or Right Arrow |
|
Rotates the camera Right (Pan Right) |
|
Q |
|
Raises the camera up |
|
E |
|
Lowers the camera |
|
Space Bar |
|
Hides/Shows panels on the screen (Press 1 time to hide, again to show) |
Using the mouse with the keyboard movements gives different results to help move around the job better. All movements that include a + means that both keys need to be held at the same time:

|
Left Click (on it's own) |
|
Currently it does nothing in regards to controlling movement |
|
Right Click + W or Up Arrow |
|
Moves the camera Forward at twice the speed (Zoom In) |
|
Right Click + S or Down Arrow |
|
Moves the camera Backward at twice the speed (Zoom Out) |
|
Right Click + A or Left Arrow |
|
Slides the camera to the Left (DOES NOT ROTATE) |
|
Right Click + D or Right Arrow |
|
Slides the camera to the Right (DOES NOT ROTATE) |
|
Right Click (on it's own) |
|
Free Look (No other movement) |
Second Method - On Screen Buttons:
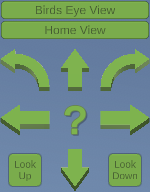
Some customers may have an easier time clicking the on screen buttons vs using a keyboard and mouse, especially if using a Laptop PC or a Tablet PC with a touch screen, such as the Surface Book or Surface Pro PC. This also moves the camera around in the job however, each click only goes a preset distance per click.
|
|
|
This is the movement control section from the top left of the Tour. The buttons are all explained below. This control section can be hidden or shown via the Settings panel. |
BUTTON EXPLAINATIONS
|
|
|
This button takes a Birds Eye View of the current room. It makes the camera extremely tall and points it facing down to give an overhead view |
|
|
|||||||||||||||||||||||||||||||||
|
|
|
|
|
||||||||||||||||||||||||||||||||||
|
|
|
This returns the camera to the initial view of the room. Keep in mind that if the camera is MANUALLY SET (not using Birds Eye) then the camera will not reset the height, just face the camera forward. The height would need to be adjusted manually at that point. |
|


