The Edit Elevations Screen
The Edit Elevations Screen
After you have drawn your floor plan, you can view and edit your wall elevations. To view wall elevations and edit cabinets, first proceed to the "Edit Elevations Screen".
To proceed to the "Edit Elevations Screen":
- If you are in the "Place Cabinets Screen", click on the Edit Elevations button or click on View in the menu bar. Then click on Edit Elevations in the drop down list or press F7 on your keyboard.

Elevations with or with out doors showing:
When the Edit Elevations Screen appears, the drawing screen will display the first wall that you drew in the Draw Walls Screen or the last wall you selected to display in the Tool Box.
Cabinet Solutions gives you 2 different views of your wall Elevations; either with doors or without. Viewing the elevations without the doors allows you to see into the cabinets and see things like the number of shelves in a particular cabinet or whether those shelves are fixed (red) or adjustable (green). It also lets you see some of the cabinet front dimension lines. Viewing the elevations with the doors gives you a more colorful view and helps you to see how the doors sizes look in comparison to one another. This view also removes many of the dimension lines to provide a more realistic picture to show your customers.

Controlling Your Room View
To change elevation view:
- Click on the check box in front of the label Display Doors in the Tool Box at the left of the screen. If the box is checked, the doors will be displayed in the elevation.
- Removing the check in the box removes the doors from your elevations.
- Click on the check box in front of the label Display Counters in the Tool Box at the left of the screen. If the box is checked, the counter tops on the cabinets will be displayed in the elevation.
- Removing the check in the box removes the counter tops from your elevations.
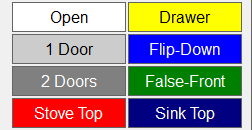
- NOTE: In the Elevations view without the doors, the openings will be color-coded. The colors are associated with the opening type as follows:
|
White = Open |
Yellow = Drawer |
|
Light Gray = 1 Door |
Royal Blue = Flip Down |
|
Dark Gray = 2 Doors |
Forest Green = False Front |
|
Red = Stove Top |
Dark Blue = Sink Top |
Selecting a Cabinet to Edit
To edit a cabinet, you must first select the cabinet you want to edit.
- Note: This section is in reference to editing a cabinets elevation. It is quite different then editing the cabinet in The Place Cabinet Screen! The editing done in the "Place Cabinet Screen" relates to changes in the overall size of a cabinet or it's placement. Editing in the "Edit Elevation Screen" relates to additions, deletions, or changes to the particulars of the cabinet you choose.
To select a cabinet to be edited:
- Be sure you are in the Edit Elevations Screen.
- Move the mouse into the drawing screen and highlight the cabinet you want to edit. (Pause to allow the highlight to settle on the cabinet you have chosen.)
- Click the mouse button to select the highlighted cabinet for editing.
- A new tool box will appear. In that tool box, all of the editing features mentioned above are available.
Editing Cabinets
In the Wall Elevations Screen, you can edit cabinets in the following ways:
- You can quickly add particular cabinet parts.
- You can delete cabinet parts or boards.
- You can edit openings by changing the opening's dimensions or by changing the type of opening. You can also edit the number of roll-outs in each opening.
- You can edit the number of shelves in each opening. You can even change the type of shelves (fixed or adjustable) in a cabinet.
- You can modify the type of end that a cabinet has on either side. Included in this feature is modifying a finished end so that it has a door panel as an end.
- You can view the cut list of the cabinet you have selected and you can add specialty parts to that cut list.
- You can adjust the standards for the cabinet you are editing.
- You can save the cabinet as a custom cabinet. Then in future jobs you can place the cabinet in the Place Cabinets Screen by clicking on the icon labeled Custom.