Backs
Backs
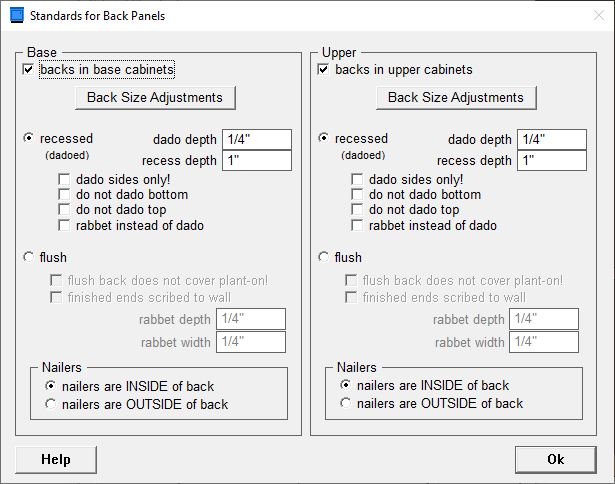
In this section you set up the way backs will be placed in your cabinets, if your cabinets have backs at all. You are given separate controls for the way the backs are done in base cabinets and upper cabinets. Full height cabinets will follow the settings for base cabinets.
Explanation of Back Specifications
- Backs in Cabinets: If the cabinets are to have backs, click on the box until it is checked. If this box is not checked, no backs will be placed in your cabinets.
- Back Size Adjustments
Back Size Adjustments:
- Extend top of back up(+) or down (-): Enter a positive number (+) to raise the top of the back. Enter a negative number (-) to lower the top of the back. This option is only available for: Dado/Rabbet Sides Only, Do Not Dado Top, and when the back is Flush.
- Extend btm of back up(-) or down (+): Enter a negative number (-) to raise the bottom of the back. Enter a positive number (+) to lower the bottom of the back. This option is only available for: Dado/Rabbet Sides Only, Do Not Dado Bottom, and when the back is Flush.
Center Back Size:
- Use Maximum Center Back Size (Euro Only): Check this box if you want to use the maximum size the Center Back Panel can be. This is helpful to optimize the saving of material.
- From Back Intersection (Euro Only): Enter the distance from where the Corner (Left) Back and the (Right) Back meet or intersect, and where the Center Back Panel will be placed.
- Recessed: If you are dado'ing or rabbet'ing the back into the box parts of the cabinet, click on the radio button until it is selected. When the backs are recessed, Cabinet Solutions allows the nailers to be placed both inside and outside the back. If you will be putting the nailers behind the back it is important to make sure that the recess depth is equal to or greater than the sum of the back thickness plus the nailer thickness.
- Dado Depth/Rabbet Depth: Enter the depth of the dadoes or rabbets that will be cut for the backs.
- Recess Depth/Rabbet Width: Enter the distance from the wall that the back is recessed. This distance is from the wall to the inside of the back depth. (Example: with 1/4 inch back material and 3/4 inch inset nailer, the dado recess/rabbet width is 1 inch.)
- Dado/Rabbet Sides Only: If you dado or rabbet your backs into your sides, but you cut your tops and bottoms short to slide your backs through, click your mouse to place a check in this box.
- Rabbet Instead of Dado: If you rabbet your backs instead of dado'ing them while the backs are recessed, then click your mouse to place a check in this box. Note: The rabbet width will not effect nailers unless they are outside the back.
- Flush: If you are not using dadoes or rabbets but instead will be placing the back flush on the cabinet, click on the radio button until it is selected. Note: Be aware, Cabinet Solutions allows you to place nailers inside or outside flush mounted backs. Be sure they are placed where you want them because if they go outside a flush back the size of the end panels will adjust to accommodate them.
- Finished Ends Scribed to Wall: If you are putting your backs on flush but you want to rabbet the back into the finished ends so that they will not be seen, click the check box until it is checked. Then enter the corresponding rabbet depth and width.
- Finished End Rabbet Depth: Enter the depth that the rabbet is cut into the finished end.
- Finished End Rabbet Width: Enter the width that the rabbet is cut into the finished end. (This distance is from the wall to the front side of the back). If the nailers are outside the back be sure that your recess width is equal to or greater than the sum of the back thickness plus the nailer thickness. (Example: with 1/4 inch back material and 3/4 inch nailer, the rabbet width should be at least 1 inch.)
- Nailers are Inside of Back --- This radio button will locate your nailer on the interior side of the base cabinet back. If there is no back, the nailer will be placed between the sides.
- Nailers are Outside of Back --- This radio button will locate your nailer on the exterior side of the base cabinet back. If there is no back, the nailer will be placed behind the sides.