Construction Methods II
Construction Methods II
Top Panel Construction
- Tops in Uppers: Check this box if your upper cabinets have a top panels.
- Tops in Bases: Check this box if your base cabinets have a top panels.
End Panel Construction
The weight of your counter tops and base cabinets has to be transferred to the floor. Typically this is accomplished either through the side panels of the cabinet going to the floor or through a separate "toe" assembly that the cabinet sits on. Related to this is the length of your side panels. By default, Cabinet Solutions runs all the finished ends (or exposed ends) to the bottom of the face frame (if a face frame is being used.) The unfinished ends by default, do not go to the bottom of the face frame. They come down to the bottom of the bottom panel. Cabinet Solutions allows you to change this to where all the panels come down to the bottom of the face frame (UE Panels same height as FE Panels) or unfinished end panels can sit on the bottom like a partition by selecting (End Panels same size as Partitions). Finally, you can chose to run all your base end panels to the floor.
Uppers
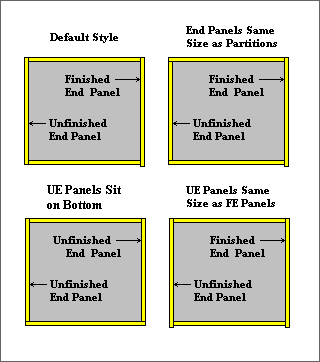
- Default: If you sandwich your top and bottom panels between your end panels and your unfinished end panels come down to the bottom of your cabinet bottom, then click this radio button.
- Top Not Sandwiched: If you sandwich your bottom panels between your end panels but do not sandwich your top panels between your end panels, check this box.
- End Panels same size as Partitions: If you sandwich your end panels between your top and bottom so all your vertical supports are of equal size, check this box.
- UE Panels Sit on Bottom: If your unfinished end panels come down to the top of your cabinet bottom, check this box.
- Widen Bottom To Edge of Stile (Face Frame only): If you would like the edge of your bottom panels to be flush with the outside edge of the stile, check this box. This is useful for closing the gap between cabinets or when against a wall.
- UE Panels same height as FE Panels: If your unfinished end panels come down to the bottom of your face frame, like your finished end panels, check this box.
Bases
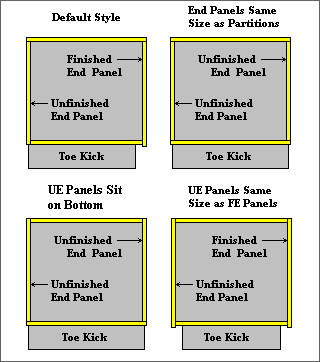
- Side Panels Touch Floor: If you run your end panels to the floor rather than placing a separate toe kick on each cabinet click on this radio button.
- Toe With Sleepers (Default): If you put on a separate toe so your end panels do not extend to the floor and you sandwich your tops and bottoms between your end panels, turn on this radio button and only this button. This is also the radio button to have on if you use leg levelers.
- Top Not Sandwiched: If you sandwich your bottom panels between your end panels but do not sandwich your top panels between your end panels, check this box.
- End Panels same size as Partitions: If you sandwich your end panels between your top and bottom so all your vertical supports are of equal size, check this box.
- UE Panels Sit on Bottom: If your unfinished end panels come down to the top of your cabinet bottom, check this box.
- Widen Bottom To Edge of Stile (Face Frame only): If you would like the edge of your bottom panels to be flush with the outside edge of the stile, check this box. This is useful for closing the gap between cabinets or when against a wall.
- UE Panels same height as FE Panels: If your unfinished end panels come down to the bottom of your face frame, like your finished end panels, check this box.
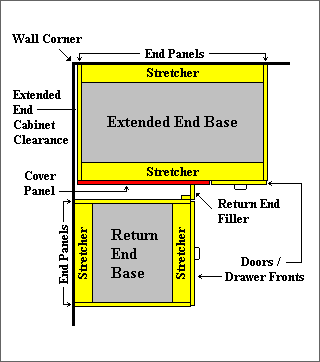
Extended End Construction Method
Extended Ends (sometimes referred to as blind corner cabinets) can be configured in a number of different ways depending on how you fasten on the cover panel.
To specify the extended end construction method:
- Click on the check box indicating whether you will be attaching a cover panel or not.
- Enter the cover panel thickness in the entry field.
- Next, click on the radio button for either insetting or flush mounting the cover panel.
- If you are building Euro cabinets, another option is given to you, that is to make the cover panel one piece with the extended end filler or two separate pieces.
- Add Cover Panel: A check in the check box indicates you will be attaching a cover panel. Click the box to remove the check and the cover panel will be left off your cut list.
- Cover Panel Thickness: Enter the cover panel thickness in the entry field.
- Inset Cover Panel: Set this radio button if you fasten the cover panel between the bottom and the top of the cabinet (or top front stretcher). Note: If you change this option to flush after you place the return cabinet, the return cabinet's measurements will be wrong because it will reflect the difference of the cover panel thickness.
- Flush Cover Panel: Set this radio button if you fasten the cover panel over the front edge of the top and bottom of the cabinet. Note: If you change this option to inset after you place the return cabinet, the return cabinet's measurements will be wrong because it will reflect the difference of the cover panel thickness.
- (Euro Only) Filler Plus Cover Panel: Check this box if your cover panel and corner filler piece are 2 separate pieces in your corner assembly. You can still fasten the cover panel as an inset piece or a flush piece.
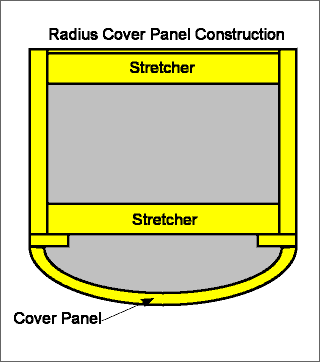
Radius Construction
Radius cabinets can be configured with or without a cover panel.
To specify the radius construction method:
- Click on the check box indicating whether you will be attaching a cover panel or not.
- Enter the cover panel thickness in the entry field.
- Add Cover Panel: A check in the check box indicates you will be attaching a cover panel. Click the box to remove the check and the cover panel will be left off your cut list.
- Cover Panel Thickness: Enter the cover panel thickness in the entry field.