Openings / Roll-outs
Openings / Roll-outs
Making changes to an openings or adding a rollout to an opening:
- Follow the instruction to select a cabinet.
- In the tool box that appears, click on the Openings / Rollouts button.
- In the new dialog box that appears, click on the opening that you want to edit.As you can see, there are many options when it comes to editing an opening. Which options are functional when you go into this new dialog box depends on what kind of opening you are working with. If the opening has doors covering it, you will be able to add rollout shelves behind the doors. If the opening is going to have an appliance inside it, the only option that will be working is the sizing edit fields.
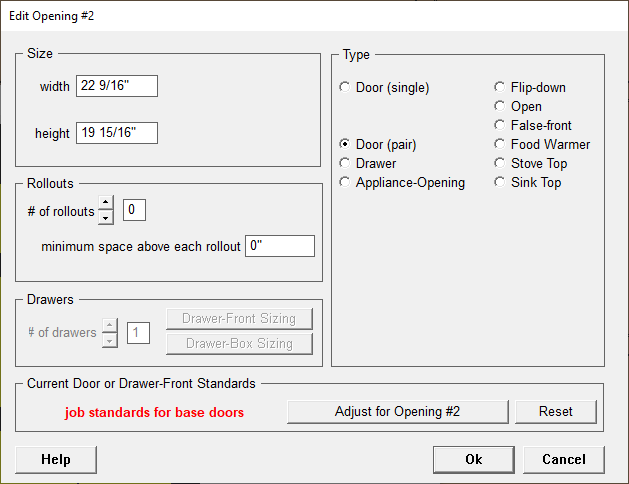
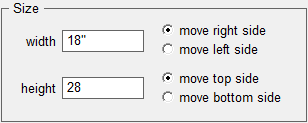
- To change the size of the opening (i.e. its height or its width), find the Height or Width entry field and type in the size you want the opening to be. This can only be done if you are moving parts that can be moved without affecting the overall cabinet size. For example, you can move a center rail that sits between the top drawer in a cabinet and the door below it, but you can't move the top rail above the top drawer in that cabinet since to move that top rail actually makes the cabinet taller. To move that top rail, you have to resize the entire cabinet.Note: The program needs to know which side of the opening to move: Left or Right, Top or Bottom. Click on the radio button indicating which side of the opening you want moved.
- To change the opening Type, simply click on the appropriate radio button.
- To change the type of appliance in the opening, select the Appliance-Opening radio button. A drop down list will appear. Click the arrow to the right of the drop down list and select the type of appliance you want in the opening. If you want to change the dimensions and placement of the appliance in the opening, follow the directions for Modifying an Appliance Opening.
- Custom Hood: Click the Custom Hood check box if you would like to display a range hood in the Enhanced 3-D. Checking Custom Hood will set the opening to a false-front, remove interior parts such as shelves, and remove knobs/pulls. There will be no job costing nor parts cut-list and it will only show up in the Enhanced 3-D. However, you can view the overall door size under the Master Cut-List.
- If the opening is a Door (single) or Door (pair) or Open (meaning nothing is covering the opening like in a bookcase), you can then add rollout shelves to the opening. To do this, enter the number of rollout shelves you want in the "# of rollouts" entry field.
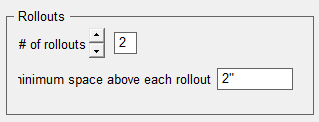
- You can also use the Arrow buttons to increase or decrease the number of rollouts in the opening. You can also set the "minimum space above each rollout". This number insures that your rollouts stay a certain distance apart.
- If the opening is set to Drawer, the "Drawers" section of this dialog box will be enabled. This box allows you to add more than one drawer to a single opening. This is often the case when you are building frameless cabinets.

- If you have at least one drawer in a single opening, you can set the sizes for the drawer boxes. Click the button labeled "Drawer-Box Sizing".
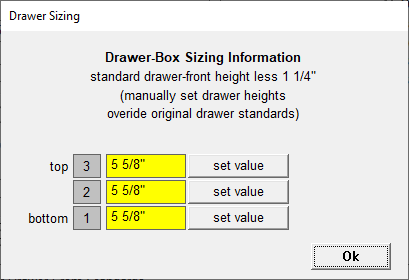
- In the new dialog box that opens, click the "set value" button of the bottom drawer (notice that the corresponding edit field changes from yellow to white and the button you just clicked is now labeled "done". In the white edit field, type in the new size you want the drawer-box to be, then click the button whose label just changed to "done".
- Notice that the sizes to the other drawer-boxes do not automatically resize. The minimum and maximum drawer-box size is determined by the drawer-front size for that drawer. Drawer-front sizing is explained in the next section below. Continue up the drawer-box size list giving each drawer-box the size you want it to have. If you make a mistake, just click the auto-resize button and Cabinet Solutions will resize the drawer-box.
- Click "Done" to return to the "Edit Opening" dialog box.
- If you add more than one drawer in a single opening, you can set the sizes for the drawer-fronts. Click the button labeled "Drawer-Front Sizing".
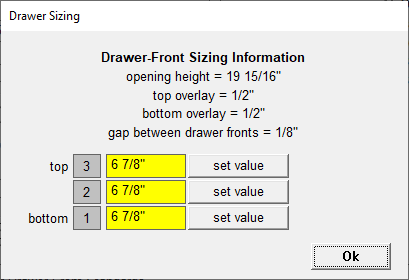
- In the new dialog box that opens, click the "set value" button of the bottom drawer (notice that the corresponding edit field changes from yellow to white and the button you just clicked is now labeled "done". In the white edit field, type in the new size you want the drawer-front to be, then click the button whose label just changed to "done".
- Notice that the sizes to the other drawer-fronts automatically resized. This sizing is done using your Job Standards for "overlays" and "gap between door pair". Continue up the drawer-front size list giving each drawer-front the size you want it to have. If you make a mistake, just click the auto-resize button and Cabinet Solutions will resize the drawer-front.
- Click "Done" to return to the "Edit Opening" dialog box.
- Whenever you select to cover an opening with a door, a pair of doors or a drawer-front, you can adjust the standards used on that door or drawer-front. This feature gives you the ability to change the door style on one opening in a cabinet to be different than the door style on a different opening in a cabinet. Just as an example, you may be building an entertainment center with solid raise panel doors on it. There maybe one section though, that needs glass doors on it. Use this feature to make that adjustment. Click on the "Adjust for Opening #__" button. If you decide you want the opening to revert back to the door style set in your Job Standards, click the button labeled "reset".
- Click on the Accept button to apply the changes you've made in the "Edit Opening" dialog box or click Cancel and none of the changes you made will apply.
- You can now select a new opening to edit or click the Done button in the Edit Opening dialog box to return to the Customize Cabinet dialog box.
- Special Step: If you build custom face frame cabinets and you build multiple sections into a single cabinet (such as a range hood cabinet placed between 2 standard upper cabinets, all as one piece) and you've already placed mullion stiles or center stiles in the cabinet, a different dialog box will appear.
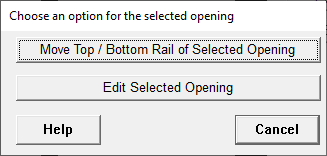
- This dialog box gives you 2 options. The bottom button, "Edit Selected Opening", will take you to the "Edit Opening" dialog box just described. The top button, "Move Top / Bottom Rail of Selected Opening", opens a dialog box in which you can move the bottom rail or the top rail of a section. Simply enter the distance from the top or the distance from the bottom that you want to move the rail.