Editing the Size or Placement of Cabinets
Editing the Size or Placement of Cabinets
Changing a Cabinet's Dimensions
This section provides instructions for changing a cabinet.s dimensions when you are in the "Place Cabinets Screen". In fact, it is only in the Place Cabinets Screen that a cabinet's overall dimensions can be changed.
To change a cabinet that you have already placed:
- In the Place Cabinets Screen, use the mouse to highlight the cabinet you want to change. (Pause to allow the highlight to settle on the cabinet you have chosen.) Notice that as you highlight the cabinet, its size will appear in the top of the tool box.
- Click on the left mouse button to select the highlighted cabinet for editing.
- A dialog box will appear. Click on the "Edit Cabinet" button.
- In this second dialog box that appears, change the dimensions of the cabinet by entering the new dimensions in the edit fields.
- When the cabinet dimensions are correct, replace the cabinet by clicking on the Move Cabinet button in the lower part of the dialog box.
- After you click on the Move Cabinet button, the cabinet will appear on the drawing screen. Move the mouse to replace the cabinet on the wall. Click the mouse when you have moved the cabinet to the appropriate place on the wall.
Moving a Cabinet
You can only move a cabinet.s position relative to the wall when you are in the Place Cabinets Screen.
To move a cabinet:
- In the Place Cabinets Screen, use the mouse to highlight the cabinet you want to move. (Pause to allow the highlight to settle on the cabinet you have chosen.)
- Left Click on the mouse button to move the highlighted cabinet.
- A dialog box will appear. Click on the "Edit Cabinet" button.
- In this second dialog box that appears, click on the Move Cabinet button.
- After you click on the Move Cabinet button, the cabinet will appear on the drawing screen. Move the mouse to place the cabinet in the appropriate place on the wall.
- Click the left mouse button when you have positioned the cabinet in the appropriate place on the wall.
- NOTE: By default, the Quick Cabinet Moving feature is enabled in the Advanced Program Settings. This allows you to move the cabinet quickly using the following steps.
To move a cabinet using the Quick Cabinet Moving feature:
- In the Place Cabinets Screen, use the mouse to highlight the cabinet you want to move. (Pause to allow the highlight to settle on the cabinet you have chosen.)
- Right Click on the mouse button to engage the Quick Cabinet Moving feature. The mouse cursor will change into up/down and left/right arrows indicating you will be moving the cabinet.
- Left Click on the mouse button to begin moving the cabinet. Move the mouse to place the cabinet in the appropriate place on the wall.
- Click the left mouse button when you have positioned the cabinet in the appropriate place on the wall.
Deleting a Cabinet
You can delete a cabinet when you are in the Place Cabinets Screen or by using the Delete Cabinets tool from the Tools menu.
To delete a cabinet:
- In the Drawing Screen, use the mouse to highlight the cabinet you want to delete. (Pause to allow the highlight to settle on the cabinet you have chosen.)
- Click the left mouse button to select the highlighted cabinet to be deleted.
- A dialog box will appear. Click on the "Edit Cabinet" button.
- To delete the cabinet, click on the Delete Cabinet button in the lower part of the dialog box.
To Delete Multiple Cabinets:
- In the Place Cabinets Screen, click the Tools menu at the top of the screen. Select the words Delete Cabinets. A dialog box will appear looking like the one below.
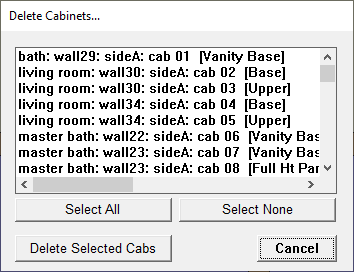
- Click on each of the cabinets you want to delete. You can click on the Select All or Select None buttons to select all the cabinets to be deleted or to select none of the cabinets to be deleted respectively.
- Click the Delete Selected Cabs button to delete the selected cabinets.
- A message box will appear asking if you really want to permanently delete all of the selected cabinets. If you are absolutely sure, click Yes.
- All the selected cabinets will now have been deleted.
Note: If at any time you accidentally click on a cabinet in the "Place Cabinet Screen", simply click on the cancel button in the first window that appears.
The Edit Cabinet Window
- In the Place Cabinets Screen, use the mouse to highlight the cabinet you want to change. (Pause to allow the highlight to settle on the cabinet you have chosen). Notice that as you highlight the cabinet its size will appear in the top of the tool box.
- Click on the mouse button to select the highlighted cabinet for editing.
- A dialog box will appear like the one below.
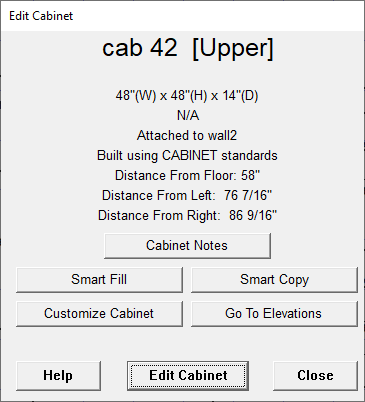
Using Smart Copy
- Smart Copy: Click this button to make an exact copy of the cabinet you have selected. The Cabinet Specifications window for the new cabinet will appear. Follow the directions for Placing a Cabinet.
Using Smart Fill
Smart Fill allows you to fill a space with any given number of the same cabinet you want. The way Smart Fill works is it will take any cabinet and "split" it up into any given number of the same cabinet, equally sized. For example: If you took a 100" wide base cabinet and used Smart Fill giving it a number of 10 (cabinets), then it would take that 100" wide base cabinet and split it into 10 exact copies of itself, each new base cabinet being 10" in width, all fitting within the original 100" space.
- Smart Fill: Click this button to open a window like the one below.
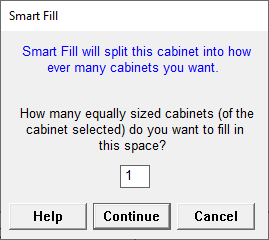
- Enter the number of cabinets (you want to fill the space with) in the entry field provided.
(Example picture above has the number 10 in the entry field.)
- Click the Continue button to apply Smart Fill on the selected cabinet.
- Click the Cancel button to return to the Edit Cabinet window.
Cabinet Notes
Cabinet Notes allow you to save notes for each cabinet in your job.
Please note that Cabinet Notes can now be accessed from the Custom Cabinet screen.
To save notes for this cabinet:
- Follow the steps to select the cabinet.
- A dialog box will appear. Click on the Cabinet Notes button located near the bottom of the dialog box.
- A dialog window will appear with the following:
- Last Modified: This is the date the notes were last modified or had changes made to them and were saved.
- Current Date: This is the current date that will be stored with the notes.
- Enter the notes in the lines provided. As you type, if you reach the end of the line, it will automatically continue down to the next line. Do not hit the Enter key on your keyboard to do this.
- Clear All Notes: Click this button to clear (delete) all the notes for this cabinet and to close the dialog window.
- Print Notes: Click this button to print the notes for this cabinet. You can also print the notes for each cabinet when you print the assembly sheets.
- Save Notes: Click this button to save the notes you have entered for this cabinet. If you delete the cabinet, the notes will be deleted as well.
Go To Elevations
You can jump directly to the elevations view of the cabinet you have selected with one click.
To go to the elevations view for this cabinet:
- Follow the steps to select the cabinet.
- A dialog box will appear. Click on the Go To Elevations button located near the bottom of the dialog box.
- The screen will switch to the Edit Elevations Screen and automatically select the correct wall the cabinet is on.