Editing Cabinets
Editing Cabinets
Adding a Preselected Cabinet Part
Adding parts to your cabinet is fast and easy with Cabinet Solutions. You can quickly add a Tray Divider, Center Rail, Mullion, Mullion Stile, or Center Stile. (In Euro these will be labeled: Tray Divider, Horizontal Partition, Vertical Partition, and Spreader.)
Deleting Cabinet Parts and Boards
You can delete any board or any part in a cabinet. Most can be deleted with this simple View/Delete Boards feature. If for some reason Cabinet Solutions will not allow the deletion using this feature, a note will appear instructing you to delete the part through Cabinet Standards, which will be discussed later in this chapter.
To Delete Cabinet Parts:
- In the "Edit Elevations Screen", move the mouse until the cabinet you want to edit is highlighted. (Pause to allow the highlight to settle on the cabinet you have chosen.)
- Click the left mouse button to select the highlighted cabinet for editing. The cabinet will become larger on the screen.
- Under the "View / Delete Boards" section in the tool box that appears, click on the "View / Delete Boards" button.
- Then in the 3-D wire view of the cabinet that appears, move the mouse until the cabinet part or board that you want to delete is highlighted.
- Note: This is called "View / Delete Boards" because it is a fast way to find out the size of cabinet parts without looking through the whole cabinet cut list. Just touch the board you want to see the size of. The name and size of each board you highlight will appear in the top of the Tool Box.
- Click on the board you want to delete. A box will appear asking you if you want to delete the cabinet board you selected. Click on the Yes button if you want to delete that board from the cabinet. Click on the No button if you do not.
- Cabinet Solutions will stay in this Delete Board mode until you cancel out of it by clicking on the "Done" button in the bottom of the tool box.
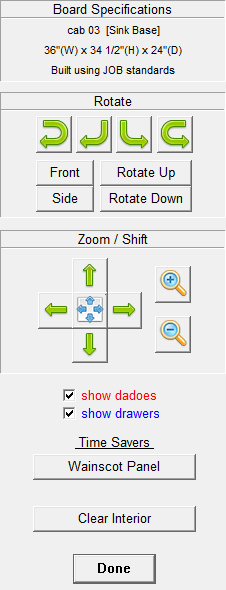
View / Delete Boards Tool Box
Rotate
Click the yellow arrow to rotate the cabinet in the direction of the arrows. The two arrows on the ends will rotate the cabinet faster than the two in the center.
- Front: Click this button to rotate the cabinet so you are looking at its front.
- Side: Click this button to rotate the cabinet so you are looking at its side.
- Rotate Up: Click this button to rotate the cabinet upwards.
- Rotate Down: Click this button to rotate the cabinet downwards.
Zoom
- Zoom In: Click this button to zoom in on the cabinet, making the cabinet larger.
- Zoom Out: Click this button to zoom out from the cabinet, making the cabinet smaller.
Shift
Click the Up, Left, Right, Down, and X arrow buttons to shift the cabinet picture in the direction of the arrow. Clicking the X will shift the cabinet to the center of the window.
Another option to move the items around is using the mouse.
- By holding down the Right mouse button and moving your mouse around on the View / Delete boards screen, you can quickly rotate the view of your cabinet around.
- This takes place of the Rotate Up, Down, Left or Right. You can also hold down the Shift key on your keyboard at the same time as the Right mouse button and you can quickly move the cabinet around as if you were using the Shift controls.
- To quickly zoom in and out, you can use the Mouse Wheel to zoom in and out on the design. This can take place of the Zoom controls.
Show Dados
Click this check box to show dadoes that are used in Standards. This also helps you get a quick view at where your dadoes are in the cabinet. The dadoes appear in RED.
Show Drawers
Click this check box to show any drawers and rollouts that are in the cabinet. This helps you get a quick view at where your drawers and rollouts are in the cabinet. The drawers and rollouts appear in BLUE.
Time Savers
These buttons will help you save time by doing all the work for you.
- Wainscot Panel: Clicking this button will delete all the boards in the cabinet except for the doors. This will prepare the doors to be used with Wainscot panels. (See Doors & Drawer Fronts for help with using Wainscot.)
- Face Frame Only: Clicking this button will delete all the boards in the cabinet except for the face frame. This feature only works in Face Frame mode.
- Clear Interior: Clicking this button will delete all the interior boards in the cabinet leaving the exterior box. Boards that may be deleted are shelves, mullions, partitions, rails, etc. Everything that is inside the top, sides and bottom of the cabinet will be deleted. This is helpful for "starting over" after placing many mullions and center rails.
Openings / Rollouts
Openings are the spaces in the front of the cabinet that allow access of some sort into the cabinet. In Cabinet Solutions, you can quickly and easily change the size of the opening, the type of opening or what's in an opening or covering that opening.
Edit Shelves
The number of shelves in a particular cabinet can and should be set at the time a cabinet is placed. However, once you start dividing a cabinet up into different sections, the number of shelves per section may vary. Cabinet Solutions is designed to allow you to easily set the number of shelves for each section in a particular cabinet.
To Edit the Number of Shelves in an Opening:
- Follow the instructions to select a cabinet.
- In the dialog box that appears, click on the Shelves button.
- In the new dialog box that appears, click on the opening that you want to change the number of shelves in.
- A new dialog box will appear. Type in the number of fixed and /or adjustable shelves you want in the opening.
- Click Accept to keep these changes or Cancel to keep things as they were.
- Repeat this for every opening you need to change.
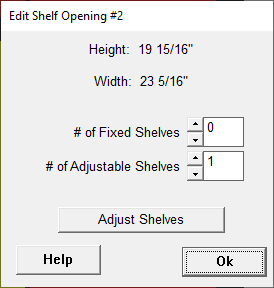
Adjust Shelves
You can adjust the shelves within this opening by clicking the Adjust Shelves button. (See Adjust Shelves)
Modifying End Types
Every time you place a cabinet, Cabinet Solutions checks to see what that cabinet is being placed next to and it automatically sets the end type for you. There may be times when you want a particular end to differ from what Cabinet Solutions has set it to. You need to modify the end type using this feature. This feature will also allow you to add a door panel to an end. In Cabinet Solutions we call this end a "Plant-On End".
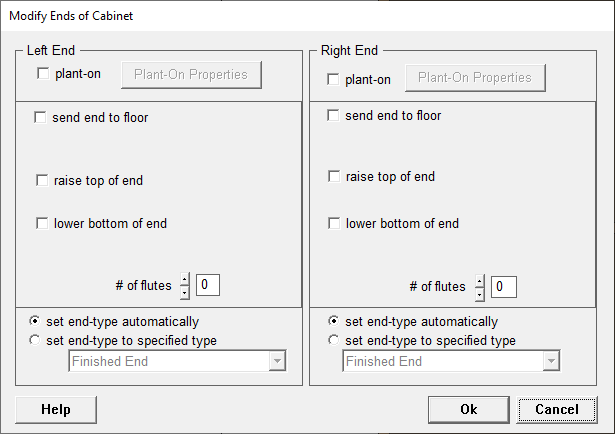
The Modify Ends of Cabinet Dialog Box
- Plant-On: You can Add a Plant-On and define what that plant-on will be.
- The following options allow you to build custom cabinets like refrigerator cabinets that are essentially refer uppers with both ends extended to the floor.
- Send Stile and End to Floor (Send End to Floor in Euro): You can send the stile with the end panel to the floor. In Euro, you can only send the end panel to the floor.
- Send Stile to Floor Only (Face Frame only): You can send the stile and not the end panel to the floor.
- Send End to Floor Only (Face Frame only): You can send the end panel and not the stile to the floor.
- The following options allow you to build custom cabinets that have valances under or above the cabinet and the end panels will cover the valance.
- Raise Top of End: You can raise the top of the end panel upwards by entering a positive (+) number. You can also lower the top of the end panel by entering a negative (-) number. Raising the top of the end panel will not move the entire end panel, rather it will stretch or make it longer.
- Include Stile (Face Frame only): You can include the stile when raising the top of the end panel. The stile will be flush with the top of the end panel.
- Lower Bottom of End: You can lower the bottom of the end panel downwards by entering a positive (+) number. You can also raise the bottom of the end panel by entering a negative (-) number. Lowering the bottom of the end panel will not move the entire end panel, rather it will stretch or make it longer.
- Include Stile (Face Frame Only): You can include the stile when lowering the bottom of the end panel. The stile will be flush with the bottom of the end panel.
- Flute Left/Right Stile: You can show fluting on the left and/or right stile by clicking the check box Flute Left (or Right) Stile. The fluting will only show up in the 2-D Elevation view and the Enhanced 3-D. It currently will not show up in the Basic 3-D. If you have the Display Doors option checked in the Elevations Screen, the fluting will show as vertical lines depending on the number of fluting you specified (see below). If you have the Display Doors option un-checked, the fluted stile(s) will be indicated by "(F)".
- # of Flutes: You can either use the up and down arrows or type in the desired amount of flutes you want to use on this particular stile. You can have a different number of flutes for each stile. The program will not allow you to put in more flutes than possible.
- Set End-Type Automatically: Cabinet Solutions will automatically set the end-type of the cabinet based on your configuration settings and how the cabinet is placed in the room.
- Set End-Type to Specific Type: You can choose to manually change the end-type. Setting the end-type to a specific type allows you to have the end-type act the way you want it to. If the end-type was automatically set as a Finished End, but you wanted it to be an Unfinished End because you didn't want the side panels to drop below the bottom, then you will want to manually set the end-type to Unfinished End. Depending on which end-type you select, the standards for that end-type you have set up will be applied. This allows you to have full custom control over the ends of your cabinets.
Viewing a Cut List
At times, you may want to view your cut list before you print it. This is always recommended when you have been making changes to your Job Standards that are out of your ordinary routine.
- Follow the instruction to select a cabinet.
- In the Edit Cabinet dialog box, click on the View Assembly Sheet button.
- In the window that appears, the assembly sheet for this particular cabinet will appear.
- Note: No changes can be made to the parts already listed in this cut list without returning to the previous window where you can of course, add parts, delete parts, or change them through editing the cabinet standards. However, in this screen you can add, or delete specialty parts that Cabinet Solutions does not allow you to put in anywhere else.
- To add a part, click on the Add Custom Part button at the top of the tool box.
- In the window that appears, fill in all the boxes for information given. Including part name, size, material type, and quantity.
- Next click on the Add Part button. It will now appear at the bottom of your printed assembly sheet as well as in a special section of your general cut list.
- If you want to delete any of these parts that you've added, move your mouse into the cut list screen and point it at the board you wish to remove.
- When the part you want to get rid of is highlighted, click your mouse.
- A notice will appear asking you if you are sure that you want to delete the specified part.
Adjusting Cabinet Standards
There may be times when you have gone through all the steps to this point and still want to make further changes. To do this, you may need to adjust the standards for this particular cabinet. The cabinet will be changed to correspond to the changes that you make in the Cabinet Standards. For example, let's say you have placed a sink base with the correct exterior dimensions. You have added a mullion to divide the lower opening but you also want to eliminate the back in this sink cabinet because there is a lot of plumbing and electrical hookup to do. This is the time you want to edit this cabinet by changing its particular standards.
To adjust cabinet standards:
- Follow the instructions to select a cabinet.
- In the Edit Cabinet dialog box, click on the Cabinet Standards button.
- Follow the instructions for changing the Standards.
IMPORTANT NOTE: Once you change a cabinet.s specific standards in the Edit Cabinet window, these new standards are isolated so they will not be affected by the Job Standards any longer. Therefore, if you change a Job Standard at a later time, it will have NO AFFECT on this cabinet.
Saving a Custom Cabinet
Cabinet Solutions allows you to save a cabinet you have edited. This is a very useful feature because once you save a cabinet it appears in the list of custom cabinets that you can place in the Place Cabinets Screen. You simply click on the Custom icon in the Place Cabinets Screen and select the custom cabinet you want to place.
To Save as a Custom Cabinet
- Follow the instructions to select a cabinet.
- In the Edit Cabinet dialog box, edit the cabinet to your specifications.
- When you are finished editing, click on the Save to Library button.
- Type in the name of the custom cabinet in the dialog box that appears.
- Click on the Save button.
- Click on the Done button in the Edit Cabinets dialog box.
- This cabinet is now saved in your custom cabinet file and can be recalled and placed from the custom icon in the Place Cabinet screen Tool Box.