Settings and Adjustments
Settings and Adjustments
The settings modified for this section are saved with the job itself. These sections change appliances and colors for the room being currently displayed.
3D Tour
3D Tour Legacy
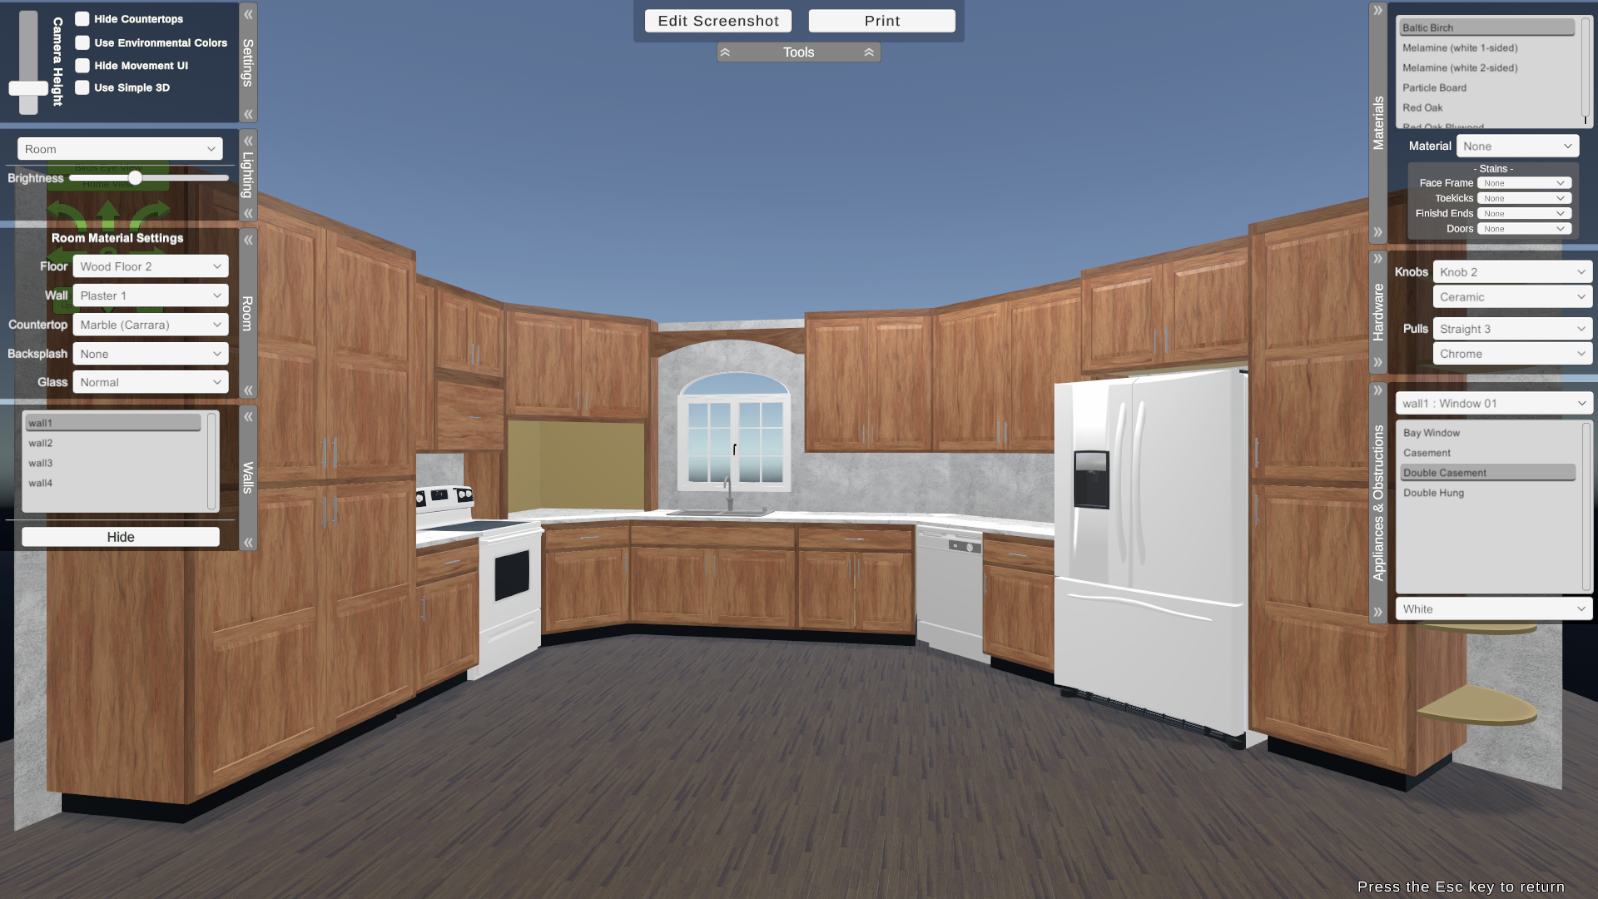
Tools
|
|
|
Edit Screenshot: This will hide the UI, and take a screen shot and open it in the default program that opens PNG files, which is by default the Microsoft Picture Viewer. If your default program is set to something more advanced like Paint or Adobe Photoshop, you can modify the picture. Print: This will take the current view you are looking at and print it on your default printer. |

Settings
|
|
|
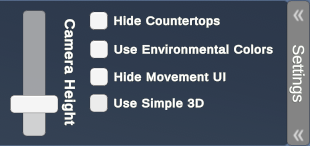
Camera Height: This raises or lowers the camera to give the illusion of eye level height. If the customer is taller, the camera height can be raised up to give a better perspective of what the kitchen will look like at their eye level. Hide Countertops: This option removes the countertops in the view of the job. With countertops hidden, the stretchers or cabinet top will be visible. Use Environmental Colors: This setting will take colors from various locations around the job and darken the image up a little more to give it a more realistic view. Keep in mind that this will make bright colors appear bluish due to shadows. Hide Movement UI: This hides the movement controls or buttons that can be clicked on to move around the job. Use Simple 3D: This setting sets the view to a flat 3D wireframe type look that was in the older versions of Cabinet Solutions, known as the Basic 3D. This replaces all texture information with a flat, slightly shaded color instead. The view will stay in this mode until the option is unchecked, even if the Tour is closed and restarted. |
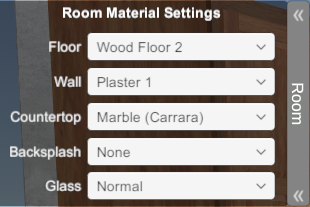
Room Settings
|
|
|
This section is where non-cabinet materials are set. When a material is set from the drop down box, the item that was changed immediately updates. |
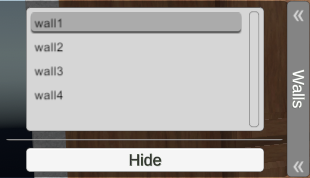
Walls
|
|
|
This allows walls to be hidden temporarily. To hide walls, click on the wall that needs to be hidden from the walls on the list and then click on Hide to hide the wall. More than one wall at a time can be hidden, but they do need to be hidden one at a time. To bring a wall back, click on the wall that was hidden on the list and then click on Show to display the wall again. Please note, pressing ESC to close out of the Tour and opening it back up will cause all of the walls to be visible again. |
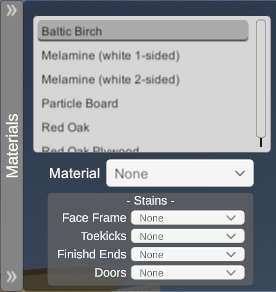
Materials
|
|
|
This section changes the look for each material being used in the job, visible or not. Just like with the Room Materials Settings, once you change a material appearance for an item on this list, the item changes immediately. The stains information changes the stains for the listed parts only for the selected material. Example: If the Doors and Face Frames are built out of Red Oak, select the material Red Oak and click on the drop box next to either Doors or Face Frames and adjust the stain to darken the color for just those items by 25%, 50%, 75% or 100% which is pure black. Remember, this section only modifies those items, if they are made from the material that is selected. |
|
|
|
|
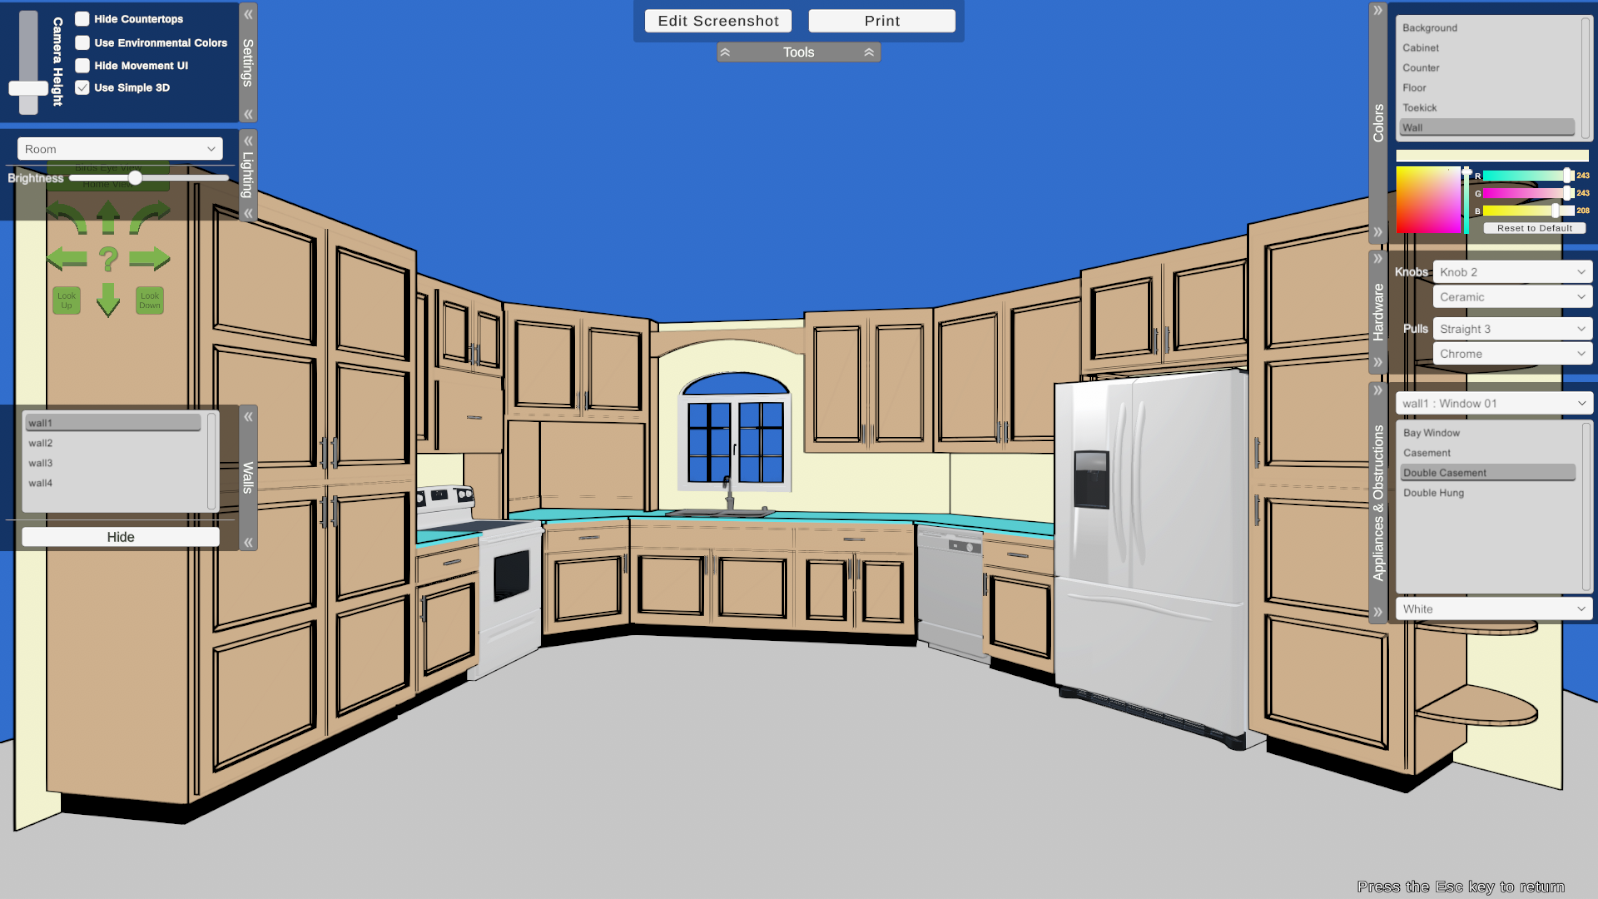
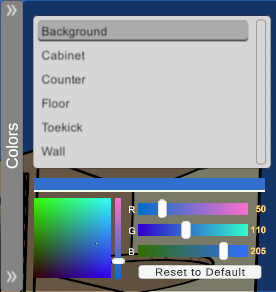
Colors |
|
|
|
|
|
This section appears with the "Use Flat Legacy 3D" option enabled in the Settings panel and replaces the Materials panel. This allows the colors to be changed for each section in the tour; Background, Cabinet, Counter, Floor, Toe Kick and Wall. Reset to Default: To reset items to their default colors on the Legacy view, click on each one of the sections one at a time and click on Reset to Default. |
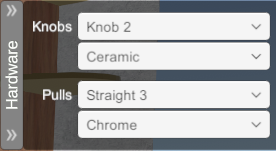
Hardware
|
|
|
This section changes the types of hardware displayed for knobs and pulls. We have different knob and pull types and color options that can be selected from the drop down list. |
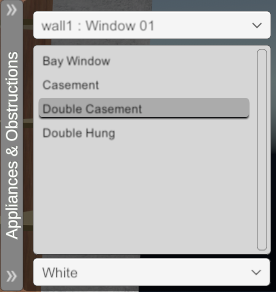
Appliances & Obstructions
|
|
|
In the Designer, when an appliance or obstruction is placed, a place holder for the floor plan and elevations is displayed. In the Tour, from this section, the actual model of the appliance or obstruction can be changed to be a closer fit to what the customer has in their kitchen. More models will be added over time. |
Birds Eye View and Home View Button
|
|
|
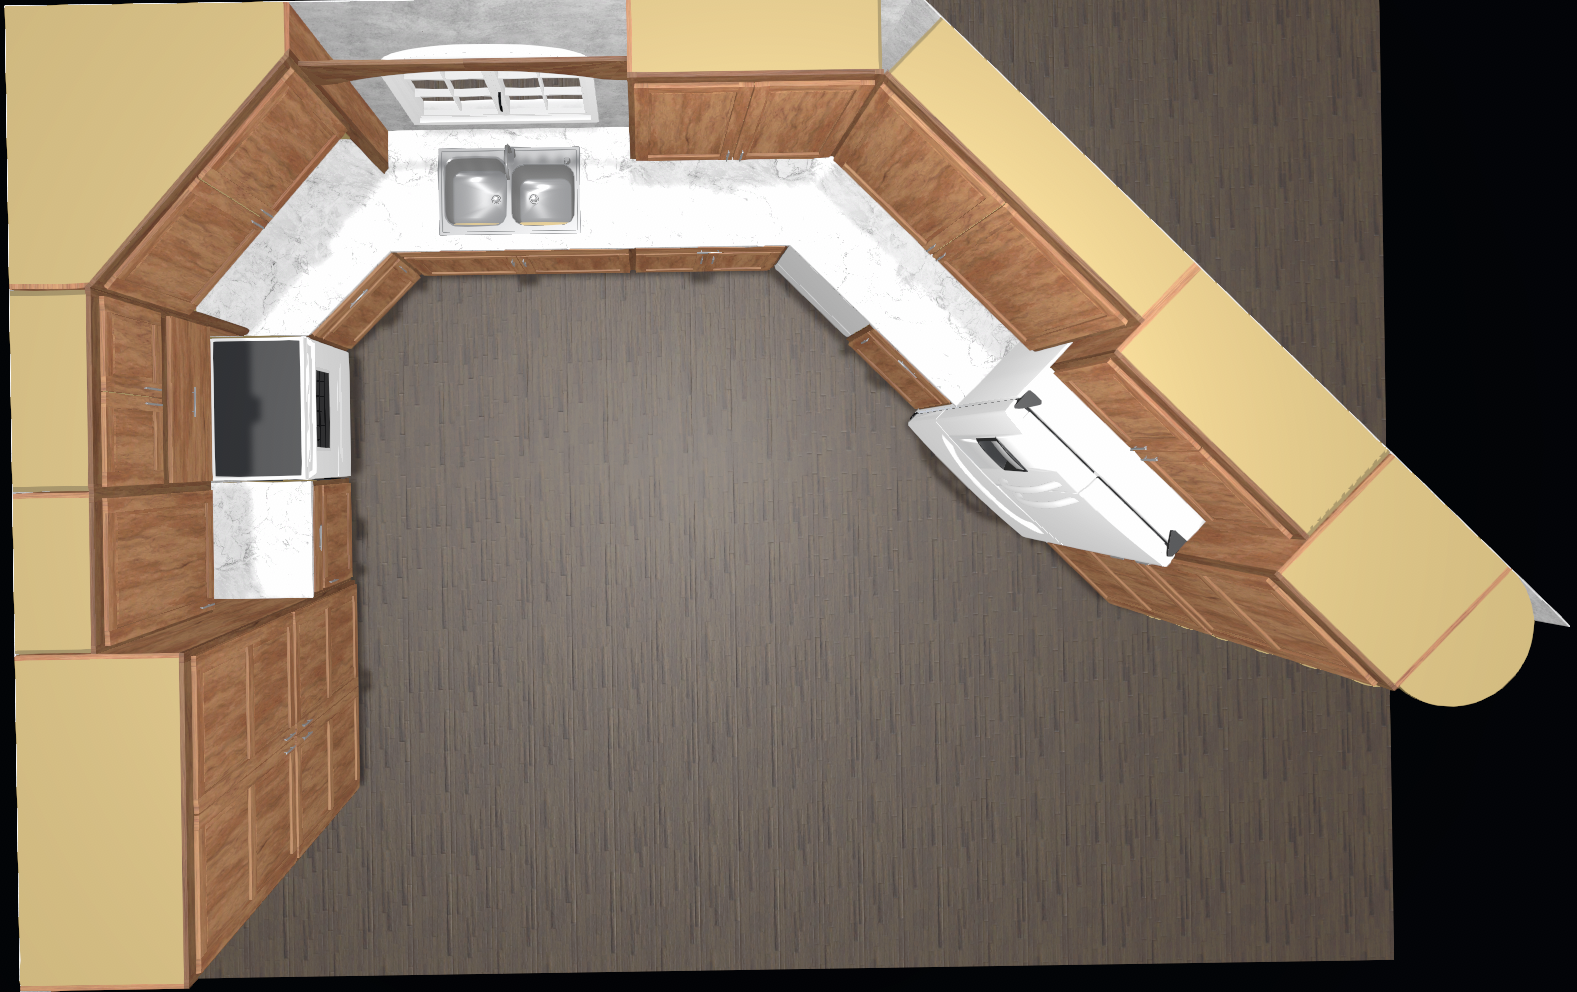
Birds Eye View: This view gives a Birds Eye View of the job currently being displayed. What this means is the camera is raised up high and then rotated down to look at the job file. If more height is needed, click on the Settings tab and the camera can be raised even higher. NOTE: RAISING THE CAMERA UP EVEN HIGHER MAY NOT DISPLAY THE ENTIRE KITCHEN. Home View: This button will reset the camera to the initial settings as if just opening the job. If the camera is not displaying any thing when the Home View button is pressed, the camera will have to be manually lowered to a normal height from the Settings tab. NOTE: IF THE CAMERA IS MANUALLY RAISED HIGHER THAN THE AMOUNT FROM THE BIRDS EYE BUTTON, WHEN CLICKING ON HOME VIEW, THE CAMERA WILL STILL BE RAISED AND NEEDS TO BE MANUALLY LOWERED FROM THE SLIDER ON THE SETTINGS TAB. Direction buttons are covered in the Moving Around the Tour section. |
|
Birds Eye Example |
||
|
|
||