Adjust Colors
The Adjust Colors menu allows you to specify colors for the different parts of the Cabinet Solutions screens. Once you have
adjusted colors, the Adjust Colors menu also allows you to save them by selecting "Save Personal Color Settings" option. You
can then restore those colors by selecting "Restore Personal Color Settings" option. Or you can restore the original colors
of Cabinet Solutions by selecting "Restore Factory Color Settings" option.
To adjust colors:
- Click on Adjust Colors in the menu bar.
- Click on the item you want to adjust the colors for.
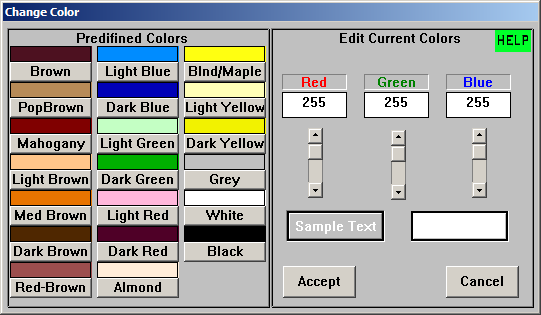
- The color is the result of a mix of red, green, and blue. In the dialog box, click on the up or down arrows to either increase or decrease the amount of each color in the mixture. You can type in the amount of each color in the entry fields or click on a preset on the left which will insert the values for you automatically.
- The resulting color appears in two boxes on the right near the bottom. The box to the left displays the color text in the font. Click on Accept when the color appears the way you like it or click Cancel if you don.t want to save the changes.
To save the color settings:
- Click on Adjust Colors in the menu bar.
- In the drop down list, click on "Save Personal Color Settings".
To restore the color settings:
- Click on Adjust Colors in the menu bar.
- In the drop down list, click on Restore "Personal Color Settings".
To restore the original color settings of Cabinet Solutions:
- Click on Adjust Colors in the menu bar.
- In the drop down list, click on "Restore Factory Color Settings"
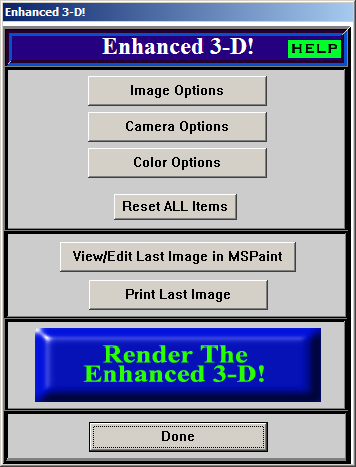
Enhanced 3-D! (Enhance This 3-D!)
Presentations is a free Enhanced 3-D tool to allow you to produce extremely high quality (life-like) pictures of your jobs to show your customer.
To open Presentations:
- In the menu bar, find and click on the Tools menu. Or click "Enhance This 3-D!" in the 3-D Room View Tool Box.
- In the drop down menu, click on the Enhanced 3-D! menu item.
- The Enhanced 3-D! dialog will appear. This dialog has the following features:
- Image Options: Click this button to open the Image Options dialog.
- Camera Options: Click this button to open the Camera Options dialog. From there you can select the type of camera to use when rendering the Enhanced 3-D. Selecting Standard will give you a lineal or plain view of the room. Selecting Wide Angle Lens will give you a "fish eye" or more realistic view of the room, as if you were standing there in the room. By default, the Wide Angle Lens is selected.
- Color Options: Click this button to open the Color Options dialog.
- View/Edit Last Image in MSPaint: Click this button to open MSPaint with the last picture you rendered. From Paint you can edit the picture or save it by clicking on the File menu, and selecting Save As.
- Print Last Image: Click this button to print the last picture you rendered. A message box will appear asking you if you are ready to print, click YES if you are ready. If you clicked YES, another message box will appear asking you if you want to print in landscape mode. If you choose yes, it will take a few moments to rotate the image width-wise to fit more of the picture onto the paper. The picture will be scaled to one piece of paper.
- Render the Enhanced 3-D!: Click this button to begin the rendering of the enhanced 3-D picture. This may take several minutes, please wait for it to finish before doing anything else on your computer. The larger megahertz processor you have the faster the image will render.
- Note: The produced picture is not an exact representation of the job, rather an estimate of what it would look like.
Rendering/Displaying a room in the enhanced 3-D:
- Click on the Tools menu. In the pull down list that appears, click on Enhanced 3-D!.
- Click on the button labeled "Render the Enhanced 3-D!".
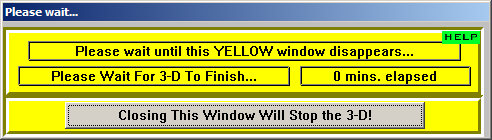
- A free program called POV-Ray for Windows (you selected to install this upon installing Cabinet Solutions) will be launched to render the picture. (POV-Ray can be obtained from www.povray.org) Because this process is very CPU (Central Processing Unit) intensive, meaning it is going to use all of your computer.s resources to make the picture as best as it can, we highly recommend closing any unnecessary programs before clicking the "Render the Enhanced 3-D!" button. Don't close Cabinet Solutions, of course.
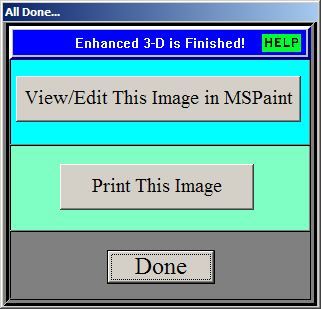
- During the rendering process, we recommend you to not use your computer until the Enhanced 3-D is Finished! window above appears on your screen. From this window you can view or edit the image in MSPaint or print the image scaled to one piece of paper. Click the Done button to close the window and continue using Cabinet Solutions.
Tips for Using the Enhanced 3-D
- Have at least 2 connected walls (like an L). This will help the camera position the room in the middle and zoom to fit the screen size.
- Always use the highest quality setting when presenting the 3-D to your customer. There is a dramatic difference between fastest and best quality.
- Use the faster quality settings to help position and test what your 3-D will look like. Then when satisfied, choose the highest quality setting and let the computer run until finished.
- It is recommended that you only use the Enhanced 3-D after you are finished with your job and have rotated the Basic 3-D to the position you want.
- If your job is large, or your computer speed is slow, start the Enhanced 3-D before you go to sleep. This will give it plenty of time to run and you won't be needing to use the computer.
- If for some reason you want to close the Enhanced 3-D while it is rendering, you may close the window by clicking on the "Closing This Window Will Stop the 3-D!" button on the yellow window. This is highly unrecommended, however.
- The Enhanced 3-D is extremely high in quality. The faster and more powerful your computer is, the less time it will take to render your jobs.
- When the Enhanced 3-D has finished rendering, you are given the opportunity to print the image (scaled to one page) or manipulate the picture in MS Paint. This is a simple program that is very common and anyone can use. You can save the picture to your hard drive, type text, draw, and much more. The default picture format is BMP (Bitmap), however you can save it as a JPG or any other supported formats.
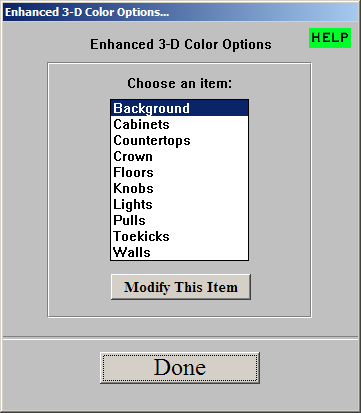
Enhanced 3-D Color Options
The Enhanced 3-D Color Options are designed to allow you to customize the Enhanced 3-D colors for several items in the job. These colors will only show up in the Enhanced 3-D.
Selecting an Enhanced 3-D Color Item
- Follow the directions for opening the Enhanced 3-D (Presentations) window.
- In the Enhanced 3-D window, click on the button Color Options.
- A window will appear like the one below.
- Under the words Choose an Item, there is a list box of items that you can modify the colors for. Select the item you want to modify by clicking on its name. (See example picture above.)
- Once you have selected an item to modify, click the button Modify This Item.
- A window will appear like the one below.
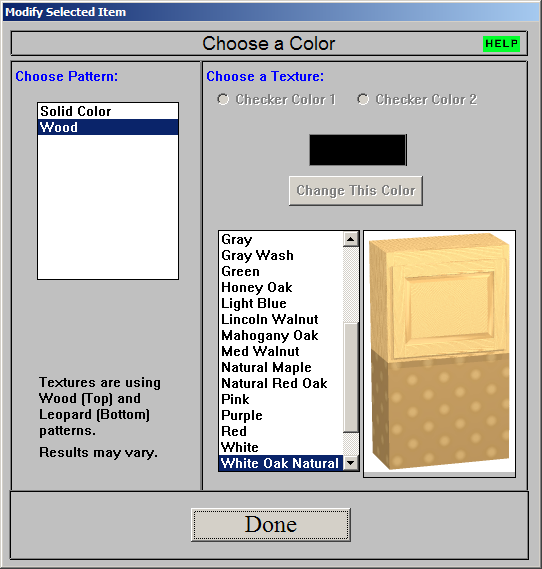
Modifying an Enhanced 3-D Color Item
- Follow the directions for selecting an Enhanced 3-D Color Item (explained above).
- In the Modify Selected Item window, you can Choose a Color for the item you previously selected.
- Under the words Choose Pattern there is a list box with the color patterns you can choose from. The list will change depending on the Color Item you chose in step 1. These patterns will depict the way the color you choose will look. For instance, choosing a Wood pattern will make the color you choose have a wood grain look. Select the pattern you want to use by clicking on its name. (See example picture above.)
- Depending on which pattern you chose, options will become available to you on the right.
- If you chose a pattern other than Checker, Clear or Solid Color, the list box on the bottom right will become available to you. This list contains the available colors you can choose from to use with the pattern you selected. (The example picture above has White Oak Natural selected.) Select the color you want to use for the pattern you selected.
-
Depending on the color you selected, an example picture will appear to the right of the list box. This picture will give you an idea of what the color you selected will look like in the Enhanced 3-D picture. The example picture on the right is of two boxes one on top of the other. The top box is using Wood pattern. The bottom box is using Leopard pattern. This gives you an idea of the different ways the color may look when using different patterns.
- If you chose the pattern Clear, then the Color Item will become invisible. (Currently, this is only available for Walls.)
- If you chose the pattern Solid Color, then the button Change This Color will become available to you. Click this button to change the solid color for this Color Item. (See Adjust Colors for help with choosing solid colors.) Solid colors do not use patterns.
- If you chose the pattern Tile, the two radio buttons at the top right will become available to you. By clicking on each of the radio buttons labeled Tile Color 1 or Tile Color 2, you can set a color for each Tile Color. Follow step 5 for selecting a pattern color.
- If you chose the pattern Checker, the two radio buttons at the top right will become available to you. By clicking on each of the radio buttons labeled Checker Color 1 or Checker Color 2, you can set a solid color for each Checker Color. Follow step 7 for selecting a solid color.
- Once you have selected a pattern and color, click the Done button to accept the changes and return to the Enhanced 3-D Color Item window where you can modify the colors of other items.
Enhanced 3-D Image Options
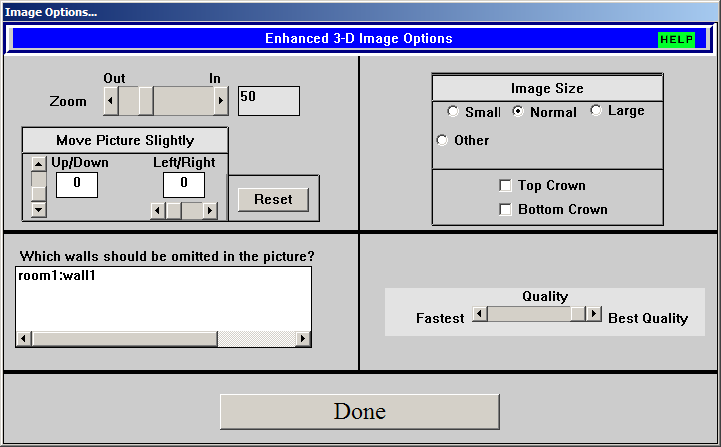
- Zoom: Use the arrows to zoom in or out of the picture. Zooming too far may render undesired results. Zooming 50 to 80 is usually all you need.
- Move Picture Slightly: Use the up/down or left/right arrows to move the picture slightly to the direction of the arrow.
- Image Size: Click on these radio buttons to select the picture size:
- Small: Will be a small picture for fast render times. This size has a resolution of 640x480.
- Normal: This is the normal picture size. This size has a resolution of 800x600.
- Large: This will enlarge the picture to the size of your screen for optimal screen quality and printing quality.
- Other: Select this radio button to choose a desired screen resolution from the list given.
- Reset: This button will reset any position changes you have made and re-center the picture to the default position.
- Top Crown: This will display top crown on all upper cabinets.
- Bottom Crown: This will display base crown on all base cabinets.
- Quality: Use the arrows to decrease/increase the picture quality for faster render times or better quality pictures.
- Which walls should be omitted in the picture?: In this box will be a list of walls for the room selected. Select the walls you do NOT want displayed in the picture. This can be useful if you want to show inside a room where a wall would be blocking your view.
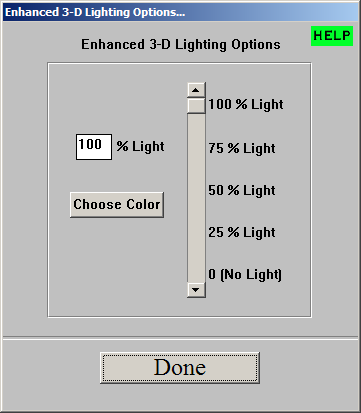
Enhanced 3-D Lighting Options
The Enhanced 3-D Lighting Options are designed to allow you to adjust the Enhanced 3-D lighting for better composition. These lighting changes will only show up in the Enhanced 3-D.
Modifying the Enhanced 3-D Lighting
- Follow the directions for opening the Enhanced 3-D (Presentations).
- In the Enhanced 3-D window, click on the button Color Options.
- Select Lights and click on the Modify This Item button.
- A window will appear like the one below:
These options allow you to change the brightness (luminosity) and color of the light being used in the Enhanced 3-D image. This can be helpful if the image appears too bright or too dark, or if you would like to add a color tint to the image. You can apply the settings in the 3-D Room View or for each individual wall in the Draw Walls Screen when editing a wall. This means you can have one wall brighter or darker than another.
To modify the lighting:
- Use the up and down arrows on the slider-bar to adjust the amount (percentage) of light (luminosity or brightness) that will be used in the Enhanced 3-D image. You can also type in the percentage amount in the edit field box on the left.
Note: 100% Light means it will be at the maximum brightness. This does not mean the screen will be entirely white. Also, 0% (No Light) does not mean the screen will be entirely black. Rather, it means it will be at the minimum brightness while still allowing you to see the cabinets.
- If you would like to change the color of the light (simulating Day, Night, or Mood), click on the Choose Color button. (See Adjust Colors for help with choosing solid colors.) The color White is the default color used for White Light
- Click Done to apply the changes which will be saved with the job.
Modify the Enhanced 3-D Lighting for Each Wall Independently
- Go to the Draw Walls Screen.
- Click on the Edit Wall radio button.
- Click on the wall you want to modify.
- Click on the E-3D Color Options button.
- Select Lights and click the Modify This Item button.
NOTE: Once you make changes to an independent wall, these changes will be saved with the wall. Any changes made in the 3-D Room View will not apply to walls that have been independently modified. To reset the wall, click on the Reset E-3D Colors button below the E-3D Color Options button when editing a wall.