Export Cut List
The Export Cut List feature is for those who want to export the parts list to a text file. There are numerous advantages and possibilities for use with this feature. You can import the comma separated text file (also known as a CSV file) exported by Cabinet Solutions into almost any database or spreadsheet program. Thus, reducing any mistakes made by inputting the information by hand. Also, it will save you considerable time. The other form of text file you can export is a PNL (Panel) file. PNL files are special files that can only be imported into programs that support PNL files. Check your database software documentation to see if it will support importing of PNL files. If the database program you are using can import PNL files, it is possible to use the export PNL file from Cabinet Solutions with a CNC compatible program. This way you won't have to manually input the same information by hand, risking mistakes and wasting valuable time.
There are two ways to access the export feature:
- Click the File menu at the top of the screen. Click on the words Export Cut List. The Master Cut List window will appear.
or
- Click the Print menu at the top of the screen. Click on the words Master Cut List. The Master Cut List window will appear.
Warning: The below does not apply to the Cabinet Solutions CNC version
Exporting Cut List to a Text File:
- Follow one of the two ways to access the export feature above.
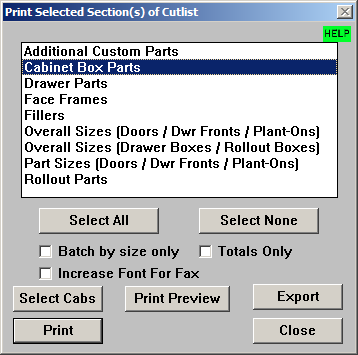
- When the Master Cut List window appears, select which reports you want in the export. Do this by selecting the report names in the list box. Shown in the picture below: Cabinet Box Parts is selected.
- If you are exporting to a TXT (Text) file, then choose whether to Batch by Size Only. This will group all similar sized boards in each material together. This will not work if you are exporting to a PNL file.
- Click the Export button.
- The Export Cut List window will appear. (See picture below.)
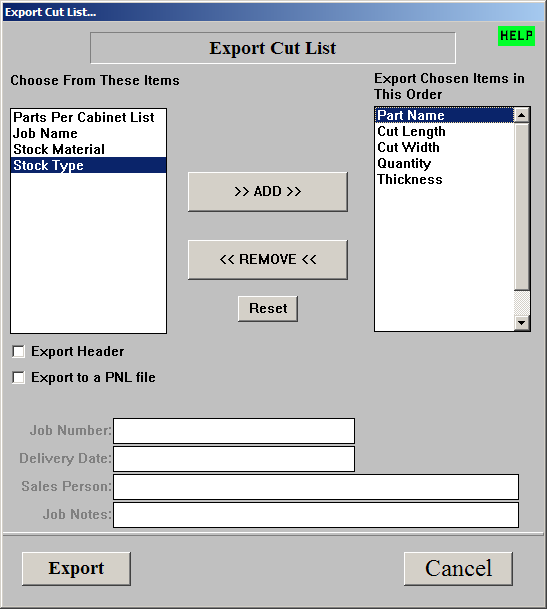
Export Cut List Window
Exporting to a TXT File:
- Choose From These Items: Below these words is a list box containing the items you can export. Select the items one by one and press the >> ADD >> button after each individual selection to move the item to the list on the right. The order in which you add these items is the order in which the items will be exported (like columns). This is helpful if you want to organize your information or if you have a database or spreadsheet program already set up in a specific order and you want to match it.
- >> ADD >>: Click this button after selecting an item in the list box on the left. It will move the item from the left list box to the right list box. The item will now be exported.
- << REMOVE <<: Click this button after selecting an item in the list box on the right. It will move the item from the right list box to the left list box. The item will no longer be exported.
- Export Chosen Items In This Order: Below these words is a list box containing the items you have selected to export. The order in which these items are listed (From Top to Bottom) is the order in which the items will be exported (From Left to Right).
- Export Header: Click the box to the left of these words to place a check in the box. If there is a check in the box, then a header row will be added to the first line of the export file. The header row contains the same words you see in the right list box. It will help you remember what the items are when importing them into a database or spreadsheet program. This way each "column" will have its own "title".
- Export: Click this button after you have set up the above items. A message box will appear with instructions on how to save the export file to a text file for importing into a database or spreadsheet program. Follow the directions on the message box.
Exporting To A PNL File:
- Export to a PNL File: Click the box to the left of these words to place a check in the box. If there is a check in the box, it will export to a PNL file instead of a TXT file. Exporting to a PNL file has its own specific "column" order. It will not use the order you have specified for exporting to a TXT file.
- Job Number: Enter the job number or quote number for identifying this job later when it is imported into another program. This information is optional.
- Delivery Date: Enter the delivery date for this job. This information is optional.
- Sales Person: Enter the name of the sales person assigned to this job. This information is optional.
- Job Notes: Enter any notes you would like to include for this job. This information is optional.
- Export: Click this button after you have set up the above items. A message box will appear with instructions on how to save the export file to a PNL file for importing into a PNL file compatible program. Follow the directions on the message box.
If you exported to a TXT or PNL file, after clicking the Export button and following the directions on the window that appears, click the upper right-hand X on the Notepad window to close the program. Or go to the File menu at the top left and click on the words Exit. You should now be back to the Export Cut List window. Click the button Cancel or Done. You should be back at the Master Cut List window. Click the button Cancel to continue working in Cabinet Solutions.