Cabinets
The first, and of course most obvious category to get a price would be the Cabinets. Cabinet Solutions gives you 2 methods of estimating the selling price of your cabinets. The first is a price per lineal foot method. The second is a Material +Labor + Profit method. Many of you may use a lineal foot price as this is often the fastest way to give out an estimate. It is advisable to check your lineal foot price against a material + labor + profit method at least once in a while to make sure that you are making a profit margin that is acceptable to you.
Cabinet Solutions automatically calculates how many lineal feet of bases, uppers, full height and wainscot cabinets you've placed in your job. To do this, Cabinet Solutions simply measures each cabinet along the wall, so a 36" x 36" corner cabinet will give you 6' of cabinets.
- Click on this radio button if you want to price your job using a lineal foot method.
Note: Your price per foot needs to include your profit margin for the cabinets. Remember, you can price the counters, finishing, and installation later.
- In the boxes given, type in your price per foot. You can use different prices for bases, uppers, full height and wainscot cabinets. (Wainscot cabinets are typically 3/4" deep cabinets that you have customized to create wainscot panels. See Wainscot here for more information.)
- In the edit field labeled % tax, enter the % tax you pay on your cabinets when priced by the lineal foot.
Cabinets priced by Material + Labor + Profit
- Click on this radio button if you want to price your job using the Material + Labor + Profit method. As specified by the title of this method, you will need to give Cabinet Solutions information in the three areas, Materials, Labor, and Profit, to get an accurate estimate.
- To get the correct Total Material Cost, you will need to input your costs for the materials needed for this job. To do this, click on the "Materials Costing" button.
In the dialog box that appears, there are 7 buttons:
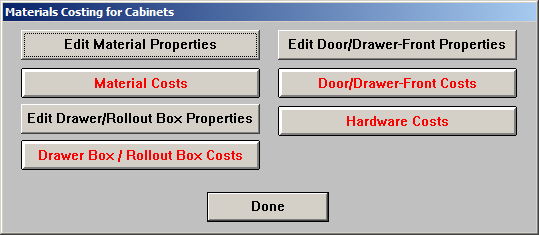
- "Edit Material Properties": This button opens a dialog box in which you can input the cost of your materials and a % waste factor for that material. You can also set the panel stock size for each material and determine which materials you want to run through the Panel Optimizer.
- "Material Costs": This button opens a dialog box where you can choose between calculating your material cost using the actual square footage of each material used multiplied by a % waste factor or using the number of sheets the Panel Optimizer determines you.ll need. You can also view your costs per each material used and your total material cost in this box.
Note: If a material such as your face frame material is hardwood and therefore can't be optimized, the actual square footage multiplied by the % waste factor will be used.
- "Edit Drawer/Rollout Box Properties": This button opens a dialog box in which you can input your cost for each drawer box and/or rollout box you will be using.
- "Drawer Box / Rollout Box Costs": This button opens a dialog box where you can view your costs for each drawer box and/or rollout box used in the job.
- "Edit Door/Drawer Front Properties": This button opens a dialog box in which you can input your cost for each door/drawer front type you will be using.
- "Door/Drawer Front Costs": This button opens a dialog box where you can view your costs for each door/drawer front used in the job.
- "Hardware Costs": This button opens a dialog box where you can set your costs for the hardware you will use on this job and view the hardware costs for this job.
Note: To get accurate estimates using Job Costing, you must click into each of these dialog boxes and give the materials, doors, and hardware your correct costs.
- In the edit field labeled % tax, enter the % tax you pay on your materials.
- In the Labor Section, there is an edit field for estimated hours of labor. Enter into the edit field the number of hours you estimate this job will take.
- Next, enter the cost per hour you charge for labor done in your shop. This number may need to reflect the number of employees you have working on the job each hour. It may also need to reflect your shop overhead for each hour of work.
- In the edit field labeled % tax, enter the % tax you pay on your labor.
- Finally, enter your % Profit you want added to the price of your job. This will give you your selling price for you cabinets only. Continue with job costing to add your prices for counter tops, installation, and finishing.
Countertops
Like installation and finishing, counter tops may be provided by someone other than you or you may figure the counter top into your bid in some other way. If so, select one of the first 2 radio buttons. For those who cost the counters out separately, Cabinet Solutions has 3 pricing options for you:
- Price the counters by the lineal foot, including profit.
- Price the counters by the square foot, including profit.
- Price the counters by the cost of materials + labor + profit.
- Select the radio button in front of the costing method that you want to use.
- If you choose a. or b., enter your price per foot in the dialog box provided. Be sure to include your profit in the price per foot.
- If you choose c: To get the correct Total Material Cost, you will need to input your costs for the materials needed for this job. To do this, click on the "Materials Costing" button.
Door/Drawer Front Costs
This dialog box is primarily for you to check your cost for each door style, and the total cost for doors and drawer fronts in this job.
Drawer Box/Rollout Box Costs
This dialog box is primarily for you to check your cost for each drawer box and/or rollout box in this job.
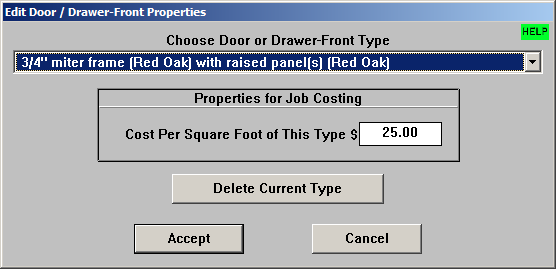
Edit Door/Drawer Front Properties
- At the top of this dialog box there is a scroll list of all the door styles you.ve chosen for your jobs with their corresponding materials. Click on the down arrow to see what is in the list, then click on the name of each door style to set the properties for that material.
- In the edit field provided, enter your cost per square foot for each door in the list.
Edit Drawer/Rollout Box Properties
Here you can price your drawer boxes and/or rollout boxes per box by square footage (instead of including them in the square footage of cabinet materials). The square footage is calculated by multiplying the overall width of the box times the overall depth of the box. The boxes will be grouped together by depth.
- At the top of this dialog box there is a scroll list of all the drawer boxes and/or rollout boxes you've chosen for your jobs with their corresponding depths. Click on the down arrow to see what is in the list, then click on the name of each box type and depth to set the properties for that box type.
- In the edit field provided, enter your cost per square foot for each box type in the list.
Finishing
The next area you can add to your job bid is the cabinet finish cost. Like the cabinet installation, the finish may be provided by someone other than you or you may already include the finishing cost in the overall lineal foot price. If so, select the corresponding radio button at the top of the window. If you are doing the finishing and add an additional cost to your job bid, indicate that by clicking on the appropriate radio button. Then, in the area below, select whether you want to price the finish by the lineal foot or by the exposed square foot. Finally, in the Entry Field provided, type in the lineal/square foot price (remembering to include a % profit) to get your total selling price of finish.
Hardware Costs
In this dialog box you will find that Cabinet Solutions has calculated an item count for each hardware listed, with the exception of Lazy-Susans and additional custom items. You will have to input the number of Lazy-Susan trays and additional items you're using for each job.
- At the front of each hardware item, there is a check box. Place a check in each check box if you want the corresponding item to be included in your total material cost for this job.
- In the edit fields provided, enter the cost for each item.
Note: For additional custom items, in the edit fields to the far left, enter the item name or description and follow steps 1 & 2.
Installation
Cabinet Solutions gives you several options for pricing the installation of your job. You may not want to price it at all because the contractor has someone else doing the installation or you may already include installation in your lineal foot cabinet pricing. If you do want to additionally price in installation, you can choose from a lineal foot pricing method or a Materials + Labor + Profit method. Just select the radio button in front of the pricing method you like. Then fill in either the price per lineal foot (remember to include profit in this), or estimate your cost of materials and labor, then and your % profit to get your total installation price.
Job Costing
Job Costing is a tool that Cabinet Solutions provides for you to help you quickly produce accurate estimates for the jobs you are trying to get. It can also help you keep track of how much each element of the job costs you to do.
To open a Job Costing:
- In the menu bar, find and click on the Tools menu.
- In the drop down menu click on the Job Costing menu item.
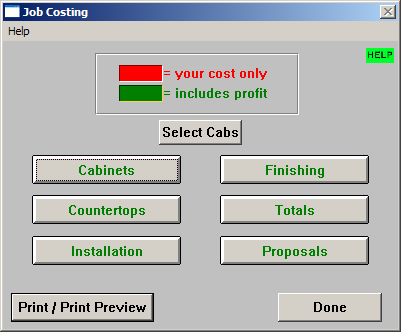
Each subcategory within Job Costing allows you to give particular information so that Cabinet Solutions can generate a proposal that reflects your cost and adds in a profit margin. It is important therefore, to enter into Job Costing, accurate and detailed information regarding your costs. Job Costing provides you with radio buttons and edit fields that you setup to reflect your method of pricing and your specific cost. Cabinet Solutions breaks the estimate into 4 categories: Cabinets, Countertops, Installation, and Finishing. This is done because you may not always be providing each element for a particular customer.
- You may choose to run Job Costing only on select cabinets in your job. To do this, click the Select Cabs button. Then, select only the cabinets you want to Job Cost and click Continue. The next time you come into Job Costing, you will have to reselect the cabinets. All cabinets in the job will be costed by default unless you select otherwise.
- In the Job Costing window that appears, click into each category, one by one.
- Each section has at least 2 methods of costing, click on the radio button that describes the method you'd like to use for generating a price.
Note: Some of these radio buttons remove costs from your proposal. For example, in the Finishing subcategory, you can select one of 3 radio buttons at the top.
- Cabinet finish will be supplied by someone other than cabinet maker
- Cabinet finish has already been included in cabinet pricing
- Cabinet finish will be supplied by cabinet maker at an additional cost
- Selecting (a.) or (b.) will delete an additional finishing price from your bid, while (c.) adds one in based on further information that you'll enter in. Obviously, choosing the right radio button can make a big difference in the price of your job.
- Besides radio buttons, each subcategory may have edit fields. Highlight each edit field and type in the information that is required.
Note: There are some edit fields that you won.t be able to change. It is information that Cabinet Solutions is calculating and giving back to you, like board footage. Other edit fields may be disabled if you have selected a radio button option that doesn't use those fields.
You will notice in Job Costing that the $ dollar amounts are color coded. All numbers in Red are your costs, not including any profit margin. All numbers in Green are profit based numbers that you can give your customers.
Material Costs
This dialog box is primarily for you to check your cost for each material and the total cost for your sheet stock and your hardwoods. There is however, one important thing that you need to input in this window. That is whether you want the cost of your materials to be calculated based on the total square footage of each material, or whether you want your total cost of materials to be based on the number of sheets the Optimizer calculates that you need.
- Based on how you want to figure your material cost, click one radio button.
Panel Optimization
The Panel Optimizer is another valuable tool that you get with your Cabinet Solutions program. This tool will give you a printed layout of how to cut your sheet stock to get the best yield from it.
To setup and start the Panel Optimizer:
- In the menu bar, find and click on the tools menu.
- In the drop down menu click on the Panel Optimizer menu item.
- In the entry field provided, enter the thickness of your saw blade, (kerf size).
- If you would like the door parts to be included in the optimization, click the check box Include Door Parts. This will include Rails, Stiles, Mullions, French-Lites, and Door Panels.
- If you haven't already specified the properties for each of your materials in Job Costing, you'll need to do so before you run the optimization. Also, if you added a new material to your list of materials for this particular job and if that material is some kind of panel stock you want optimized, you need to be sure you have given that material a panel size or the optimization won't work.
Edit Material Properties
Note: This panel Optimizer assumes the grain direction of a panel goes parallel with the given length of the panel.
- You may choose to run Panel Optimization only on select cabinets in your job. To do this, click the Select Cabs button. Then, select only the cabinets you want to optimize and click Continue. The next time you come into Panel Optimization, you will have to reselect the cabinets. All cabinets in the job will be optimized by default unless you select otherwise.
To print the optimized sheet layout:
- Click on the Optimize and Print Layout button to start the optimization.
- In the window that appears, select the materials that you want sheet layouts for at this time.
- When the optimizer report prints out, the parts list below the sheet image will reflect the optimized sheet image and not the Master Cut-List. If you would like it to reflect the Master Cut-List instead, click the check box Match Parts List to Cut List Instead of Optimized Sheet. This can be helpful when boards are rotated and their widths and lengths get reversed in the optimized image.
- You can also print out labels for each and every part in a job. This option can be found in the menu bar under Print.
- To print labels that are in the same order as the panel optimizer, click the check box "Also print matching labels". The labels will be printed after the optimizer. A message box will ask you when you are reading to start printing the labels to give you time to insert the label paper into your printer.
Attention: A final word about optimization in Cabinet Solutions. A basic premise that Cabinet Solutions uses when optimizing is: once you start a cut into a sheet of panel stock, you will continue cutting all the way through. The program also assumes you will cut length wise first (rip), and width wise second (crosscut). If you happen to do this process in reverse order, (crosscut and then rip), check the box "Cross Cuts First (Rotatable Only)" in the Material Properties section for each material needed.
Totals
The totals window gives you a quick preview of how the selling price of this job breaks down. By comparing the numbers, you can see if one elements of the job seems to be over or under priced. If you feel that one of the elements is too high or too low, go back into the pricing window for that element and double check your numbers. (Any changes to your selling prices need to be made in the different pricing windows for the individual elements.) If you are doing a lineal foot price, try the Materials + Labor + Profit method to see how they compare. If you are using the Materials + Labor + Profit method, switch back and forth between that method and the Lineal Foot method and try find what a good lineal foot price is for the way you build cabinets. It may help you at times if a customer needs a quick estimate and you don't have the time to lay the job out in Cabinet Solutions.
If you apply a tax to the entire job, enter the tax amount in the box provided to the right of the words "Job Tax".