Labels
Printing Labels
You can print labels for parts of every cabinet in your job.
- Click the Print menu at the top of the screen.
- Click the word Labels.
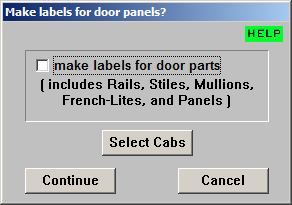
- A window will appear like the one below.
- Click the check box to the left of the words Make Labels For Door Parts if you want to include door parts in the list of labels. The parts that will be included are Rails, Stiles, Mullions, French-Lites, and Panels.
- Click the Select Cabs button if you want to choose which cabinets will be used when making the labels.
- Click the Continue button.
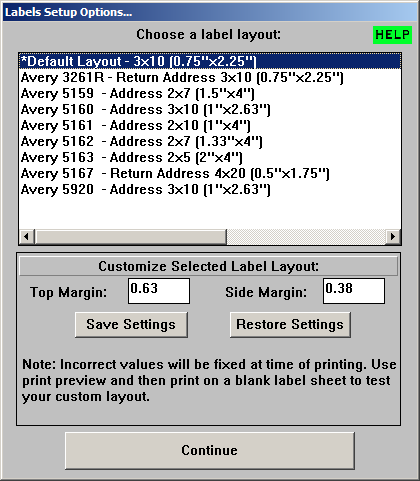
- A window will appear like the one below.
- Under the words Choose a Label Layout, there is a list box of available label layouts. These layouts match industry standard label papers. The name of the label layout in the list box will allow you to match up the label paper you are using.
Note: You should run a test print on a blank label paper to make sure the labels print properly. If they are off center, then use the Customize Selected Label Layout option explained below.
- Select the label layout that best matches the label paper you are using. Do this by clicking on the name in the list box to select it.
- Under the words Customize Selected Label Layout, you have options to customize the label layout you have selected.
- Top Margin: Enter the distance in inches (using decimals) the first (top left) label on your label paper starts from the top of the page.
- Side Margin: Enter the distance in inches (using decimals) the first (top left) label on your label paper starts from the left of the page.
Note: The margin information can usually be found on the box your label paper came in. Also, if you enter margin sizes that the program cannot use, Cabinet Solutions will automatically correct the margin settings during print. However, it will not change your saved settings!
- Save Settings: Click this button to save the custom label layout margin settings to be used at a later time.
- Restore Settings: Click this button to restore the saved custom label layout margin settings. You will have to click this button after you select any label layout in the list box above if you want to use the saved margin settings.
- Click the Continue button.
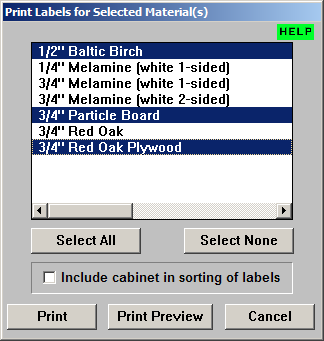
- A window will appear like the one below.
- In the list box shown above, there will be a list of available materials. If this list is empty, click the Cancel button and check your Materials List in Job Costing. Otherwise, click on the names of the materials you want to include in the label printout.
- Select All: Click this button if you want to select all of the materials to be included in the label printout.
- Select None: Click this button if you do not want any of the materials to be included in the label printout
- Click the check box to the left of the words Include Cabinet in Sorting of Labels if you want to include the list of cabinets in your job when sorting the labels.
- Click the Print Preview button to view on-screen what the label layout will look like.
Note: If you click the Print Preview button, you will have to repeat these steps. However, it is wise to preview before you print!
- When you are ready, click the Print button to begin printing the labels.
Note: Make sure you have the correct label paper in your printer BEFORE clicking Print!
- To close the window and not print the labels, click the Cancel button.
Printer Setup
To Setup The Printer:
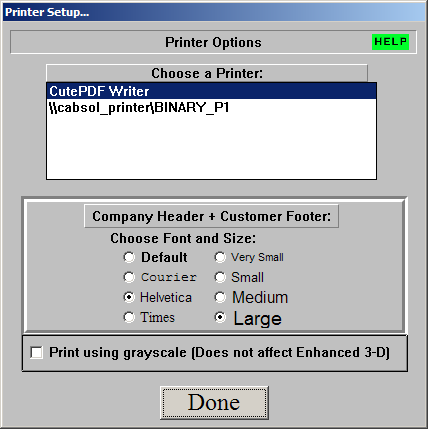
- Click on Print in the menu bar at the top of the screen.
- A window will appear like the one below.
- Under the words Choose a Printer, click on the name of the printer you want all of Cabinet Solutions' reports to print to. If no printer is listed, check your printer cable connections and/or printer driver software.
- Under the words Choose Font and Size, you can click on the radio buttons for the type of font you want to use for the company header and customer footer on various reports. If you choose other than Default, you can also choose the size of the font by clicking on any of the radio buttons to the right.
- Click the check box to the left of the words Print using grayscale (Does not effect Enhanced 3-D). Placing a check in this check box will make all printouts use gray-shading or black-and-white. No color will be used. Note: This will not apply to any Enhanced 3-D printouts or pictures.
- Click the Done button to accept all your changes and continue using Cabinet Solutions.
Note: You should setup your printer before printing any reports. Once you setup the printer, you won't have to do it again until you get a new printer or change your printer configuration. If you do not setup your printer, Cabinet Solutions will print to the default Windows printer.
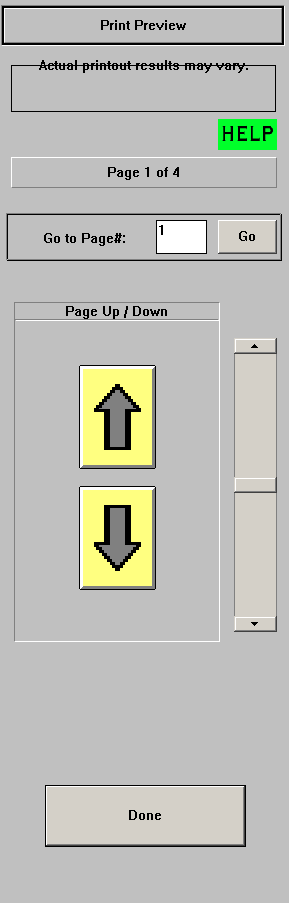
Print Preview
The Print Preview feature allows you to view on-screen the same report that can be printed. The Print Preview feature is only available wherever you see the button Print Preview. The Print Preview tool bar on the right has some features to make it easy to view the different pages.
Navigating With Print Preview
Proposal
Finally, you can create proposals straight out of Cabinet Solutions. In the proposal window, you can enter the customer's name and address, as well as an address of the job site. Then you can type in a description of the work you will be doing, what the costs will be, and a payment schedule.
- The total that appears in the proposal contract when you first go into it is a total of the cabinet costing method you entered, plus the finish cost, installation cost, and the counter top cost. (The last 3 are only applicable if you have selected them to be added into your bid.) To change this total, you need to go back into the pricing windows for the different elements and change some of the numbers there.
- You can change this total from the proposal to be used as a one-time total for printing, as soon as you close out the proposal window, it will go back to the actual total.
- The work that you do for each job in Job Costing will be saved with that job for future reference. The costs that you give to each material, door, or hardware item in job costing will be saved and automatically used in your next job. When your supplier gives you a price change, you need to update Cabinet Solutions with that information.