Views

The Start Up Screen

The first screen that appears when you start Cabinet Solutions is the Start Up Screen. The Start Up Screen is where you will start each new job or where you can open old jobs that you want to work on. The Start Up Screen is also where you should set up the standards when you start a new job. Before proceeding beyond this screen, ample time should be spent setting the Job Standards, eliminating the need to backtrack.

Your Shop Address and Phone #

In the Start Up Screen, you can enter your shop name, address and phone number. Once you have entered this information, it will automatically appear for each new job you start. You can change this shop information at any time. This information will be used to set up your proposal sheets in the Job Costing section of Cabinet Solutions, and parts of it will be printed at the top of each page of the print outs.

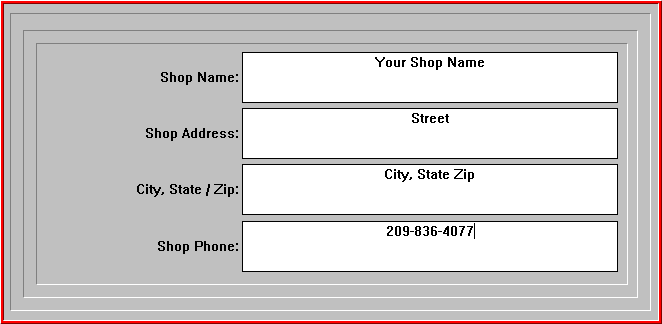
To enter shop address and phone#:

  1. Click the mouse button when the pointer on the screen points to the entry field located next to the words "Shop Name:".
  2. Type in the name of your shop.
  3. Press the "Tab" key or repeat step 1 for the next entry field.
  4. Type in the street address.
  5. Type in the city, state and zip code.
  6. Type in the shop phone number.

    Note: You will only need to enter shop information once when you install Cabinet Solutions.

Enter Job Information

In the Start Up Screen, you can enter a job name, address, phone number, and job site. You can enter job information for each new job that you start. This information will be printed out at the bottom of each page of print out. This will help keep your jobs organized in your shop. It will also appear in your proposal sheets in Job Costing.

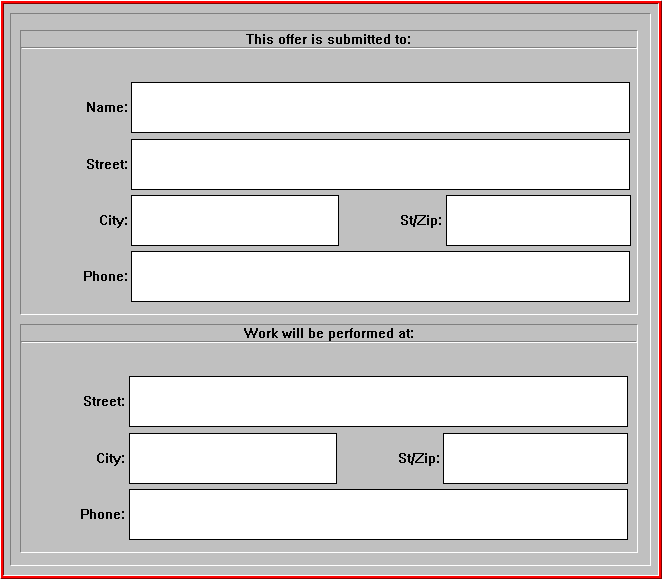
To enter job information:

  1. If you just typed in the shop phone number, press the Tab key. (You can also click the mouse when the pointer is in the job name entry field).
  2. Type in the name of the job.
  3. Type in the name of the job address.
  4. Type in the job phone number.
  5. Type in the name of the job site.

    Note: The "Start Up Screen" is for your convenience. If you wish, you can proceed with your job without entering shop or job information. However, to keep track of your jobs, it is highly recommended that you enter shop and job information.

Starting a New Job

The Start Up Screen contains a button named Start New Job. The Start New Job button allows you to start a new job. Again, it is always recommended that in starting a new job, the Job Standards are reviewed.
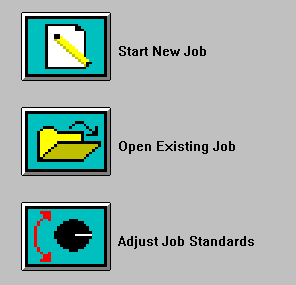
To start a new job:

  1. Click on the word File in the menu bar at the top of the screen.
  2. Click on the word Start New Job in the vertical list that appears.
  3. A dialog box will appear verifying that you actually want to start a new job. Click "yes" if you do, and of course "no" if you don't.
  4. If you clicked "yes", another dialog box will appear that will warn you that if you have not saved the job you were just working on you will lose any changes that you've made to the job since the last time you saved it. If you still need to save the job you were just working on, click Cancel. The save dialog box will appear allowing you to save the your work.
  5. If you clicked the "OK" button, a dialog box will appear asking you if you want to enter new standards for the new job you will be creating. Click "No" if you want the job to use the standards you were just using in the previous job. Click on "Yes" and the Job Standards dialog will appear.
  6. Select the style of cabinets that you want to design using the radio buttons at the top of the screen. Then open the standards you want to use for that job or manually adjust them to the specifications you need.
  7. Click the "Done" button at the bottom of the standards box and proceed to the Draw Walls screen to begin your drawings.

Opening an Existing Job File

The Start Up Screen contains a button named Open Existing Job. The Open Existing Job Button allows you to open any of your job files you have previously saved.

To open an existing job:

  1. Move the mouse until the pointer on the screen points to the Open Existing Job button. Click the mouse button.
  2. A dialog box will appear with a list of jobs that you have previously saved. Click on the name of the job that you want to open or type in the name of the job you want to open.
  3. When the name of the job you want to open is displayed at the top of the list in the dialog box, click on the Accept button to open that job. Click on the Cancel button to continue with the job you were working on.

Controlling Your Room View


Shifting the View to the Right, Left, Up, or Down

  1. Locate the Arrow buttons in the Tool Box at right.
  2. Click on one of the Arrows pointing right, left, up or down. Your view of the wall will be adjusted accordingly.

Centering the View of the Elevations

  1. Click on the button in the center of the Arrow buttons. The button has an X on it. The view of the elevations will be centered.

Zooming In or Zooming Out

  1. Click on the Zoom In button for a closer view of the wall of cabinets. Click on the Zoom Out button to view the wall of cabinets from a greater distance.

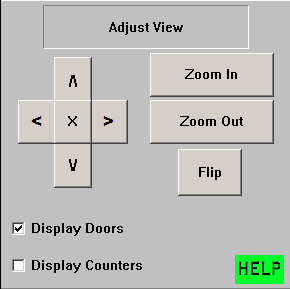
    Note: Another way to zoom in and out is with the zoom feature in the menu bar under View.

Flipping the Wall Elevation

You can flip the wall to view the elevation of the cabinets you have placed on the other side of the wall.

  1. Click on the Flip button located in the middle of the tool box.

Rotating the Room Left or Right

  1. Clicking on the arrows will rotate the room to the left or to the right. The longer arrows rotate the room to the left or right, twice as far as the smaller arrows.

Rotating the Room Up or Down

  1. Clicking on the "Rotate Up" or "Rotate Down" buttons will rotate the room up or down.

Changing to a Different Room

  1. In the Tool Box to the right, locate the display underneath the words Select Current Room. The name of the room currently being viewed will be displayed.
  2. Locate the small arrow at the end of the display. Click on the Arrow and a drop down menu will appear.
  3. Click on the name of the room you want to be displayed. The name of the room will appear in the display and you will now see the first wall of that room in the Drawing Screen.
  4. You can also change to a different wall by clicking on the name of the wall currently being displayed. The name of the wall will be highlighted in black. Type in the name of the wall you want to display. The new wall will appear in the Drawing Screen and the name of the wall will appear in the display.

To change rooms

  1. The current room name is displayed in the middle right part of the screen. Locate the small downward pointing arrow just to the right of the room name. Click on that Arrow.
  2. The names of the existing rooms will be displayed in a drop down list. Click on the name of the room in which you want to place cabinets.
  3. The room you have chosen will appear at the top of the list and that room will now be displayed on the screen. You can begin placing or changing cabinets in that room.

The Draw Walls Screen

Drawing Walls

After entering your job information you must draw the walls of your rooms. This screen is composed of a menu bar located at the top, a tool box to the right and a large drawing screen.

To draw walls:

  1. In The Draw Walls Screen, press and hold down the mouse button to start the wall at the point you see the mouse cursor.
  2. Move the mouse to draw the wall. (Displayed in the Tool Bar on the right, the size of the wall and the angle of the wall are displayed as you move around your mouse cursor.)
  3. Release the mouse button when you have finished drawing the wall. It is not necessary to drag the mouse until the wall is the exact size. It is easiest to size it in step 4.
  4. A dialog box will appear. If the wall length or wall height displayed are not correct, enter the proper wall length or wall height. It is highly recommended that you use actual field measurements when drawing your walls. You can change these sizes later but you may have to redo much of your work. Cabinet Solutions will automatically number your walls as you draw them. If you want to change the number or give each wall a specific name (west wall of kitchen) you should do that at this time.
    • (To change values: highlight old values using the mouse and then either type in the correct information or click the arrow keys in the dialog box. The arrows change the size in increments of 12", 1", or 1/32" per click.)
    • Remember---this is also the place that you should give your walls a value for height.
  5. Click on the Accept button when the wall length, height and wall name are correct. Click the Delete Wall button to cancel placing the wall.
  6. Continue drawing the walls in this fashion until you have drawn all the walls of your room.

A few things to know about drawing walls. First, every cabinet in Cabinet Solutions needs to be placed on a wall, including islands and peninsulas.

To place an island or peninsula, first draw a wall where the back of the cabinets will go. When the "Edit Wall" dialog box pops up, click the button "Make Wall an Island", then enter in the dimensions of the wall. What this does, is it makes the wall 0" in height. Next, place the cabinet on the wall.

Another important rule to follow when drawing walls is to draw them sequentially or in consecutive order around a room. After you draw your first wall, place your cursor near one of the end points of the first wall, then click and drag the mouse to make the second wall. Continue drawing all the walls in the room in this manner.

The drawing of the walls will automatically be centered after you finish drawing each wall. The drawing will always be in the proper proportions. If two wall ends are drawn within a certain distance of each other, Cabinet Solutions will automatically connect the ends of the walls together. You can specify how close the wall ends need to be to each other before they will automatically be connected. This is set up through the Advanced Program Settings under the Options menu.

Tool Bar Options for Drawing Walls

In the tool bar, on the right of your screen, you will find 3 radio buttons. When you come into the draw walls screen, the radio button for Snap to Angle should be selected. To select an option click your mouse on the desired radio button located in the Tool Box on the right side of the screen.

Snap to Angle

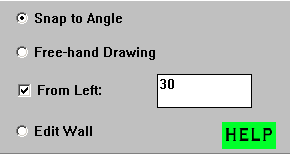
Select the radio button for Snap to Angle, (a black dot appears inside that radio button). This option is the easiest to use for drawing walls because it limits the angle that the walls can be drawn at. Because in most buildings, walls are typically placed at common angles to one another (i.e. 30, 45, 60, or 90 degrees). Snap to Angle limits you to these wall angles. As you drag your cursor around the screen you will notice the angle of the wall you are dragging will "jump" to the next incremental angle. If an uncommon angle is needed, such as 28 degrees, then the free hand radio should be selected.

Free Hand Drawing

You can also choose Free Hand Drawing which allows you to draw angles of degrees of 1, 2, 3, 4, and so on. The Free Hand Drawing radio button is located right below the Snap to Angle radio button.

From Left:

When drawing walls, either using Snap to Angle or Free Hand Drawing, you can snap the wall you are drawing a certain distance away from the left end of another wall already on the floor plan. Click on the words "From Left:" to place a check in the check box. An edit field to the right will become available. Enter in the distance away from the left of the wall you will be placing the new wall on. This is especially handy for drawing peninsula walls when the peninsula wall is say, 30" away from the left of another wall. After you have entered in the amount, move your mouse cursor nearest the wall you want to connect to. Start drawing your wall following the steps above. You will notice that the wall is attached exactly the distance you specified away from the left of the wall on the floor plan. After you are done, make sure you uncheck the box next to "From Left:" for when you draw your next wall.

Editing Walls

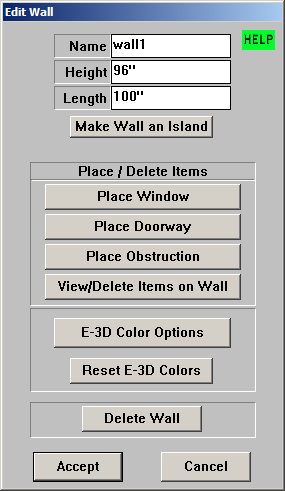
At times you may need to change a wall or you may want to add something like a window to a particular wall. You can make these changes using this function. You can change the name of a wall, the height of a wall, the length of a wall. You can delete a wall entirely. You can also place windows, doors, and obstructions. And you can delete all of the windows, doors, and obstructions that you place.

Managing the Room

In a particular job you may want to draw several rooms. Cabinet Solutions allows you to start a new room, change rooms, change the name of a room or delete a room. The current room is always displayed in the upper middle right part of the screen.

New Rooms

You can start a new room at any time. You must be in the Draw Walls Screen to start a new room. For optimum efficiency in layout, it is recommended that you lay out all the walls in all the rooms, and edit each wall with doors and windows before moving to the place cabinet screen. It is not necessary to do it this way, but it allows you at any future time to jump from room to room or wall to wall.

To start a new room:

  1. Click on the Start New Room button in the Tool Box on the right.
  2. A dialog box will appear. Type in the name of the new room.
  3. Click on the OK button in the dialog box to start the new room or click on the Cancel button to cancel the new room.

Selecting a Room

You can change to a different room at any time.

To change between rooms:

  1. In the Tool Box on the right, locate the display with the name of the current room.
  2. Next to the display is a small arrow. Click on the small arrow.
  3. A drop down list of the names of the existing rooms will appear. Click on the room to which you want to change.
  4. The name of the room you have chosen will be highlighted and will be then displayed on the screen.

Room Names

You can change the name of a room at any time in the Draw Walls Screen. The program names each room with a generic system of room1, room2, etc. You may prefer to name these rooms something more descriptive, like kitchen, master bath, etc.

To change the name of a room:

  1. Click on the Change Room Name button in the Tool Box on the right side of the screen.
  2. In the dialog box that appears, type in the new name of the room.
  3. Click on the OK button in the dialog box to change to the new name or click on the Cancel button to cancel the change.

Deleting a Room

You can delete a room at any time.

To delete a room:

  1. Click on the Delete This Room button in the Tool Box on the right side of the screen.
  2. A dialog box will appear. Click on the Yes button in the dialog box to delete the current room. Click on the No button in the dialog box to keep the current room.

Changing the Draw Walls Font Size

You might notice that after you draw a few lengthy walls, the letters and numbers on the screen will change size (scale) to fit the wall length proportionally. Sometimes, this might be hard to read. To change the font size, click on the arrow below to the words "Font Size:" in the Tool Box on the right. The left arrow will decrease the font size and the right arrow will increase the font size. (Font size can be from 2 to 24).

Cabinets on Floor

You can show already placed cabinets on the floor plan by selecting the check box next to the words "Cabinets on Floor". This is helpful when you are drawing a wall that will be between cabinets or you are adding a wall and want to make sure it does not interfere with cabinets already in the job.

The Place Cabinets Screen

In the Place Cabinets Screen you can choose a room and place cabinets on the walls that you have drawn in the room, or change cabinets that you have already placed. To place cabinets you must be in the Place Cabinets Screen.

To display the Place Cabinets Screen:

  1. Click on Display in the menu bar, then click on Place Cabinets in the drop down list. If you are in the Draw Walls Screen, click on the Place Cabinets button in the tool box to the right of your screen.

Selecting Placement or Editing Mode

To place cabinets, simply begin selecting, sizing and placing cabinets. You will automatically be in the placement mode. To edit cabinets, simply move the cursor into the drawing screen. You are automatically in the edit mode and any cabinet you highlight and click on can then be edited.

Note: Be careful not to accidentally click the mouse when the cursor is in the drawing screen. Cabinet Solutions will think you are instructing it to select the cabinet nearest the cursor to make a change. If you do this, click the "cancel" button in the first window that appears.

To place cabinets:

  1. In the middle right of the Place Cabinets Screen, locate the icon (picture) of the type of cabinet you want to place. Click on the icon of the cabinet you want to place.
  2. A dialog box will appear with the title of "Cabinet Specifications". (See Fig #1.)
    • The "Cabinet Specifications" box that appears is the first step in collecting information about this particular cabinet. It is here that you will set the basic overall size (height, width, depth) of the cabinet that you are placing. If the cabinet is an upper or will be above the floor, you will also set the height it sits off the floor. If the cabinet is to have shelves, this is where you enter general information on the number of shelves this cabinet will have per opening.
    • Later, you will be able to customize any cabinet to have multiple sections and set each section up with a different number of shelves if you so desire. The "entry fields" in this specifications window will already have values when you pick a cabinet to be placed. These "default" values come from your Job Standards. Many of the defaults, such as the cabinets depth may never need adjusting but others such as the cabinet widths will need to be set almost every time you place a new cabinet. Type in the new dimensions by first highlighting the old value using the mouse. You may also change the value by using the arrow buttons.

      NOTE: Be sure to give the cabinet all the correct information at this point. As always, this can be changed at a later time but it is easiest if the correct dimensions have already been entered the first time around.


      Fig #1
    • The Cabinet Specifications Dialog Window
      • Smart Placer: You can turn the Smart Placer off by clicking on the box in front of Smart Placer so that it is no longer checked.
      • Center in Window: If you are placing a sink cabinet, a special feature is available to you. It is a setting that causes the sink (or any cabinet) to automatically center on a window. A check in the box will cause your cabinet to be automatically centered on the window that the cabinet is placed nearest to.
      • Abbreviated Name (14 letters): You can type in an abbreviated "nick name" for the cabinet. This name will only show up in reports where the type of the cabinet would normally be displayed. Example: If the type of the cabinet was a Full Ht Pantry, many people would not want Full Ht Pantry to be displayed when the cabinet was to be an Entertainment Center. Therefore, if there is anything in the Abbreviated Name entry field, where it normally used to display Full Ht Pantry on reports, it will now display the Abbreviated Name, for example: Ent. Center.
  3. When you are done specifying the dimensions of a cabinet, click on the Place Cabinet button in the bottom of the dialog box. To cancel the cabinet, click on the Cancel Cabinet button.
  4. After you click on the Place Cabinet button, the cabinet will appear on the drawing screen. Move the mouse to position the cabinet. Pause to let the cabinet settle in that spot then click the mouse button to place the cabinet in the spot you have chosen. (Notice that in the lower right part of the screen the distances from the sides of the cabinet to the ends of the wall are displayed.)

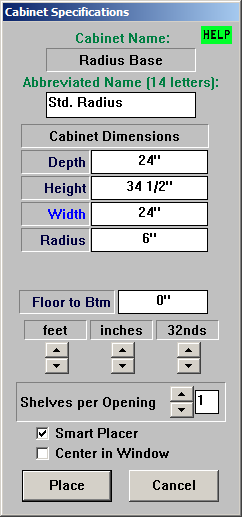
    NOTE: For most people, placing a cabinet with precision using a mouse will be difficult --- thus, the invention of Smart Placer. With Smart Placer on, cabinets will not overlap other cabinets or walls. This allows you to begin laying out cabinets by picking a size, then overlapping it with a wall or an adjoining cabinet.

  5. Repeat steps 1-3 until you have finished placing all the cabinets in the room.
    • Note: It is recommended that you begin laying out a room from the corner and work your way out, or to place the sink under a window and work off that fixed position. This always gives you an already placed cabinet to overlap.
    • Special Feature: You will notice as you place cabinets along the wall that the dimensions of each cabinet are displayed on the Floor Plan. Also, the space remaining on the wall will be displayed as well, helping you to determine what size cabinets to use in your design.
    • Special Instructions Regarding Corner Cabinets: Base and upper corner cabinets need to be placed in a special way. Although these cabinets will, in reality, be connected to both walls that make up the corner, Cabinet Solutions only sees it as being connected to the right wall that makes up the corner. Therefore, as you drag your corner cabinet into the corner, it is most effective to drag it along the right wall into the corner.

Placing Cabinets with Smart Placer

Cabinet Solutions offers a special cabinet placing feature called Smart Placer. Smart Placer provides special features to make the placing of cabinets easier. The theme behind Smart Placer is to place cabinets in an intuitive and intelligent manner.

The Smart Placer is automatically turned on each time you select a cabinet to place. When the Smart Placer is turned off, the cabinets are placed exactly where you set them even if it does not seem to make sense. When you are using Smart Placer, Cabinet Solutions will: a) automatically resize an oversized cabinet to fit into a smaller space, b) automatically places a cabinet that you overlap with another cabinet adjacent to the cabinet already set, c) takes a corner cabinet that you overlap into a wall and places it exactly in the corner.

Editing the Size or Placement of Cabinets

Sometimes you may find that a cabinet you have placed needs changing. Maybe its size needs to change to make the doors in an area look symmetrical. A cabinet or an appliance may get moved by the contractor or home owner or something may need to be deleted altogether. You can change a cabinets dimensions, move the cabinet, or delete the cabinet at any time.

Changing Rooms

The name of the room in which you are placing cabinets is displayed in the middle right part of the screen. You can place cabinets in another room by changing rooms. (Instructions for adding a new room can be found in The Draw Walls Screen.)

Assign Standards

As mentioned in Standards, Cabinet Solutions creates each cabinet with a file of information called a standards file. This file is stored with each cabinet and gives that cabinet the instructions it needs to be constructed the way you want it to be. If every cabinet within a job has the same standards file saved with it, they will all be built the same way. However, there may be times when you want individual cabinets or rooms of cabinets to differ from the rest of the job. The "Assign Standards" button is a tool that allows you to pick one or more cabinets in a room so you can "Assign" those cabinets a different standards file. If you have been following the manual to this point, every cabinet in the job so far has been given the same standards file which you setup in the Job Standards file.

Note: Once you have changed a cabinets individual Cabinet Standards, any changes to your Job Standards will not affect that one cabinet. Resetting a cabinet to your Job Standards is possible and will be explained in this chapter.

Connect Toe Kicks

By default, base cabinets are built with a back toe kick. If you have not disabled this feature in Initial Values under Toe Kicks, then a back toe board will be included in base cabinets. The "Connect Toe Kicks" button is a tool that allows you to pick one or more cabinets in a room so you can "connect" the front and back toe boards together. Doing this makes a long run of toe kicks often called a "Ladder Kick".

Changing the Place Cabinets Screen Font Size

You might notice that after you place a number of cabinets, the letters and numbers on the screen will change size (scale) to fit the wall length proportionally. Sometimes, this might be hard to read. To change the font size, click on the arrow below to the words "Font Size:" in the Tool Box on the right. The left arrow will decrease the font size and the right arrow will increase the font size. (Font size can be from 2 to 24).

Showing Grid Lines on the Place Cabinets Screen

You can show 1 foot square grid lines on the Place Cabinets Screen by checking the box next to the words "Grids on Floor". This is helpful when placing cabinets that are aligned.

Use Selected Cabs

In various areas of the program like Job Costing and Master Cut List, you may choose to run only select cabinets in your job. To do this, click the Select Cabs button. Then, select only the cabinets you want to use and click Continue. Now, only the cabinets you selected with be used in the area you are in.

The next time you come into that area, you will have to reselect the cabinets. All cabinets in the job will be used by default unless you select otherwise.

The Edit Elevations Screen

After you have drawn your floor plan, you can view and edit your wall elevations. To view wall elevations and edit cabinets, first proceed to the "Edit Elevations Screen".

To proceed to the "Edit Elevations Screen":

  1. If you are in the "Place Cabinets Screen", click on the Edit Elevations button or click on Display in the menu bar. Then click on Edit Elevations in the drop down list.

Elevations with or with out doors showing:

When the Edit Elevations Screen appears, the drawing screen will display the first wall that you drew in the Draw Walls Screen or the last wall you selected to display in the Tool Box.

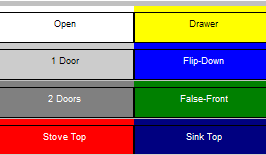
Cabinet Solutions gives you 2 different views of your wall Elevations; either with doors or without. Viewing the elevations without the doors allows you to see into the cabinets and see things like the number of shelves in a particular cabinet or whether those shelves are fixed (red) or adjustable (green). It also lets you see some of the cabinet front dimension lines. Viewing the elevations with the doors gives you a more colorful view and helps you to see how the doors sizes look in comparison to one another. This view also removes many of the dimension lines to provide a more realistic picture to show your customers.

Controlling Your Room View

To change elevation view:

  1. Click on the check box in front of the label Display Doors in the Tool Box at the right of the screen. If the box is checked, the doors will be displayed in the elevation.
  2. Removing the check in the box removes the doors from your elevations.
  3. Click on the check box in front of the label Display Counters in the Tool Box at the right of the screen. If the box is checked, the countertops on the cabinets will be displayed in the elevation.
  4. Removing the check in the box removes the countertops from your elevations.

    Note: In the Elevations view without the doors, the openings will be color-coded. The colors are associated with the opening type as follows:

Selecting a Cabinet to Edit

To edit a cabinet, you must first select the cabinet you want to edit.

Note: This section is in reference to editing a cabinets elevation. It is quite different then editing the cabinet in The Place Cabinet Screen! The editing done in the "Place Cabinet Screen" relates to changes in the overall size of a cabinet or it's placement. Editing in the "Edit Elevation Screen" relates to additions, deletions, or changes to the particulars of the cabinet you choose.

To select a cabinet to be edited:

  1. Be sure you are in the Edit Elevations Screen.
  2. Move the mouse into the drawing screen and highlight the cabinet you want to edit. (Pause to allow the highlight to settle on the cabinet you have chosen.)
  3. Click the mouse button to select the highlighted cabinet for editing.
  4. A new tool box will appear. In that tool box, all of the editing features mentioned above are available.

Editing Cabinets

In the Wall Elevations Screen, you can edit cabinets in the following ways:

  1. You can quickly add particular cabinet parts.
  2. You can delete cabinet parts or boards.
  3. You can edit openings by changing the opening's dimensions or by changing the type of opening. You can also edit the number of roll-outs in each opening.
  4. You can edit the number of shelves in each opening. You can even change the type of shelves (fixed or adjustable) in a cabinet.
  5. You can modify the type of end that a cabinet has on either side. Included in this feature is modifying a finished end so that it has a door panel as an end.
  6. You can view the cut list of the cabinet you have selected and you can add specialty parts to that cut list.
  7. You can adjust the standards for the cabinet you are editing.
  8. You can save the cabinet as a custom cabinet. Then in future jobs you can place the cabinet in the Place Cabinets Screen by clicking on the icon labeled Custom.

The 3-D Room View Screen

Viewing your Room in 3-D

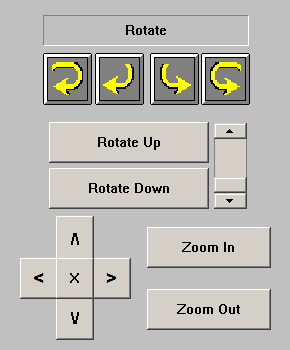
After you have drawn your floor plan and edited your elevations, you may want to view the job in a 3-dimensional view. Cabinet Solution's 3-D view allows you to rotate the room around to get different views in 3-D.

To proceed to the 3-D Room View Screen:

If you are in the Edit Elevations Screen, click on the 3-D Room View button, or click on Display in the Menu Bar. Then click on 3-D Room View in the drop down list.

Controlling your 3-D Room View

A big part of viewing your room in 3-D will be getting the right perspective of the room, one that allows the customer to see what the cabinets will look like when you are done with the work. Cabinet Solutions gives you the following ways of changing your 3-D view.

  1. You can shift your view to the right, left, up or down.
  2. You can center your view.
  3. You can zoom in or zoom out.
  4. You can rotate the room horizontally.
  5. You can rotate the room vertically.
  6. You can shift your view to a "Bird's Eye View" or a view looking down from above.
  7. You can save the current view for each job and restore it later when the job is opened.

Displaying Wall Names

To Display Wall Names in 3-D:

  1. Click the check box named "Display Wall Names".

Displaying Wireframe View

To Display the 3-D in Wireframe View:

  1. Click the check box named "Wireframe".

Printing a 3-D Room View

To print a room in 3-D

  1. Following the previous instructions, move your room to a perspective that you want to print.
  2. In the tool box on the right, click the Print button.
  3. A message box will ask you if you are ready to print, click Yes if you are.

Note: You can't print this 3-D view through the print menu because you first need to move the room to the perspective you want to print.


Member Login


Forgot password? Click here to change it

New? Click here to get started

Join Us Online
Find us on Facebook! Find us on YouTube! Find us on Twitter!
Sales and Tech Support
+1 (209) 836-4077
Cabinet Solutions Design Software, LLC BBB Business Review